
How to Clear Arduino Memory
An Arduino comes up with three kinds of memory SRAM, Flash & EEPROM. One of them is Volatile and the remaining two are Non-Volatile. Volatile memory erases the data once you remove the input power. On the other hand, non-volatile memory keeps the data saved even if you have removed the input DC power or reset the Arduino.
Below I have briefly explained three types of memory and what they stored:
FLASH: It’s the type of memory which stores our Arduino sketch. When you reset the Arduino information remains saved inside it.
SRAM: SRAM (Static Random Access Memory) creates and stores all types of variables and plays with them once called in the program. When you reset the Arduino all the contents got deleted.
EEPROM: (Electrically Erasable Programmable Read Only Memory) stores data which is to be retained for a longer time duration; it keeps information saved even if input power is lost. I would recommend EEPROM as it is more reliable when it comes to memory management. EEPROM is like a hard drive present in a PC. EEPROM remembers the last program you have executed using Arduino.
Number of bytes every memory store depends upon which microcontroller you are using below i have mentioned the memory capacity of two microcontrollers:
| Memory Type | ATmega328P | ATmega2560 |
|---|---|---|
| Flash | 32K bytes | 256K bytes |
| SRAM | 2K bytes | 8K bytes |
| EEPROM | 1K bytes | 4K bytes |
Ways to Clear Arduino Memory
We have a few options available to clear our Arduino memory:
- The easiest of them is just press the Reset button present on the Arduino board.
- Joining the RX and GND pins.
- Uploading the bare minimum sketch.
Now, we will discuss these three methods in detail:
1: Use of Reset Button for Clearing Memory
Simplest way of resetting your Arduino is by pressing the Reset button highlighted in the image above:
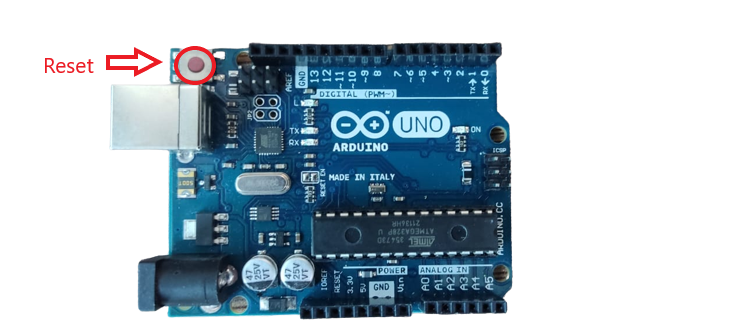
Pressing this button will not remove the sketch already stored, it only clears the volatile memory such as RAM. The stored program will restart and data such as variables, instruction pointers and registers that are stored in RAM will get clear.
Follow these steps to clear Arduino Memory (RAM) using the Reset Button:
Step 1: Disconnect Arduino Power.
Step 2: Now press and hold the Reset button while doing this turn on your Arduino by connecting it to a power supply.
2: Clearing Arduino Memory using RX and GND Pins
Second way of clearing Arduino memory is by using RX and GND pins. Follow the below-mentioned steps:
Step 1: Remove the USB serial cable this will turn off your Arduino. On Arduino board serial communication is done by using two pins RX and TX, removing the USB cable will free up these two pins.
Step 2: Now join the Rx and GND pins, in between them use a Resistor (20kOhm) to maintain a safe current limit.
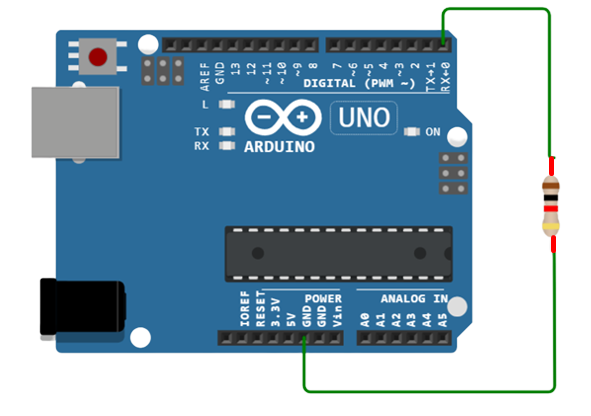
Step 3: Remove the RX pin, power up your Arduino using USB cable but before that disconnects RX pin first.
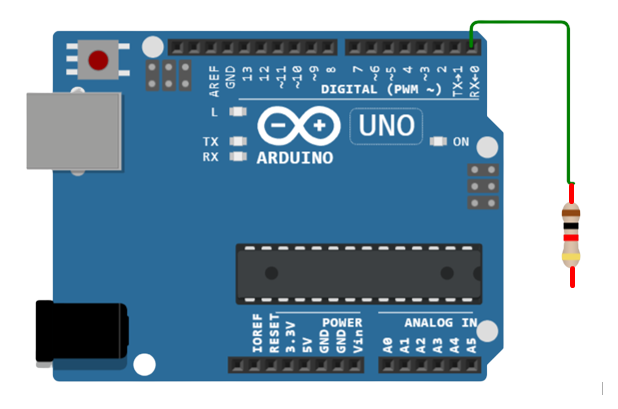
Step 4: Open your Arduino IDE and upload any simple sketch or “Bare Minimum” sketch from the Arduino library.
Step 5: Again, remove the USB cable your Arduino will be off again, doing this we can ensure current limits between the two terminal ports RX and GND.
Step 6: As we have removed the USB cable now disconnects both RX and GND terminal.
Step 7: Lastly, directly connect your Arduino board with PC using COM Port.
3: Clearing Arduino Memory by Uploading a Blank Sketch
Suppose you do not prefer using wire for clearing Arduino memory so another method of doing it is by uploading a blank sketch also known as “Bare Minimum” sketch to clear your Arduino memory.
Before uploading the “Bare minimum” sketch, first do the steps below:
Step 1: Remove the USB cable to disconnect your Arduino from the power source.
Step 2: Press the Windows key from your keyboard and type Device Manager then click open.
Step 3: It will open a new window, now scroll down to the COM & LPT section.
Step 4: Find and select the COM port at which Arduino is connected.
Step 5: Right click and press Properties from the drop-down menu then select “Port setting” and switch the “Flow Control” to Hardware.
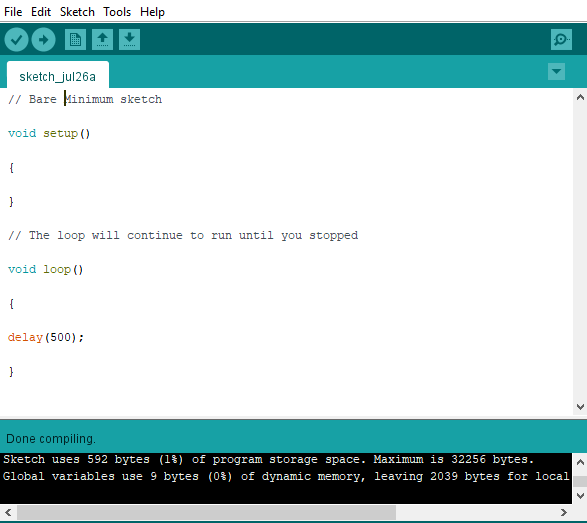
Now you have set up your hardware it’s time to upload the “Bare Minimum” sketch in your Arduino board. Below I have shown a blank sketch which replaces the previous sketch you have uploaded and it tells Arduino to set up nothing and loop nothing.
Conclusion
Suppose you have not used Arduino for a while and now you want to connect it to a new circuit and you don’t remember the last program you have uploaded in it, so previous sketch might damage your new circuit it’s better to always upload a “Blank Sketch” or use the led blink program which comes up with Arduino and it can save your circuit from any kind of damage.
About the author

Kashif
I am an Electrical Engineer. I love to write about electronics. I am passionate about writing and sharing new ideas related to emerging technologies in the field of electronics.
Arduino.ru

В котором происходит загрузка в буффер кода кнопки пульта после чего идет отправка.
Все срабатывает на ура но проблема в том, что буфер не очищается после отправки.
выглядит это так
- Войдите на сайт для отправки комментариев
Как полный бред выглядит то, чем вы занимаетесь. Очистить memset ? Вообще-то это имя функции. Вы знаете, как очистить имя функции «без хардресета» ? Очистить от чего? От дурной репутации? От чего-то еще очистить имя будет проблематично.
- Войдите на сайт для отправки комментариев

memset, он, конечно, быстро пачкается и нуждается в периодической чистке (как и мозги тех, кто его использует), только Вам никто не поможет, пока Вы не выложите нормальный полный код который собственно и напечатал то, что Вы там привели про память. А если код секретен, то придётся Вам как-то жить с грязным memset’ом 🙁
- Войдите на сайт для отправки комментариев
От злых духов очистить!
Возможно я некорректно выразился, суть в том, что значения из файла собранные в массив нужно очистить из памяти после отправки. Так как значения накапливаються при каждой отправке пока не израсходуют память ардуино. После чего дуня бонально зависает.
Бред или не бред это судить думаю не вам!
Я не программист а вольный самоучка, знаете как делать очистку, помогите. Нет тогда нет смысла флудить.
- Войдите на сайт для отправки комментариев
Секрета в коде нет
пришло в терминал к примеру циферка 1
открываеться вайл 1 считывается значение в memset( irSignal )
как полностью считалось отправляеться через irsend.sendRaw
вопрос как после отправки с памяти все выкинуть лишнее
- Войдите на сайт для отправки комментариев

Бред или не бред это судить думаю не вам!
Ты правда думаешь, что после такого заявления тебе кто-нибудь поможет?
Представленный код — полный бред, написанный мудаком. И судить об этом, например я, могу потому, что имею нужную квалификацию. А мудак, который код писал, такой квалификации — не имеет. Зато гонора дохера.
И советы по исправлению кода обычно получают вежливые люди. Понимающие, что их мнение и уровень знаний, а так же мысли и мечты — нихера тут никого не интересуют.
Писать надо так: «Память выделять не умею, программирование на «С» не учил и в нем нихера не понимаю, очень хочу научиться, объясните почему утекает память?»
- Войдите на сайт для отправки комментариев
Гонора и у [5] хватает, хоть я с ним и более согласен 🙂
Но даже если memset и отрабатывает правильно, далее начинается и правда х**ня:
- Войдите на сайт для отправки комментариев
«Бред или не бред это судить думаю не вам!» относиться исключительно к уважаемому a5021.
Не люблю когда люди с ходу обсирать начинают не разобравшись в теме вопроса.
Если вы приняли это на свой счет. Прошу прощения. Адресованно исключительно a5021.
По поводу кода неприятно, когда кто то брызжет ядом. Данный код написан не мной, как вы правильно подметили я программирование на «С» не учил и в нем нихера не понимаю, очень хочу научиться.
Не так давно озаботился написанием кода, просил помощи, результаты пичальны. К счастью на другом ресурсе откликнулся человек и написал данный код. Все заработало сразу.
На радостях устройство собрано. И в процессе тестирования выяснилось что идет переполнение памяти. с чем собственно я и пытаюсь разобраться. И по этому прошу помощи. Человек который помог с кодом в первый раз не насвязи.
Оскорбить людей на данном форуме я искренне не хотел.
Просто обидно когда труд тех, кто отозвался откровенно оскорблют.
Замечу, что отзываеться не так много людей.
- Войдите на сайт для отправки комментариев
Уважаемые форумчане.
Приношу свои искренние извенения если, кто то принял пост #3 за оскорбление.
Я ни вкоем случае не хотел, кого бы то нибыло оскорбить. И пост относиться исключительно к негвативно выразившемуся a5021.
Я человек культурный. По крайней мере очень на это надеюсь.
- Войдите на сайт для отправки комментариев
Просто обидно когда труд тех, кто отозвался откровенно оскорблют.
если результатом твоего труда является дерьмо, то кому обижаться на сей факт? — включай голову, труженник.
- Войдите на сайт для отправки комментариев
Тогда, без обидок, приведи полный скетч.
Ты в цикле по 31 байт теряешь. Это близко не имеет отношения к 67 целым. Нужно видеть весь код целиком.
- Войдите на сайт для отправки комментариев
Труд не мой! По этому и обидно. буть это мой код я с радость принял бы критику. Отозвался 1 человек в прошлый раз он и помог. Хороший код или нет мне судить сложно. Я новичек и с си знаком исключитель в общих чертах. С буффером, массивом и памятью никогда не работал.
- Войдите на сайт для отправки комментариев
в том коде, что приведен, утечки памяти нет
- Войдите на сайт для отправки комментариев
после отправки все с памяти чистится. и память остается неизменна. Отправил все 67 команд которые уже забиты и все сработали идеально.
- Войдите на сайт для отправки комментариев
Бросил пульт куб под стол. И все работает. Каналы все переключает. По bluetooth тоже все идеально срабатывает разве, что с задержкой в пару секунд. от Аккумуляторов 18650 полет нормальный. Осталось приделать голосовое управление)))
Всем, кто откликнулся Огромное спасибо.
За недоразумение с оскорблением еще раз прошу прощения у всех форумчан.
По поводу плохого кода, сказать плохо не могу все работает отлично. Не судите строго.
Еще и место осталось прикрутить Wi-fi и модуль 433 мгц для управления светом, чайником и т.д.
- Войдите на сайт для отправки комментариев
Может кому пригодится. В связке arduino nano, SD адаптер, Bluetooth, 4 ir диода. 2 старых аккумуляторов 18650 от бука через DC преобразователь хватате на 2 суток в среднем.
- Войдите на сайт для отправки комментариев
Секрета в коде нет
пришло в терминал к примеру циферка 1
открываеться вайл 1 считывается значение в memset( irSignal )
как полностью считалось отправляеться через irsend.sendRaw
вопрос как после отправки с памяти все выкинуть лишнее
Вы читали, что я Вам написал? Нужен полный код, Вы понимаете смысл слова «полный»?
Дело в том, что чистить memset сам по себе бестолку — сначала нужно почистить void и digitalRead или убедиться, что с ними всё в порядке. А как это сделать, если Вы только куски кода даёте?
Ещё раз повторяю, без полного кода Вам не поможет никто.
- Войдите на сайт для отправки комментариев
Огромное спасибо! Уже помогли. Проблема найдена и решена. Проблема была в том, что не закрывался dataFile после чтения. В открытом состоянии они накапливались и переполняли память дуни. Проблема оказалась не в memset. К несчастью в меру с воей не опытности, до меня недоходило, что открытый файл забирает память и при открытии нового файла старый не закрывается. Весь код программы приведен в #13 посте. программа малюсенькая.
- Войдите на сайт для отправки комментариев
Я ни вкоем случае не хотел, кого бы то нибыло оскорбить. И пост относиться исключительно к негвативно выразившемуся a5021.
Т.е. вы будете упорствовать в том, что ваше желание «очистить memset» не является бредом, а всякие некультурные человеки пытались вам нагрубить без всякой на то причины?
- Войдите на сайт для отправки комментариев
Уважаемый a5021 возможно просто не стоит незнакомым людям (Учитывая возможность возростной разници в плоть до поколений), с учетом, что на форуме не все программисты (в противном случае смысл задавать вопросы, зная ответ) с ходу грубить. В плане бред и т.д.
Если вы знаете больше, чем ваш аппонент ато похвально.
Я ранее не работал с массивами, буферами и т.п. и мне это в новинку. Когда я ранее просил помощи, откликнулся один человек, и помог с кодом. (Замечу, что все работает идеально как часы. Даже несмотря на негативные отзывы.)
Не смотря на негатив окружающих, что код плохой, и вообще все фигня. Других вариантов никто не показал. А голословное оскорбление чужого труда это просто некрасиво.
По поводу memset. Согласен прошу меня извенить в связи с моей неграмотностью и некорректной формулировкой. (Хотя я считаю, что можно указать на недостатки знаний другого человека в более лояльной форме не прибегая к оскорблению.)
Я ошибочно пологал, что все считанное содержимое храниться в memset и из за ошибки освобождения памяти вызывает переполнение озу с последующим зависанием. К счастью прблема решена и оказалась бональной моей невнимательностью, и скудным знанием языка программирования. Код оказался абсолютно рабочим. (Как показала ночь эксперементов, все работает (даже лучше чем ожидалось)).
How to Clear Arduino Memory?
An Arduino has three forms of memory: RAM, Flash, and EEPROM.
When the Arduino is reset, the contents of the RAM are deleted. The variables and registers, as well as the instruction pointer, are all used.
Flash memory is used to store the code. Whenever the Arduino is reset or switched off, this information is not lost.
You should store data in EEPROM if you don’t want it to be deleted. You can’t simply designate a variable to be in EEPROM; you have to do so directly. It’s good for storing configuration data that doesn’t alter often but that you don’t want to change every time the Arduino is turned on or reset.
The created data inside a sketch only takes as long as the Arduino is turned on when you identify and use a variable. The data contained on the Arduino is lost whether it is reset or turned off.
Table of Contents
What is EEPROM?
Each Arduino board has separate memory storage in the microcontroller. It is called Electrically Erasable Programmable Read-Only Memory (a.k.a. EEPROM).
Byte variables may be stored in this tiny storage space. When you reset or turn off the Arduino, the variables contained in the EEPROM remain there. Simply stated, an EEPROM is a form of permanent storage that works similarly to a hard drive in a device.
Electronically, the EEPROM may be interpreted, deleted, and rewritten. Using the EEPROM library in Arduino, you can quickly read and write from the EEPROM.
How many bytes can you store?
Only 8-bit numbers, such as integer values between 0 and 255, can be stored in each EEPROM location, which implies you only can store 8-bit numbers.
The number of bytes you may store in EEPROM is determined by the Arduino microcontroller:
| The microcontroller of Arduino | EEPROM size |
| ATmega2560 (Arduino Mega) | 4096 bytes |
| ATmega328 (it can be found in Arduino Uno, Nano, Mini) | 1024 bytes |
| ATmega168 (Arduino Nano) | 512 bytes |
You can get an additional (external) EEPROM if you require storing more data.
The EEPROM’s lifespan is restricted. The EEPROM in Arduino is set to manage 100 000 write/erase cycles per place. Reads, on the other hand, are limitless. This ensures that you will be able to read from the EEPROM as many times as you like without jeopardizing its longevity.
It’s especially useful for recalling a variable’s last state or the number of occasions a device was turned on.
For instance, you may use this feature in such scenario:
- You’re using the Arduino to operate a lamp, and the lamp is turned on;
- The Arduino accidentally loses power;
- When the power is restored, the lamp remains off – it doesn’t remember its previous setting.
- This is what you don’t want to occur. You may need the Arduino to remember what happened before it lost power and go back to its previous state;
To solve this dilemma, save the lamp’s state in the EEPROM and provide a condition in your sketch that checks if the lamp’s current state matches the state saved in the EEPROM storage.
How to clear Arduino memory/erase EEPROM with coding:
- You need to find the basic empty setup program (sometimes it is called a loop);
- Then you should compile it;
- Reset the Arduino board. Push the hardware button (usually located on the chip);
- Then you need to press the key combination of Ctrl + U. It will upload the code;
- If nothing happens, repeat the previous step once again;
Before the boot loader launches the program, there is an expected delay; just wait for it. It may cope with the potential bugs in Arduino’s code when executing a soft reset every 500 ms.
How to reset/clear Arduino Leonardo board memory?
Here is the simple algorithm of actions:
- The USB cable must be unplugged;
- Connect the RX pin to the ground;
- The USB cable must be plugged;
- Upload a new program;
- Remove the cable;
- Remove the RX grounding;
Make sure the Arduino is connected directly to the PC device rather than a hub.
Another simple solution that may work:
- Unplug the USB cable;
- Select the Device Manager;
- Select Ports (COM & LPT)
- Press the right click on your Arduino board (COMx);
- Then choose “Properties – Port Settings – Set flow control to Hardware”;
- Create an empty sketch (the example is below);
- Again connect the USB cable;
- Upload by pressing Ctrl + U;
Here is an example of an empty sketch that you may use:
// Empty sketch
// The loop routine goes over and over forever:
When the Arduino is powered on, it will run the last program that was installed on it. If you don’t want it to go, don’t turn it on.
The Arduino normally runs the Blink program right out of the package. If you want to “reset” it, you may simply load that and you’re done.
Alternatively, you might use a loop program with a sleep button.
However, if you’ve been tinkering with the USB bootloader through the pins, you’ll have to reboot the bootloader. If you’ve been uploading programs through USB or directly utilizing a compiler, uploading Blink or another dummy program to reset it should be no problem.
How to reset or clear Arduino Uno board memory?
If you’ve ever worked with an Arduino board, you’ve probably come across the RESET pin and wondered what its purpose was. So, this pin will come in handy.
Furthermore, you might have found that when uploading the code to your Arduino board, it resets.
Another method to reset Arduino is to open the Serial Terminal in the Arduino program when attaching your Arduino board to your device. The Arduino is immediately reset when you launch the Serial Terminal.
The push button is the third method of resetting Arduino. Arduino will reset as you click and release the push button.
To “reset” the Arduino, follow these steps. Switch it off, hold down the Reset, and then turn it back on while still holding down the button. The original sketch can no longer work as a result of this. After that, you’ll need to create a new sketch.
Related Video: How to Clear EEPROM in Arduino
How to clear any sketch from any Arduino board?
Consider loading the sketch into the flash memory as if you were flashing an OS file onto your Raspberry Pi SD card. This sketch will load any time you plug in the power. However, with a microcontroller, it loads almost instantly.
Since the Arduino chip is programmed to be flashed with a program, it can remain on the chip until it is flashed again, regardless if it has been turned off and on.
If you want to set up your Arduino board for a new circuit, consider uploading the Blink program first because it’s the simplest and fastest way to “reset” to a common starting point.
A guide to EEPROM
The microcontroller on the Arduino boards have 512 bytes of EEPROM: memory whose values are kept when the board is turned off (like a tiny hard drive).
Functions in the EEPROM class is automatically included with the platform for your board, meaning you do not need to install any external libraries.
Hardware Required
All of the following boards have an EEPROM:
EEPROM Clear
This example illustrates how to set of all of those bytes to 0, initializing them to hold new information, using the EEPROM.write() function.
EEPROM CRC
A CRC is a simple way of checking whether data has changed or become corrupted. This example calculates a CRC value directly on the EEPROM values. This CRC is like a signature and any change in the calculated CRC means a change in the stored data. The purpose of this example is to highlight how the EEPROM object can be used just like an array.
EEPROM Get
The purpose of this example is to show how the put and get methods provide a different behaviour than write and read, that work on single bytes. Getting different variables from EEPROM retrieve a number of bytes that is related to the variable datatype.
EEPROM Iteration
The purpose of this example is to show how to go through the whole EEPROM memory space with different approaches. The code provided doesn't run on its own but should be used as a surce of code snippets to be used elsewhere.
EEPROM Put
The purpose of this example is to show the method that writes data on EEPROM using also the EEPROM.update() that writes data only if it is different from the previous content of the locations to be written. The number of bytes written is related to the datatype or custom structure of the variable to be written.
EEPROM Read
This example illustrates how to read the value of each byte EEPROM using the function, and how to print those values to the serial window of the Arduino Software (IDE).
EEPROM Update
The purpose of this example is to show the method that writes data only if it is different from the previous content of the locations to be written. This solution may save execution time because every write operation takes 3.3 ms; the EEPROM has also a limit of 100,000 write cycles per single location, therefore avoiding rewriting the same value in any location will increase the EEPROM overall life.
EEPROM Write
This example illustrates how to store values read from analog input 0 into the EEPROM using the function. These values will stay in the EEPROM when the board is turned off and may be retrieved later by another sketch.