
How to Connect Surround Speakers to a Samsung Soundbar?
Soundbars are the best audio choice for completing your home theater while saving space. However, you might miss the power a surround sound stereo kit produces. Thankfully, you can achieve a complete surround sound experience from your soundbars by adding surround speakers to your setup. So, how do you connect the speakers to your Samsung soundbar?
To use speakers with your soundbar, connect the wireless module to the speakers using the color-coded cables that your speakers came with. Then, connect the wireless module to a power source. In most cases, the Soundbar will automatically connect, but if not, do an ID SET on the Soundbar.
Soundbars usually do not have an “audio out” port. That means we’ll have to use a different method to connect the speakers to your soundbar. So, let’s go over the process and cover the issues you might encounter when configuring your soundbar with extra speakers.
Can You Add Surround Speakers to a Samsung Soundbar?
When buying a rear speaker kit for your Samsung soundbar, check to see whether it’s compatible with your device. Usually, the soundbar models supported by the speakers are listed explicitly.
If you’re still not sure which speakers to get, here are some recommendations:
SWA-9500S
Unlike other rear speaker kits, the SWA-9500S (on Amazon) does not depend on a wireless receiver module. Rather, it works standalone and connects directly with 2021 soundbar models (with support for Dolby Atmos or DTS:X).
Supported Soundbars:
- HW-Q900A
- HW-Q800A
- HW-Q700A
SWA-9100S
Shipped with a wireless module, the SWA-9100S (on Amazon) is another amazing rear speaker kit you can connect with the Samsung soundbars. It supports 2021 soundbar models and beyond. Hence, if you have a soundbar that dates back before this year, you might want to look for other choices.
In addition, it supports different sound codecs, from 2.0 to 5.1 to Dolby Atmos/DTS:X formats.
Supported Soundbars:
- HW-Q600A supports Dolby Atmos/DTS:X sound format
- HW-A650, HW-S60A, HW-S61A, and HW-S50A support 5.1 channel
- HW-A550 and HW-A450 support 2.0 channel
SWA-9000S
If your soundbar is a little older, you can get the SWA-9000S rear speaker kits. This hardware works with soundbar models released before 2021.
Supported Soundbars
- Among the 2020 models, the speaker is compatible with Q-900T, HW-Q800T and HW-Q70T models flaunting support for Dolby Atmos/DTS:X.
- From 2019 Models, the speaker syncs perfectly with HW-Q80R offering codec support for Dolby Atmos/DTS:X.
- The device is compatible with two Samsung soundbar models from 2018, the HW-N850 with Dolby Atmos/DTS:X sound format and HW-NW700 with 5.1 channels support.
- There are a few Soundbar models from 2017 that are compatible with these speakers. The HW-MS750, HW-MS6500 and HW-MS650 models support 5.1 channel codecs and the HW-MS550 model with 2.0 channel support.
SWA-8500S
The SWA-8500S rear speaker kit (on Amazon) is one of the most versatile choices, supporting a diverse number of Samsung soundbars from 2017 to 2020.
Supported Soundbars
- If your Soundbar model is from 2020, you can connect HW-Q60T, HW-T650, HW-T60M and HW-S60T with 5.1 channel codec support. Plus, a few 2.0 codec soundbars such as HW-T550, HW-T45C, HW-T450 and HW-T40M. Those owning the HW-T47M model must have got these rear speakers in the box itself.
- From 2019 models, you can connect the rear speakers to HW-Q70R and HW-Q7CR with Dolby Atmos/DTS:X codecs. However, the speaker also supports soundbars with other audio formats. HW-Q60R, HW-Q6CR, HW-R650, HW-R60M and HW-R60C have 5.1 channel codecs and HW-R550, HW-R50M, HW-R450 and HW-R40M supports 2.0 codec.
- The HW-R47M model also has a 2.0 sound format. However, you do not need to buy these rear speakers separately with this model as it’s included with the soundbar itself.
- The other models supported are HW-N650 and HW-N550 with 5.1 channel support. Plus, HW-N450 and HW-N400 with 2.0 codec support. These are the 2018 models.
- There is just one model from 2017 that pairs perfectly with the SWA-8500S rear speaker kit. Its 2.0 codec HW-M360 model.
Potential Audio Issues
Although rear speaker kits amplify the sound exponentially, there are certain audio issues you might encounter.
Rear Speaker Going to Sleep Mode
When connected to a TV, the Samsung soundbar and the wireless rear speakers go to sleep after 15 minutes when idle. The same happens when you turn off the TV while the speakers are still on. For power saving, these will switch to the sleep mode.
After turning the TV back on with some models, you may get audio from the soundbar but not from the speakers. In that case, you need to configure the connection between the soundbar and the speakers through the ID SET process manually. You can also try turning the devices off and then back on.
Soundbars with 2.0 Channel Support
Sound devices that only process 2.0 codec support only left and proper channels. However, you can still connect your rear speakers for additional sound effects.
However, you won’t have a separate sound channel for the soundbar when doing so. Simply put, the speaker and the soundbar will play the same effects, just amplifying the sound and not creating a surround sound experience.
In other words, you can only make your hardware setup imitate the sound of 4.1 or 5.1. With two rear speakers added to the sound system, a 2.1 soundbar will process 4.1 sound, and a 3.1 soundbar will provide 5.1 sound.
In some cases, adding these rear speakers may only ruin the audio of your home theatre. Hence, you must do proper research and weigh out the best decision for your home theater.
The easiest hack is to get the surround sound stereo instead of a Soundbar.
Troubleshooting Soundbar with Surround Sound
Some individuals still prefer to add more speakers to the home setup regardless of the complexity. For some home theaters, this addition really pays off!
So, if you are ready to take the effort to put the devices together for a more enveloping sound experience, here are some steps to troubleshoot the wireless receiver connection.
Surround Sound Speaker Placement: 5.1, 7.1 & Dolby Atmos Setup

Finding the best surround sound speaker placement for your room can make or break your 5.1, 7.1 or Dolby Atmos home theater system.
Don’t go to all the effort of choosing the right speakers for your room – spending your hard-earned money on quality equipment – and then just put them in any old place when installing them.
If you spend some time getting the 5.1 speaker placement just right, you will make the best of your surround sound setup.
The most important speakers are the center, front left and front right, which do most of the work when reproducing a movie soundtrack.
But the surround, rear, Dolby Atmos and subwoofer speakers also play an essential role in creating an immersive sound.
So it is crucial to find the perfect spot for each surround sound speaker to optimize your multi-channel home theater.
I will discuss each speaker type in this article and point out the important considerations for each one.
Center Channel Speaker Placement
The center channel speaker plays a crucial part in a 5.1 surround sound system. It is the main speaker for the dialogue in a movie, so you must place this correctly.
You should position the center speaker just above or below the middle of the TV screen – usually below – but this will depend on the height of your TV screen and if there is a suitable place to put it.
Just try not to place it too far from the screen, or the sound may appear removed from the picture. This will sound unnatural and spoil the impact of the soundtrack.
Ideally, your primary seating position will also be central to the middle of the TV. So, the center channel speaker should be pointing directly at you.

The position above or below the screen isn’t so important as the position relative to your ears.
Ideally, the speaker’s tweeters should be level with your ears when sitting in your viewing position. This is because higher frequencies are more directional.
The tweeters are the small speaker cones in your speaker.
In a bookshelf or floorstanding speaker, the tweeters are usually positioned above the larger woofer speakers. However, in a center channel speaker, they are generally fitted in line with the woofers.
You may be able to remove the speaker grille if you can’t see where the actual speakers are. Be careful, though!
If you can’t get the speaker into a level position with your ears, try to slightly angle the speaker up or down. Just try to ensure it is pointing at your head when sitting down.
If possible, the tweeters of the center speaker should be the same height as the tweeters of the front left and right pair. Although, this can be difficult to achieve precisely.
Doing this will allow a more consistent sound when the audio moves across the front three speakers.

However, you will find that as long as they are relatively level – say within 1-2 feet – you won’t notice too much of a problem when the sound pans across the speakers.
If in doubt, play a movie, watch a scene with plenty of effects moving across the front speakers, and listen to how it sounds.
Using your ears and judgment is probably the most crucial aspect of speaker placement.
Also, avoid placing the speaker behind the TV’s front edge, especially if it is on top. This means the sound will hit the TV first, affecting the sound reaching you.
You can use wall brackets, floor stands, or shelves to place the speaker – just try to make sure it is stable and on a solid, flat surface. In many cases, this can be the most challenging speaker to find a good position for.
If so, you might consider a piece of furniture designed to hold a TV and the center speaker.
A speaker designed specifically for the center will usually be a broad, horizontal shape, allowing it to lay along the edge of a TV screen and spread the sound evenly.
However, you can use any speaker type as your center – such as a regular bookshelf speaker. But bear in mind the shape of this type of speaker may be more challenging to install in an ideal position.
Also, you may not get the wide soundstage you can get with a dedicated center channel speaker, which will depend on the speaker’s design.
Front Left and Right Speaker Placement
The front left and right speakers are the equivalent of the stereo pair you might use with your hi-fi system.
They handle much of the music and sound effects in a movie soundtrack but sometimes reproduce the dialogue.
Therefore, balancing the sound field across the front of the screen is essential, which is easier if the front left, center and front right speakers complement each other.
The front speakers should be an equal distance left and right of the TV – and ideally, both should be an equal distance from the primary listening position.
However, the chances are your room may not suit this exact positioning. So, in many cases, one speaker may be slightly closer than the other.
That’s OK; if necessary, your AV receiver will adjust the output level for minor differences. Just try to make things as equal as possible and that you are as central as you can manage.

Front left and front right speaker placement
If you imagine an arc across the front of the room from your central home theater seats, you should try getting the center speaker at the top.
Then, the front left and right speakers will be slightly further forward. This ensures they will be a similar distance away from the listening position.
If this proves difficult, don’t worry too much. Your AV receiver can compensate for the difference in distance between speakers.
Get as close as possible in your room, but don’t start knocking walls down to get it exactly right!
The suggested angles for the front left and right speakers from your sitting position are 22 to 30 degrees (see below). So, use this as a guideline when positioning the front speakers.
This angle may not be possible depending on the size and shape of your room, so don’t get too distracted by the numbers.

Front left and right speaker placement angle (top view)
One common suggestion is to imagine an equilateral triangle. You are at the tip, and your front left and right speakers are at the other two points.
If all the distances between you and the speakers are the same, this will result in the 30° angle between you and each speaker.
If you move further away, the angle will narrow, which is fine. But try to avoid getting too close, or you won’t get a great stereo effect, and you might be too close to the screen for comfort.
Ideally, the front speakers will have their tweeters at ear height when sitting in your viewing position, which should be about the same height as your center speaker.
If you have floorstanding speakers, the height of the tweeter should be about right when sitting down. Similarly, with bookshelf speakers, your stands should create the right level.
Many people like to have the front speakers slightly angled to point at the centrally seated position. This is called ‘toeing-in’ the speaker.
However, this can come down to personal taste and vary between speakers. The best idea is to play with the angle of the speakers and decide which you prefer.
You will usually get a wider soundstage if you don’t toe-in the speakers – and a narrower, more focused sound if you do. But, the design of your speakers will also have a significant impact.
Also, consider the audience. If only you are watching, toeing in the speakers can help you get the best stereo effect in your listening position.
But suppose several people are watching across the room. In that case, not angling the speakers will usually be better for everybody as they all benefit from the broader stereo effect.
As with the center speaker, if you can’t get the front speakers at ear height, it can be beneficial to angle them up or down toward the listening position.
Although, whether you can do this depends on the stands or brackets you use.
But, depending on their design, you should only position some speakers on the level, so it’s up to you if you think angling them improves the sound.
Surround Speaker Positioning
The surround speakers create a sense of space in your room. Ideally, the surround speakers in a 5.1 surround sound configuration should be placed just behind or to the side of your listening position.
Dolby recommends an angle of 110° to 120° from your listening position, as in the image below.
However, if that’s impossible, the next best location is nearer the 90-degree angle on either side.
THX recommends between 90° to 110°, so I wouldn’t feel the need to get too precise. You can put your protractor away!

5.1 surround speaker placement – rear speakers
For example, if your couch is up against a wall, you can put the surround speakers on either side at 90°.
In many rooms, you may struggle to get the exact position but always try to get as close as your space will allow.
Depending on your room, you may have to compromise due to the position of walls, doors, windows and furniture. But there are usually ways to get as close as you can with a bit of thought.
The surround speakers should be slightly higher than the front speakers in the room. Ideally, about 1 to 2 feet above head height when sitting down.
This is because the surround channels create an ambient sound in your room. So, you should benefit if they are slightly further away from your ears.
The idea isn’t to get the direct up-front sound you want from your front speakers.
You would usually point these speakers at the central seating, much like the front speakers. However, this can also depend on the speaker’s design – and if the stands or brackets allow it.
Try angling standard direct-firing (monopole) speakers straight at your listening position.
Although, some people may find the sound too direct when you do this.
Therefore, placing direct-firing speakers relatively high above your main movie chair is also worth considering, as this will disperse the sound more before it reaches your ears.
Experiment and let your ears decide which sounds the best.
It should be noted that since Dolby Atmos speaker layouts were introduced, Dolby now suggests the surround speakers should be nearer head height/ear level.
They suggest either the same height as the front speakers or no more than 1.25 times the height.
This is so there is a distinct separation between the surround and Atmos effects, and you might want to experiment with this and see what works best in your room.
If you don’t have Atmos, anything from head height to one or two feet above should work equally well once the receiver has worked its magic.
However, I think head height might feel a bit close in a small room.
The surround effects should complement the front soundstage – not compete with it.
Higher will also likely be better if more people are in the seating area, as the people nearest the head height speakers will block the sound for others.
Remember, many people won’t have the luxury of getting the speakers precisely in the recommended locations anyway.

7.1 surround speaker placement – rear and back speakers
7.1 speaker placement is similar. However, the left and right surrounds should be slightly more to the side of the listening position – between 90° and 110°.
The two extra back speakers should be behind the listening position at around 135° to 150°.
Apart from that, the height and angle of the speakers should be the same as with a 5.1 speaker system.
What is the Minimum and Maximum Distance for the Surround Speakers?
There are no recommended distances for the surround speakers, only angles relative to the listening position.
The calibration of your speakers will adjust the output level for each one so they produce the same volume at the main listening position.
So if your speakers are close, they will be turned down. And if they are further away, they will be turned up.
However, if you have enough room to play with, I would try and use some common sense.
If the surround speakers are too close, they might distract from the front-of-room sound.
But, if they are too far away, the sound might get lost, and you may start to get reflections from the rest of the room.
As a rule of thumb, aim for around three to six feet, maybe? But, of course, that depends on the space you have available.
Bipole and Dipole Speaker Placement
If you have bipole or dipole surround speakers, you don’t need to worry about angling them – the design of these speakers will provide the ambient sound you need.
They will usually mount flat against a wall.
In a 5.1 setup, the ideal place for bipole speakers will be directly behind the listening position – pointing toward the front speakers.
Place them about 1 or 2 feet above the listener – in line with, or slightly wider than, the front speakers.
If that’s not possible, the next best option is directly at either side – 90° to the listening position. Again, 1 or 2 feet higher than the listener.
For dipole speakers, the correct positions are 90° on either side of the listening position. This means the speakers in the unit will be facing the front and back, i.e., not at the listening position.
As in the previous examples, these should also be 1 or 2 feet higher than the listener.
One advantage of bipole speakers is they are more flexible in their positioning.
If you come across a different name, bipole speakers are also known as bipolar speakers.
This video covers some of the issues I have discussed – and highlights the compromises that are sometimes required:

Dolby Atmos Speaker Placement
A Dolby Atmos system must have at least two speakers to recreate the overhead audio.
These should be installed high in your room as in-ceiling, on-ceiling or on-wall speakers – or you can buy dedicated Dolby Atmos modules that you can place on top of your existing speakers.
Traditional speakers with integrated Dolby Atmos modules are also available.
These modules will bounce the overhead audio off the ceiling toward your listening position.
For DTS:X soundtracks, there is no requirement for dedicated overhead speakers or modules, and a DTS:X soundtrack will adapt to any speaker layout.
It won’t be as much fun without the height element, though.
Does Your AV Receiver Support Atmos?
The other thing to consider before you start is the support from your AV receiver.
Firstly, the receiver must support Dolby Atmos and have output channels for the number of speakers you require.
Budget models will only support two Atmos speakers plus a 5.1 layout.
You can also install speakers for Atmos in several different locations. The common ones are:
WALL SPEAKERS
- Front Height Left/Right
- Surround Height Left/Right
- Rear Height Left/Right
CEILING SPEAKERS
- Top Front Left/Right
- Top Middle Left/Right
- Top Rear Left/Right
DOLBY ATMOS MODULES
- Front Dolby Atmos Enabled Left/Right
- Surround Dolby Atmos Enabled Left/Right
- Back Dolby Atmos Enabled Left/Right
No matter which ones you use, you should always install Dolby Atmos speakers in pairs.
When you set up your receiver, you will need to tell it what type of Dolby Atmos speakers you have installed in your room – and where they are.
Then the receiver will adjust the delivery of a soundtrack to suit your installation.
But not all receivers will support all the possible locations – so check this before drilling holes in your ceiling!
Positioning Your Dolby Atmos Speakers
With the introduction of Atmos audio, Dolby introduced a slightly different concept for home theater sound – listener-level audio and overhead audio.
Listener-level speakers are the standard 5.1 or 7.1 surround speakers, and ideally, these should be roughly the same height and placed around the ear level.
This leaves space above for the Atmos overhead audio plane. When combined, this will produce a thrilling 3D audio experience in your room.
If the overhead speakers are mounted on the ceiling and pointed directly down, they should have a wide dispersion pattern of around 45 degrees (from 100 Hz to 10 kHz).
For speakers with a narrower soundstage, these should be angled toward the primary listening position.
Ideally, you should install the overhead speakers at around 2 to 3 times the height of the listener-level speakers. While these are only guidelines, try to get as close as possible in your room.
The main thing is to get a good separation between the listener level and overhead speakers – although not too far, or the audio will become disconnected and won’t be as immersive.
As already mentioned, the minimum number of overhead speakers for Dolby Atmos is two – although Dolby recommends four.
While several speaker locations are supported, with four overhead speakers, the suggested places to use are:
- Top Front Left/Right
- Top Rear Left/Right
As in the picture here:
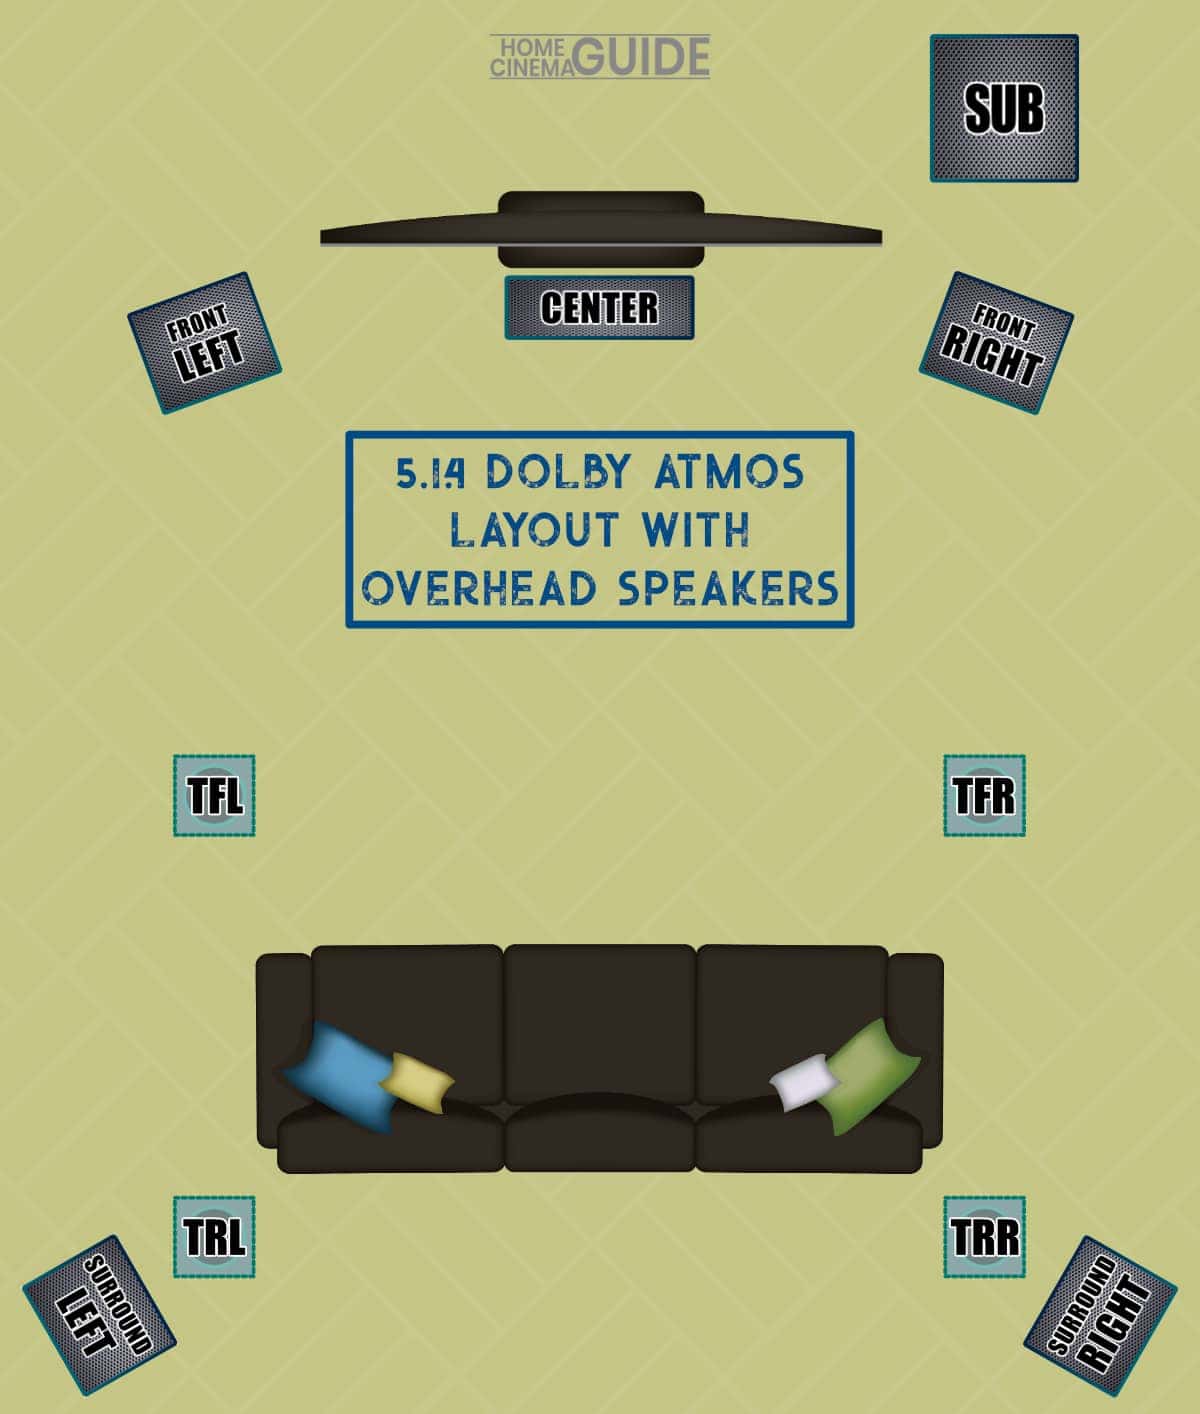
5.1.4 Dolby Atmos Layout with Overhead Speakers
As you can see, ideally, you should center the position of the overhead speakers around the listening position, roughly in line with the front speakers.
But this does require support from your AV receiver for these locations – and enough space in your room. You can choose a different layout if you don’t have either of these.
Another thing to consider is the speaker type.
The ideal speaker for the top front, middle and rear locations is in-ceiling because they are intended to be directly overhead.
However, many people can’t (or don’t want to) cut holes in their ceilings to install speakers. If so, consider using conventional speakers with brackets, which will make less mess.
Or, why not try putting speakers on the sidewalls and angling them down to the primary listening position?
You can still tell the receiver these are top-positioned speakers. Or, if supported by your receiver, you can identify them as surround and rear-height speakers.
This isn’t strictly as intended, but if you bend the rules a little, you can still get a great 3D effect in your room. Try it and see what sounds best to you.
With four speakers, the recommended angle from the listening position is 45 degrees to the top front and rear speakers.
Although this can be increased to between 30 and 55 degrees if necessary.

The ideal angle of Dolby Atmos top front and top rear overhead speakers
If you only install two overhead speakers, Dolby recommends using the top middle left and right speaker positions.
This should be 65° to 100° above your listening position. So, anything from just in front of you to directly overhead or slightly behind.

The angle of Dolby Atmos top middle overhead speakers
But you don’t have to. You could install two front-height left/right speakers if you prefer. Or any of the other locations.
If you don’t want to install overhead speakers at all, buying Dolby Atmos-enabled modules – or speakers with integrated Dolby Atmos drivers – is a good solution.
They can also be easier to install.
The idea is you place the modules around ear level, and they direct the audio toward your ceiling, which creates a diffuse overhead sound when it reflects down to your listening position.
The recommended position of the modules is slightly different from the overhead speakers.
If you only have two Dolby Atmos modules, placing these on or near your front left and right speakers is recommended.
If you want four modules, you should place the rear pair on, or near, the rear back surrounds in a 7.1 system – and on/near the rear surrounds in a 5.1 system.
There are a few other guidelines you should remember if you want to consider using this type of speaker.
When you install Dolby Atmos-enabled speakers, you should:
- make sure the room height is between 7.5 and 14 feet
- ensure that the ceiling is made of reflective material like plaster, drywall or hardboard
- place them at, or slightly above, ear level
- install them no higher than one-half the room height
If you can follow these points, you should get an effective overhead sound using Atmos modules.
Positioning Dolby Atmos speakers is more complicated than traditional 5.1 and 7.1 systems.
The beauty is you can go from a 2.1.2 layout to 7.1.4 to 11.1.8 and beyond – and use a combination of overhead speakers and modules.
The recommended location for the Dolby Atmos speakers does vary slightly between each layout, but they do follow the same basic principles.
And you can also just place your speakers where they will fit and still get a pretty good immersive experience. Don’t be afraid to experiment and decide what sounds best in your room.
You can also visit the Dolby website for more detailed information on more Atmos layouts.
Placement of the Subwoofer
The subwoofer is the maverick of surround sound speakers. It’s the cool guy who goes where he wants and doesn’t follow the same rules as everybody else.
The main reason for this is the subwoofer has a specific job – to reproduce the really low bass in a soundtrack.
Low bass frequencies are less directional than higher frequencies due to their long wavelength, making it harder to tell where the sound comes from in the room.
Therefore, subwoofer placement in a room is much less critical than with other speakers – which can be a blessing given the size of the darn thing!
Wherever you have a spare bit of space in your room, you can stick it anywhere pretty much.
Although, there are a few general guidelines worth considering if you can.

In general, avoiding the corners of a room can be important for the subwoofer because the bass frequencies can become ‘boomy.’
Having said that, you can sometimes use a position near the corners of a room to your advantage and boost the bass sound from your subwoofer. Your neighbors might not be so pleased, though!
The potential disadvantage is the bass becomes too overpowering in the room and harder to control.
Have a play around with the position and see what you think. You will have to try this for each room, as no two rooms will sound the same.
One thing to listen out for is areas of the room where the bass is especially quiet – or loud. Because of the long wavelength of bass sound waves, it is easy to create standing waves in a room.
This can cause the bass volume to vary throughout a room as the sound waves add together – or cancel out.
The shape of your room can also affect the creation of standing waves – and a square-shaped room can be a particular problem as the walls will be the same distance apart.
So, avoid placing the subwoofer at an equal distance between two opposite walls, or it can result in the reflecting waveforms canceling each other out.
Therefore, don’t have the speaker precisely in the middle of the room – ideally, it would be best to place the subwoofer nearer one end or the other.
The main thing to check is that a drop in the bass isn’t happening around the listening area, which is not what you want. If you find this happening, you can move the subwoofer a bit. Just a few inches may do it.
This can drastically improve the bass levels in the critical listening area.
Another common way of finding the best subwoofer position for your room is to do the ‘subwoofer crawl.’
For this, you need to place the subwoofer in the primary listening position (you may need a long cable for this if it’s not wireless) and then get on your hands and knees and crawl around the room while listening to some audio content.
Then when you hear where the bass sounds the best to your ears, you can put the subwoofer there.
Another solution, especially for a large room with a few quiet areas, is a 5.2 or 7.2 setup with an extra subwoofer (or more).

7.2 surround sound system layout
A second subwoofer can help level the bass throughout a room – especially in the crucial areas where people sit.
For the best results, move the subwoofer positions around your room and listen for a change in the bass levels. You are looking for consistent bass at all listening positions in the room.
There isn’t a perfect position for the second sub that will suit all rooms.
Another trick is having one person sit in the listening position and another move the subwoofers around. You may be surprised at how much difference a few inches one way or another can make.
As you might guess, the downside of a 7.2 setup is that it can be harder to set up a room with two subwoofers. The low-frequency bass sound waves from two different places could start to cancel each other out.
So, you could make the bass sound in the room worse!
Plus, it can be more challenging to wire two subwoofers because are more cables to run (again, assuming they are wireless).
And does your receiver even support two subs?
Once you get into this kind of territory, you might want to hire an expert with sound meters to test the room and properly position the subs.
However, try giving it a go yourself first. Use your ears and listen to the effect of moving the subs around.
General Speaker Placement Guidelines
So far, I have looked at the placement of specific home theater speakers.
In terms of general guidelines, you should bear in mind the following points when positioning your speakers.
Remember, it’s not the end of the world if you don’t follow them to the letter.
But, the nearer you get, the more chance you have of getting a great sound in your room.
1. Every Room Is Different
The first thing to remember is that your room will probably not be the perfect shape for a home theater sound system.
Most people will use a communal living area for their home theater equipment, so it is tough to get the perfect setup.
However, that doesn’t mean that you can’t try to get the best sound possible from your amplifier and speakers.
Many people think about the technical aspects of the amplifier and speakers – like matching the speaker impedance and amplifier power – but forget the importance of ensuring the speakers are in the ideal locations.
While you may not be able to get every point precisely right, you will still be making the best use of the space you have available.
Most people will have to make some compromises in the location of their speakers. That’s fine. Aim to do the best job you can, and it will make a big difference to the sound in your room.

Once you have the speakers in the best location, you can adjust the settings of your AV receiver with volume, phase and tonal balancing.
This can help compensate for each speaker’s actual position in the room.
Most modern AV receivers will have some form of automatic room correction, which you can run using the supplied microphone.
This can be very effective, and you can still manually tweak the settings afterward to your taste if you prefer.
2. Not Too Close to Walls, Floors and Ceilings
I’ve already mentioned this for the subwoofer, but it holds true for all your speakers. Avoid placing the speakers too close to walls, floors and ceilings.
This can be difficult in smaller rooms, but you will alter the speakers’ sound if they are too close to these surfaces.
The bass will increase if too close to walls or floors, artificially changing the speakers’ sound.
Also, the sound waves can reflect off these hard surfaces and delay the sound waves reaching your listening position, creating poor clarity and stereo imaging.
However, to confuse you, some smaller speakers may actually benefit from placement on or near walls.
Some are designed to use this increase in the low end to help their sound because they are too small to get a good bottom end on their own.
Check out the information that comes with the speaker if you are unsure.
As a general guideline, the bigger the speaker, the more bass it creates on its own, and it will be more important to keep these away from the walls.
3. Avoid Corners
Try to avoid placing the speakers in corners.
This is like point 2 – except the issues are even more of a problem to the sound – because it is where the floor, wall and ceiling meet.
The corner of a room can do strange things to the sound waves bouncing around your room, especially the bass end. The bass will often appear ‘boomy’ or ‘muddy’ if your speakers are too close to the corner.
Having said that, I’m now going to contradict myself completely.
In some rooms, you can try placing the subwoofer near the corner to boost the bass in the room.
Putting the subwoofer there might boost the bottom end if you’re not getting the desired results.
Just be aware that this could also result in excessive bass, which is hard to control.
Speaker placement can be full of seemingly conflicting advice. But the truth is each room is different, and something that works well in one room may not work in another.
Experiment and listen!
4. Avoid Obstructions
Always try to ensure nothing is getting in the way of the sound reaching your ears.
You won’t get the best sound from your speakers if the furniture, curtains, and even your TV itself obstruct the sound from getting to you.
Obstructions will cause the sound waves to bounce around the room before reaching you.
Ideally, you want the sound to go directly from the speaker to your ears.
Even if your speakers are sitting on a shelf – try to move them forward a little – so the speaker’s front is in line with the edge.
Maybe even overhang them a touch. Not too much, though, or they might fall off! Half an inch is plenty.
The main thing to avoid is the speaker being pushed back into the shelf, which will ensure the sound from the speaker doesn’t reflect off the hard surface as soon as it leaves the speaker.
This can be a particular problem for your center speaker because having these on a shelf below the TV is standard.
So move the center speaker to the front edge to drive the sound directly at your listening position.
5. Try a Listening Test
Play a constant sound – like a piece of music you know well – and sit in your normal listening position. Listen carefully to the sound.
Then, move the speakers by a few inches, or change the angle they are pointing, and hear how this affects the sound.
This is easier if there are two of you – one to listen and one to move the speakers.
It may surprise you how moving the speakers by a small amount can alter the sound.
This can be especially useful when finding the correct position for the subwoofer. You have more freedom where to place the sub, so you can experiment more.
Wrapping Up
Follow these guidelines, and you will be well on your way to the best speaker placement for your surround sound system.
The main thing to remember is that they are just that – guidelines. Don’t feel that you must follow each point strictly.
Get as close as you can – depending on the dimensions of your room and the type of speakers.
The center and front speakers are crucial to a surround sound system and should receive most of your attention. Get this right, and you will be well on the way.
However, it’s easy to forget the surround, rear and subwoofer speakers.
The correct surround speaker placement is crucial to get the best out of your speaker system, so make sure they work together to give you a great surround sound experience.
Please don’t waste the potential of your home theater sound system by not giving it a chance to sound its best.
Frequently Asked Questions
This article covers quite a bit of ground, but there is always more to learn about placing surround sound speakers. Here are the answers to some common questions.
How High Should the Surround Sound Speakers Be?
In a traditional 5.1 and 7.1 speaker system, the recommendation for surround speakers is one or two feet above ear level. Since the introduction of Dolby Atmos audio, Dolby now refers to the 5-channel and 7-channel speakers as being at listener level – and suggests these should all be at ear-level for the listener. This creates a distinct separation between the listener-level audio and the Atmos height audio. However, these aren’t hard and fast rules, so you can place the surrounds higher than this. Although, in this case, Dolby recommends a height of no more than 1.25 times the height of the front speakers. These are only guidelines. You can deviate from this if your room layout is challenging.
How Far Back Should the Rear Surround Speakers Be?
There isn’t a specific distance for the rear surround speakers in a 7.1 speaker layout. However, it would be best to keep relatively close to help the immersive sound experience. The recommendation is for the rear surround speakers to be around 135° to 150° from the listening position and roughly in line with the front left and right pair.
Does Surround Sound Speaker Height Matter?
Yes, to get the best immersive experience, you want to follow the guidelines as best you can. For 5.1 and 7.1 systems, the surrounds should be from ear level to 1 or 2 feet above. For a Dolby Atmos system, Dolby recommends having the standard surround speakers at ear level (listener level) – and the Dolby Atmos overhead speakers at two to three times the height of the listener-level speakers.
Do I Need Overhead Speakers in a Dolby Atmos Speaker System?
Dolby says the overhead sound is integral to the Dolby Atmos audio experience. Therefore you must have speakers capable of creating the Dolby Atmos sound field. Overhead speakers can be in-ceiling, on-ceiling, in-wall or on-wall – or you can place Dolby Atmos-enabled modules on top of your existing listener-level speakers. DTS:X soundtracks don’t insist on having overhead speakers, so DTS:X will adapt to any speaker layout.
How to Install 7.1 Surround Sound with a Couch Against the Wall?
The easiest answer is to stick with a 5.1 surround sound system and put the surrounds at 90° to your sitting position. The rear surrounds in a 7.1 layout really should be a distance behind you, which you can’t do when the couch is against the wall. If you really want to try it, you could install in-ceiling speakers above you, in-wall speakers behind you, or maybe use bipole/dipole speakers attached to the back wall. But neither solution is ideal, and you will probably be better off setting up an outstanding 5.1 system than trying to hack a 7.1 layout.
About The Author
Paul started the Home Cinema Guide to help less-experienced users get the most out of today’s audio-visual technology. He has been a sound, lighting and audio-visual engineer for around 20 years. At home, he has spent more time than is probably healthy installing, configuring, testing, de-rigging, fixing, tweaking, re-installing again (and sometimes using) various pieces of hi-fi and home cinema equipment. You can find out more here.
Add surround speakers to a Sonos home theater
This article will show you how to add surround speakers to your Sonos home theater for surround sound. See our article on surround sound guidelines and limitations for information on which Sonos products can be used as surround speakers.
Before you start
- Your home theater product, and products you want to use as surrounds, must already be added to your Sonos system as separate rooms .
- Products used as surrounds will connect wirelessly to your Sonos home theater product. Make sure they are in the same room and have line-of-sight to your home theater product.
- If the products you want to use as surrounds are set up as a stereo pair, make sure you separate the stereo pair before adding them as surrounds.
- Open the Sonos app for iOS or Android.
- From the Settings tab, tap System.
- Under Products, tap the Sonos home theater room.
- Tap Set up Surrounds.
- Follow the in-app instructions to add your speakers as surrounds.
Still need help?
Our technicians can help over the phone or with a live chat. You can also ask questions and find answers with other Sonos owners in our Sonos Community.
polk audio FX Wireless Surround Speaker System Руководство пользователя
 report this ad
Беспроводная акустическая система объемного звучания Polk Audio FX

ХАРАКТЕРИСТИКИ
Активная акустическая система
- 1 – 5 1/4″ низкочастотный динамик Dynamic Balance®
- 4 – 2 1/2″ полнодиапазонные динамики Dynamic Balance
- 3-х позиционный переключатель выбора комнаты
- Сетевой выключатель переменного тока
- Линейный источник питания
- Выходная мощность системы — 120 Вт с DSP
- Частотная характеристика системы: 48 Гц – 20 кГц
- Беспроводная передача 2.4 ГГц
- Расстояние передачи 50″ в помещении
- Кнопка беспроводного сканирования
- Рейтинг Energy Star
- 9-дюймовый шнур переменного тока со встроенным блоком питания
Габаритные размеры:
- 8 1/8″ В x 19 1/2″ Ш x 7 3/4″ Г
- (20.6 см в x 49.5 см x 19.6 см в глубину)
Беспроводной передатчик
- 1 пара линейных входов L/R Surround
- 1 пара линейных входов L/R Surround Back
- 1 пара громкоговорителей уровня L/R Surround входы
- 1 пара входов уровня громкоговорителей L/R Surround Back
- Кнопка беспроводного сканирования
- Регулируемая внешняя антенна
- Блок питания от настенной розетки
Габаритные размеры:
Please enable JavaScript
- 1 – 1/2 дюйма В x 7 дюймов Ш x 3 13/32 дюйма Г
- (3.8 см В x 17.8 см Ш x 8.6 см
Входящие в комплект аксессуары
- Две пары 5-футовых кабелей RCA «папа-папа»
Дополнительная информация
- Общий вес: 18 фунтов (8.2kg)
- Готово: черный пика
- MSRP: $399.95
Цели дизайна
Для многих людей установка высококачественной компонентной аудиосистемы домашнего кинотеатра сопряжена с несколькими серьезными препятствиями. К ним относятся прокладка и скрытие проводов по комнате для прослушивания, косметический эффект от размещения в комнате от 2 до 4 отдельных корпусов динамиков и обеспечение их правильного размещения. Хотя в настоящее время доступно несколько беспроводных продуктов, они либо беспроводные, ampусилители, в которых до сих пор используются проводные динамики или динамики с индивидуальным питанием. Ни один из этих продуктов не решает проблему дополнительного беспорядка или сложности размещения.
Polk® F/X Wireless Surround решает все эти проблемы с помощью простой и элегантной одиночной беспроводной акустической системы, которую можно легко разместить на полу, столе или полке позади зоны прослушивания. Благодаря фирменной технологии Controlled Dispersion Array™ (CDA) Polk Audio, FX Wireless Surround создает убедительный 5.1-канальный или 7.1-канальный объемный звук.tagе. Кроме того, технология Polk Digital Logic™ позволяет использовать три отдельных варианта размещения без ущерба для производительности. В то время как подавляющее большинство современных ресиверов объемного звука оснащены дискретными линейными выходами 5.1 или 7.1, существуют устаревшие продукты, которые не имеют такой конфигурации. Передатчик Polk F/X Wireless Surround включает в себя как линейный уровень, так и уровни громкоговорителей объемного звучания и объемного звучания.
ПОДКЛЮЧЕНИЕ СИСТЕМЫ И КАЛИБРОВКА
передатчик
Поместите передатчик в надлежащей близости от приемника или предварительноamp в зависимости от длины кабеля (поставляются два 5-футовых кабеля RCA). Мы не рекомендуем размещать передатчик прямо над ресивером или DVD-плеером. Подключите блок питания и вставьте его в удобную розетку. Светодиод будет светиться КРАСНЫМ до тех пор, пока не будет установлено соединение с динамиком. Подключите линейные выходы объемного звучания 5.1 или 7.1 от ресивера или предусилителя.amp к соответствующим входам на блоке передатчика.

Входы передатчика
- Аудио входы: Уровень линии и уровень динамика. Здесь вы подключаете передатчик к приемнику или процессору. Вы можете выполнять соединения либо на уровне громкоговорителей, либо на уровне линии, но никогда не выполняйте оба соединения одновременно.
- Подключение питания: Сюда подключается источник питания передатчика.
- Светодиод питания: Светится синим цветом, указывая на то, что передатчик активен и успешно подключен к громкоговорителю. Светится красным цветом, указывая на то, что передатчику и громкоговорителю не удалось установить беспроводное соединение.
- Сканирование: Нажмите эту кнопку, чтобы восстановить связь между передатчиком и громкоговорителем.
ДИНАМИЧЕСКАЯ СИСТЕМА
Расположите длинную ось громкоговорителя F/X Wireless Surround за зоной прослушивания. ampНа входе lifier есть стрелки, указывающие на правильную ориентацию левого/правого канала. F/X Wireless Surround можно разместить на полу, на столе или на полке. Благодаря уникальным свойствам массива с контролируемой дисперсией динамик все еще может работать с твердой поверхностью в нескольких футах над ним, при условии, что есть ample открытая область по обе стороны от массива преобразователя динамика, расположенного на каждом конце изогнутой перегородки. Подсоедините сетевой блок питания и включите сеть переменного тока. Нажмите кнопку положения комнаты, чтобы выбрать пол, стол или полку в зависимости от желаемого места. Оранжевый светодиод загорится соответствующим образом. Теперь нажмите кнопку сканирования. Светодиод сканирования изменит свой цвет с красного на синий, как только соединение с передатчиком будет установлено.
ПРИМЕЧАНИЕ: Система использует функцию сна, если сигнал отсутствует в течение нескольких минут; как только сигнал будет обнаружен, система снова подключится.
Беспроводное управление объемным звуком F/X

- Светодиод питания: Светится синим, когда динамик включен, красным — в режиме ожидания.
- Кнопка положения комнаты: Эта кнопка устанавливает эквалайзер для F/X Wireless Surround в зависимости от его расположения: на полу, на столе или на полке. Светодиод указывает, какое место выбрано.
- Сканирование: Нажмите эту кнопку, если возникнет необходимость восстановить связь между передатчиком и громкоговорителем.
- Индикатор беспроводной связи — горит синим цветом, указывая на то, что передатчик и громкоговоритель подключены по беспроводной сети. Мигает синим/красным, когда громкоговоритель и передатчик подключены, и светится красным, когда громкоговоритель и передатчик не подключены.
- Подключение питания: Сюда подключается источник питания громкоговорителя.
- Сеть переменного тока: Сетевой выключатель переменного тока включает и выключает громкоговоритель, хотя вы можете оставить его постоянно включенным.
- Ориентация динамика: Указывает ориентацию левого и правого каналов. Обязательно расположите динамик 6 соответствующим образом.
КАЛИБРОВКА СИСТЕМЫ
- Усиление канала объемного звучания должно быть установлено таким образом, чтобы уровень звука соответствовал или немного превышал уровни звука фронтальных каналов.tage.
- Тыловой объемный звук должен быть установлен в соответствии с настройкой усиления, определенной для каналов объемного звучания.
Exampль: Если +3 дБ является подходящей настройкой канала объемного звучания, для заднего объемного звучания также следует установить значение +3 дБ.
Расстояние до слушателя
Чтобы откалибровать расстояние с помощью F/X Wireless Surround, вам необходимо определить две вещи.
- Для определения расстояния объемного звучания просто измерьте приблизительное расстояние от акустической системы до ближайших боковых стен.
- Для заднего объемного звучания измерьте расстояние от акустической системы до места прослушивания.
УСТАНОВКА В СИММЕТРИЧНЫХ ПОМЕЩЕНИЯХ
Таблица 1 Симметричная комната: расстояние между правым и левым громкоговорителями объемного звучания
Exampль: В Таблице 1 показано, что задержка Surround Left и Surround Right должна быть установлена на 30 футов для симметричной комнаты шириной 20 футов, когда F/X Wireless Surround находится на расстоянии 2 футов от зоны прослушивания.
Расстояние до громкоговорителя в футах от зоны прослушивания (D)
УСТАНОВКА В НЕСИММЕТРИЧНЫХ ПОМЕЩЕНИЯХ
В соответствии с рисунком 2 измерьте A и B расстояния между корпусом громкоговорителя и левой и правой боковыми стенками соответственно. Теперь обратитесь к таблице ниже, чтобы определить соответствующие настройки расстояния для левого и правого каналов объемного звучания.
Таблица 2. Несимметричное помещение: расстояние между правым и левым динамиками объемного звучания
Exampль: Динамик F/X Surround расположен на расстоянии 8 дюймов от зоны прослушивания несимметричной комнаты. Громкоговоритель находится в 12 футах от левой боковой стены (A = 12 ′) и в 8 футах от правой боковой стены (B = 8 ′). В Таблице 2 установите расстояние для левого объемного звука равным 33 футам, а для правого объемного звучания — 29 футов.
Расстояние до громкоговорителя в футах от зоны прослушивания (D)
Расстояние от боковой стены (A или B)
- Если размеры вашей комнаты и расположение громкоговорителей находятся между значениями ширины комнаты и/или расстояния до места установки, указанными в таблицах 1 или 2, или превышают их, вы можете соответствующим образом интерполировать данные из таблиц.
- Некоторые ресиверы для домашнего кинотеатра требуют установки задержки динамика в миллисекундах, а не расстояния до динамика в футах. Если у вас есть такой приемник, вы можете прочитать значения в таблицах 1 и 2 как временную задержку в миллисекундах.
ОПИСАНИЕ СИСТЕМЫ
Ограждение
Polk Audio F/X Wireless Surround представляет собой трехкамерную конструкцию, которая отдельно изолирует левый канал, правый канал и секции портированных низкочастотных динамиков. Корпус изготовлен из МДФ толщиной 3/4″, что обеспечивает высокую плотность и исключительную жесткость. Решетка изготовлена из акустически оптимизированной ударопрочной перфорированной металлической решетки для защиты водителей при размещении на полу.
Порт Дизайн
С помощью компьютерного моделирования инженеры Polk оптимизировали корпус J-Port с одним раструбом, направленным в пол. Эта конструкция помогла оптимизировать ламинарный поток воздуха из порта, где турбулентность может привести к слышимому шуму порта (пыхтению) и потере детализации и четкости басов. Нижняя точка стрельбы системы J-Port набирает обороты.tage увеличения усиления басов при размещении на полу, столе или полке.
Дополнение к динамику
Динамики диаметром 4–2 1/2 дюйма и низкочастотный динамик диаметром 5 1/4 дюйма используют технологию динамического баланса Polk Audio, которая минимизирует модальные резонансы и обеспечивает более естественное воспроизведение средних и низких частот. Драйверы оснащены неодимовым магнитом с диффузором из легированной целлюлозы и окантовкой для оптимального соотношения мощности двигателя к массе для достижения плавной расширенной частотной характеристики до 20 кГц. Низкочастотный динамик с длинным ходом оснащен звуковой катушкой диаметром 1 1/4 дюйма, в которой используется массивная структура ферритового магнита весом 40 унций для отличного низкочастотного воздействия и удара.
Ampфункции лифтера
F/X Wireless Surround включает в себя многоканальный цифровой усилитель класса D мощностью 120 Вт. ampLifier с DSP для оптимизации частоты, защиты от задержки и перегрузки. Предусмотрен внешний источник питания с кабелем питания 9 футов.
ТЕХНОЛОГИИ
Беспроводной объемный звук Polk Audio F/X использует следующие запатентованные технологии Polk.
Динамический баланс
В 1988 году Polk Audio приступила к долгосрочному исследовательскому проекту в сотрудничестве с Университетом Джона Хопкинса. Результатом стала гетеродинирующая лазерная интерферометрическая система полного поля, способная обнаруживать микроскопические детали целых вибрирующих поверхностей (таких как диффузор громкоговорителя) в режиме реального времени. Этот исследовательский инструмент позволил нам view и анализировать всю вибрирующую поверхность драйвера или твитера. В частности, мы смогли увидеть и понять резонанс, возникающий на диффузорах громкоговорителей при их движении. Модальный резонанс является основной причиной аберраций частотной характеристики и других искажений в громкоговорителях. Наше новое понимание того, как возникает резонанс в компонентах динамиков, привело нас к разработке метода проектирования под названием «Динамический баланс». Dynamic Balance использует анализ всей электроакустической и механической систем для выбора композитных материалов и геометрии, которые уменьшают резонанс. Полученные приводные устройства обладают необычайной четкостью, детализацией и расширением.
- Мэтью Полк и научный сотрудник университета в лаборатории лазерных интерферометров.
- Изображения лазерного интерферометра, показывающие резонанс на конусах пикера.
Клиппель-оптимизация
Используя современный анализатор искажений Klippel, инженеры Polk смогли оптимизировать структуру двигателя низкочастотного динамика, выравнивание звуковой катушки и подвеску для достижения наилучших возможных характеристик даже при экстремальных уровнях громкости.
Массив с контролируемой дисперсией
Технология Controlled Dispersion Array была разработана специально для F/X Wireless Surround. Плотно сгруппированные массивы дискретных электродинамических преобразователей в сочетании с фазовыми и/или ampсужающиеся по высоте, создают диаграмму направленности, характеризующуюся узкими направленными лучами. CDA позволяет F/X проецировать звук на отражающие поверхности для создания обволакивающего, объемного звукового поля, богатого пространственными сигналами, необходимыми для правильной локализации эффектов объемного звучания. Кроме того, новаторский анализ Polk связанных с головой передаточных функций (HTRF) позволяет F/X Wireless Surround работать оптимально в различных местах размещения. HRTF, важная тема в области психоакустических исследований, описывают, как мы находим источники звука на основе их воспринимаемой частотной характеристики. Встраивая формирование отклика амплитуды, которое отражает соотношение определенных HRTF, беспроводная система объемного звучания F/X от Polk перемещает источники звука из фактического положения динамика в комнате в соответствующие виртуальные боковые места на возвышении. Конечным результатом является захватывающее ощущение объемного звучания, которое просто необходимо испытать, чтобы полностью оценить.
Двойные массивы динамиков в F/X Wireless Surround ориентированы на боковые стены и излучают «узкие» звуковые лучи в стороны. Для правильного воспроизведения каналов окружающего звучания двухэлементные массивы работают не в фазе. Это создает акустические нули — области перед динамиком и позади него, где звуковое излучение значительно уменьшается по сравнению с боковым акустическим выходом. Результатом является захватывающий, просторный эффект объемного звучания, в котором преобладают диффузные боковые отражения, в отличие от прямого звука из корпуса, который в противном случае диктовал бы воспринимаемое местоположение источника звука.
Чтобы создать тыловые эффекты объемного звучания, связанные с выделенными тыловыми каналами объемного звучания программного материала 7.1, мы ослабили усиление тыловых каналов объемного звучания и добавили дополнительную задержку, чтобы гарантировать, что пространственные сигналы канала объемного звучания предшествуют синфазному выходу SB. Это помогает сохранить объемность канала объемного звучания, которая была бы потеряна, если бы эффекты объемного звучания были слишком громкими или предшествовали пространственным сигналам канала объемного звучания. В соответствии с общепринятым принципом психоакустики первые приходящие звуковые волны определяют воспринимаемое местоположение источника звука.