TMP36 LCD Temperature Display
The TMP36 sensor is a temperature sensor, and using it with a 16 pin LCD display is a nice way to display the current temperature.
The first thing you must do it include the LCD library so that text can be displayed. This is shown below
Next you need to specify which pins you want to use to display the output. For this example we are using pins 12, 11, 5, 4, 3, 2. You can see more clearly in the Fritzing diagram at the bottom where these pins are located.
Next we declare the analog input pin for the TMP36, for this example we are using pin 1.
Next is the setup function. This returns nothing but sets up the properties of the LCD display including its width in characters, height in characters and the text that is displayed.
Finally we use the loop function which continuously loops through the TMP36’s input and performs a calculation to convert the analog reading into temperature (degrees Celsius). This then gets displayed on the LCD screen, and updates every 1000ms, or every 1 second.
In the end this is what your code should look similar to.
You will need to modify the temp variable’s calculation if you want it in fahrenheit.
Аналоговый термометр (Troyka-модуль): подключение, настройка, схема и примеры использования
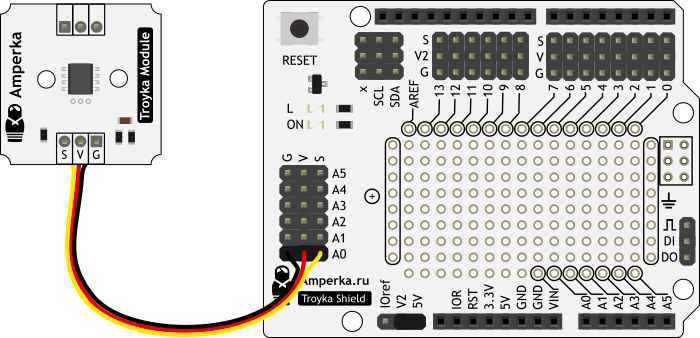
Для измерения температуры окружающей среды воспользуйтесь электронным аналоговым термометром на основе микросхемы TMP36.
Подключения и настройка
Датчик общается с управляющей электроникой по трём проводам. На выходе сенсора — аналоговый сигнал, который сообщает микроконтроллеру об измеренной температуре.
При подключении к Arduino или Iskra JS удобно использовать Troyka Shield.
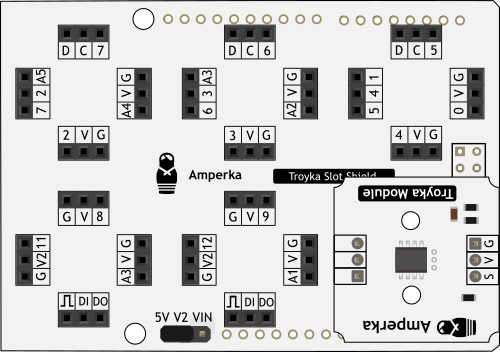
С Troyka Slot Shield можно обойтись без лишних проводов.
Примеры использования
Программа для Arduino
С помощью библиотеки TroykaThermometer, выведем в Serial-порт температуру, используя три шкалы измерения.
Программа для IskraJS
Выведем в Serial порт значения температуры используя четыре разные формы представления данных. Применим модуль thermometer для Iskra JS
Элементы платы
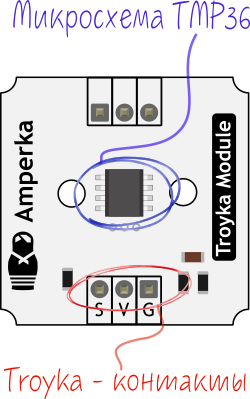
Микросхема TMP36
Микросхема TMP36 от Analog Device — это прецизионный низковольтный датчик температуры. Высокая линейность выходного сигнала, а так же достаточная точность измерений позволяет подключать датчик напрямую к аналоговым входам Arduino/Iskra.
Контакты подключения трёхпроводного шлейфа
Модуль подключается к управляющей электронике по трём проводам. Назначение контактов трёхпроводного шлейфа:
TMP36 analog temperature sensor with Arduino tutorial
In this tutorial, you will learn how to use a TMP36 analog temperature sensor with Arduino. I have included a wiring diagram and several example codes to help you get started!
In the first part of this article, you can find the specifications and information about the TMP35, TMP36, and TMP37 sensors. Next, we will look at how to connect the sensor to the Arduino.
The first code example can be used to take temperature readings from the sensor and display the results in the Serial Monitor. In the second example, I will show you how to display the temperature on an I2C LCD to create a standalone thermometer.
If you would like to learn more about other temperature sensors, check out the articles below.
Recommended articles
Supplies
Hardware components
Software
Makerguides.com is a participant in the Amazon Services LLC Associates Program, an affiliate advertising program designed to provide a means for sites to earn advertising fees by advertising and linking to products on Amazon.com.
About the TMP35/TMP36/TMP37 analog temperature sensors
The TMP35/TMP36/TMP37 are low voltage, precision centigrade temperature sensors made by Analog Devices. They provide a voltage output that is linearly proportional to the temperature in degree Celsius (°C) and are, therefore, very easy to use with the Arduino. Moreover, they are precise, never wear out, and very inexpensive!
The TMP35/TMP36/TMP37 sensors do not require any external calibration to provide a typical accuracy of ±1°C at +25°C and ±2°C over the −40°C to +125°C temperature range.
The difference between the TMP35, TMP36, and TMP37 is their temperature operating range and output scale factor. The TMP35 reads temperatures from 10°C to 125°C and provides a 250 mV output at 25°C. This sensor is functionally compatible with the LM35 made by Texas Instruments. You can find a dedicated tutorial for the LM35 here:
The TMP36 reads temperatures from -40°C to 125°C, provides a 750mV output at 25°C, and operates to +125°C from a single 2.7 V supply. This sensor is functionally compatible with the LM50.
The TMP35 and TMP36 have the same output scale factor of 10 mV/°C.
The TMP37 is intended for an operating range of 5°C to 100°C and provides a 500 mV output at 25°C. This sensor provides a slightly higher precision than the other sensors and has an output scale factor of 20 mV/°C.
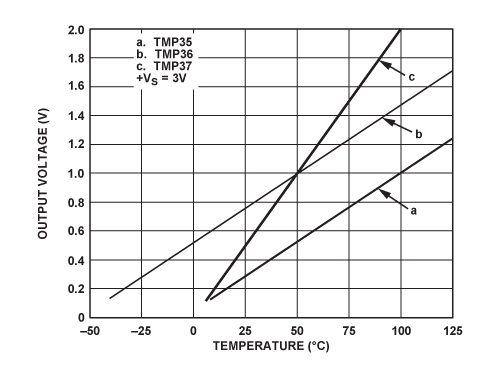
Output voltage (V) versus temperature (°C). Source: Analog Devices
As you can see in the figure above, the output range of all of the sensors is between 0.1 V and 2 V. Note that the output voltage is independent of the supply voltage you use.
TMP35/TMP36/TMP37 pinout
The TMP35/TMP36/TMP37 sensors come in 3 different form factors, but the most common type is the 3-pin TO-92 package, which looks just like a transistor. The TMP36 version of this sensor has the model number TMP36GT9Z.
The pinout of the sensor is given in the figure below:
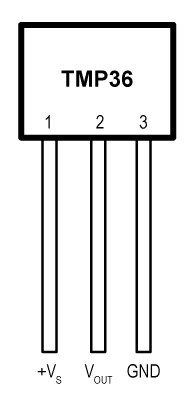
Note that pin 1 (+VS) is the leftmost pin when the flat side of the sensor (with the text printed on it) is facing towards you.
You can find more specifications of the TMP36 in the table below.
TMP36 analog temperature sensor specifications
| Supply voltage | 2.7 V to 5.5 V |
| Quiescent current | 50 µA |
| Temperature range | -40°C to + 125°C |
| Accuracy | ±1°C at +25°C ±2°C from -40°C to +125°C |
| Output scale factor | 10 mV/°C |
| Output voltage at 25°C | 750 mV |
| Package | 3-pin TO-92 |
| Manufacturer | Analog Devices |
| Cost | Check price |
For more information, you can also check out the datasheet here:
Wiring – Connecting TMP36 temperature sensor to Arduino
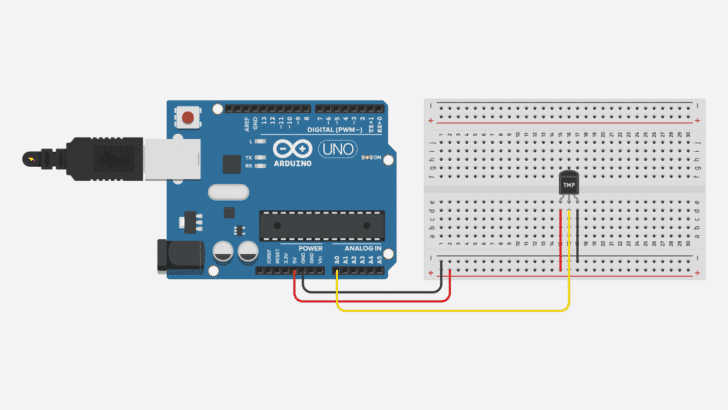
Connecting a TMP36 to the Arduino is very easy as you only need to connect 3 pins. Start by connecting the +VS pin to the 5 V output of the Arduino and the GND pin to the ground. If you are using a 3.3 V Arduino, simply connect +VS to 3.3 V instead.
Next, connect the middle pin (VOUT) to any of the analog inputs of the Arduino. In this case, I used the analog input pin A0.
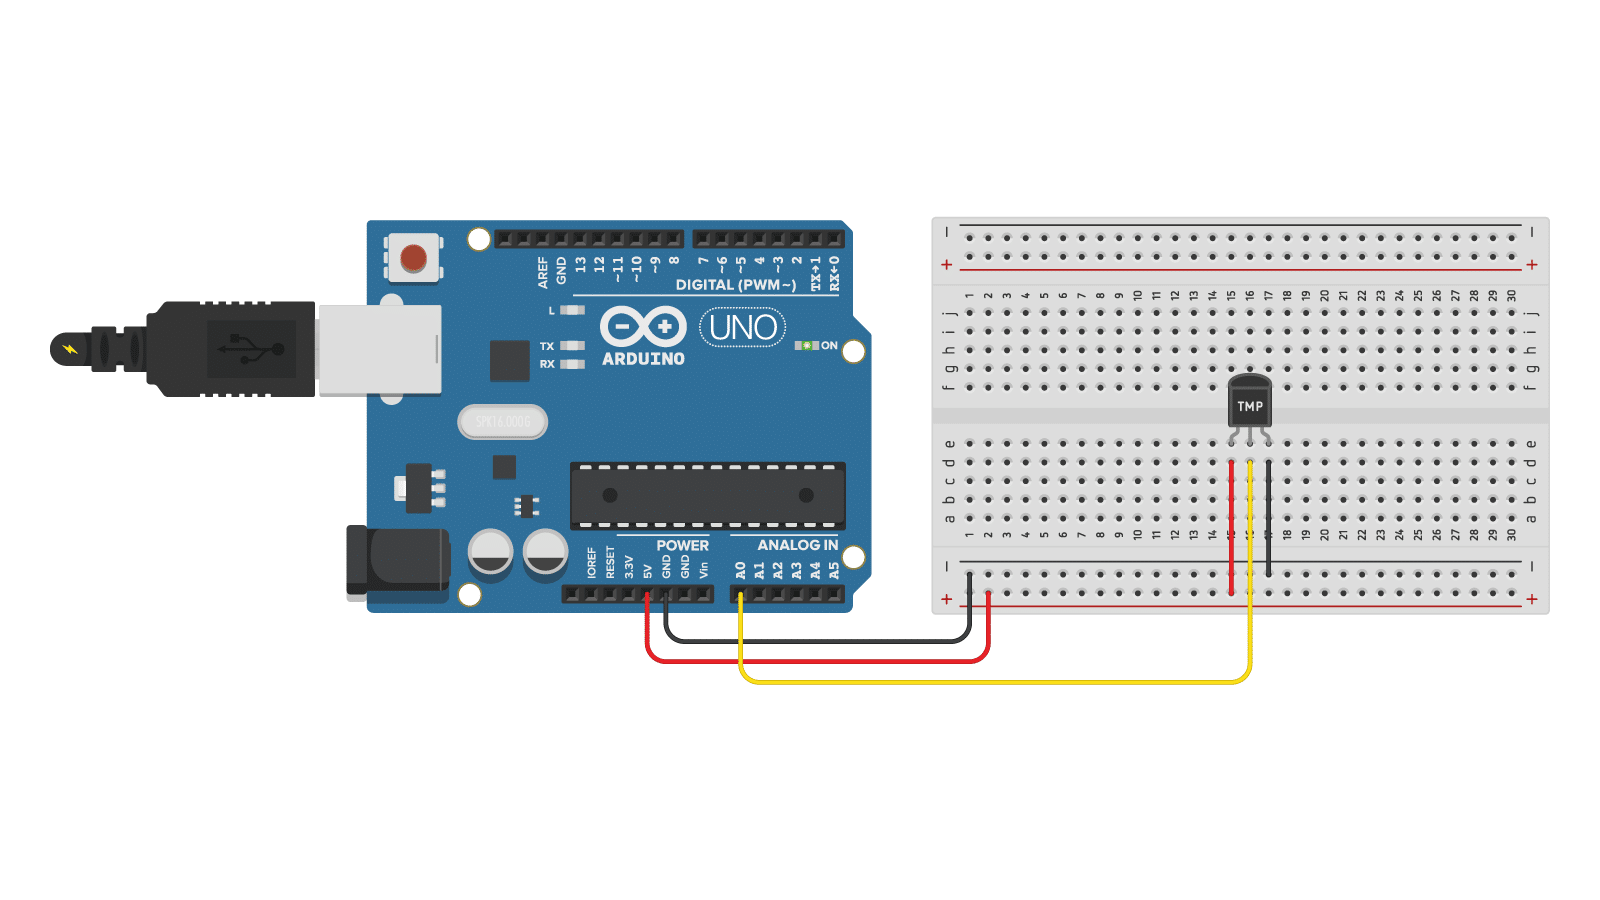
TMP36 analog temperature sensor with Arduino Uno wiring diagram
The connections are also given in the table below:
TMP36 analog temperature sensor connections
| TMP36 | Arduino |
|---|---|
| Pin 1 (+VS) | 5 V |
| Pin 2 (VOUT) | Pin A0 |
| PIN 3 (GND) | GND |
To improve the stability of the sensor, the datasheet recommends adding a 0.1 μF ceramic capacitor between the +VS pin and GND. When you are using long cables, adding a small resistor (e.g. 750 Ω) in series with the signal line (VOUT) can also reduce the noise.
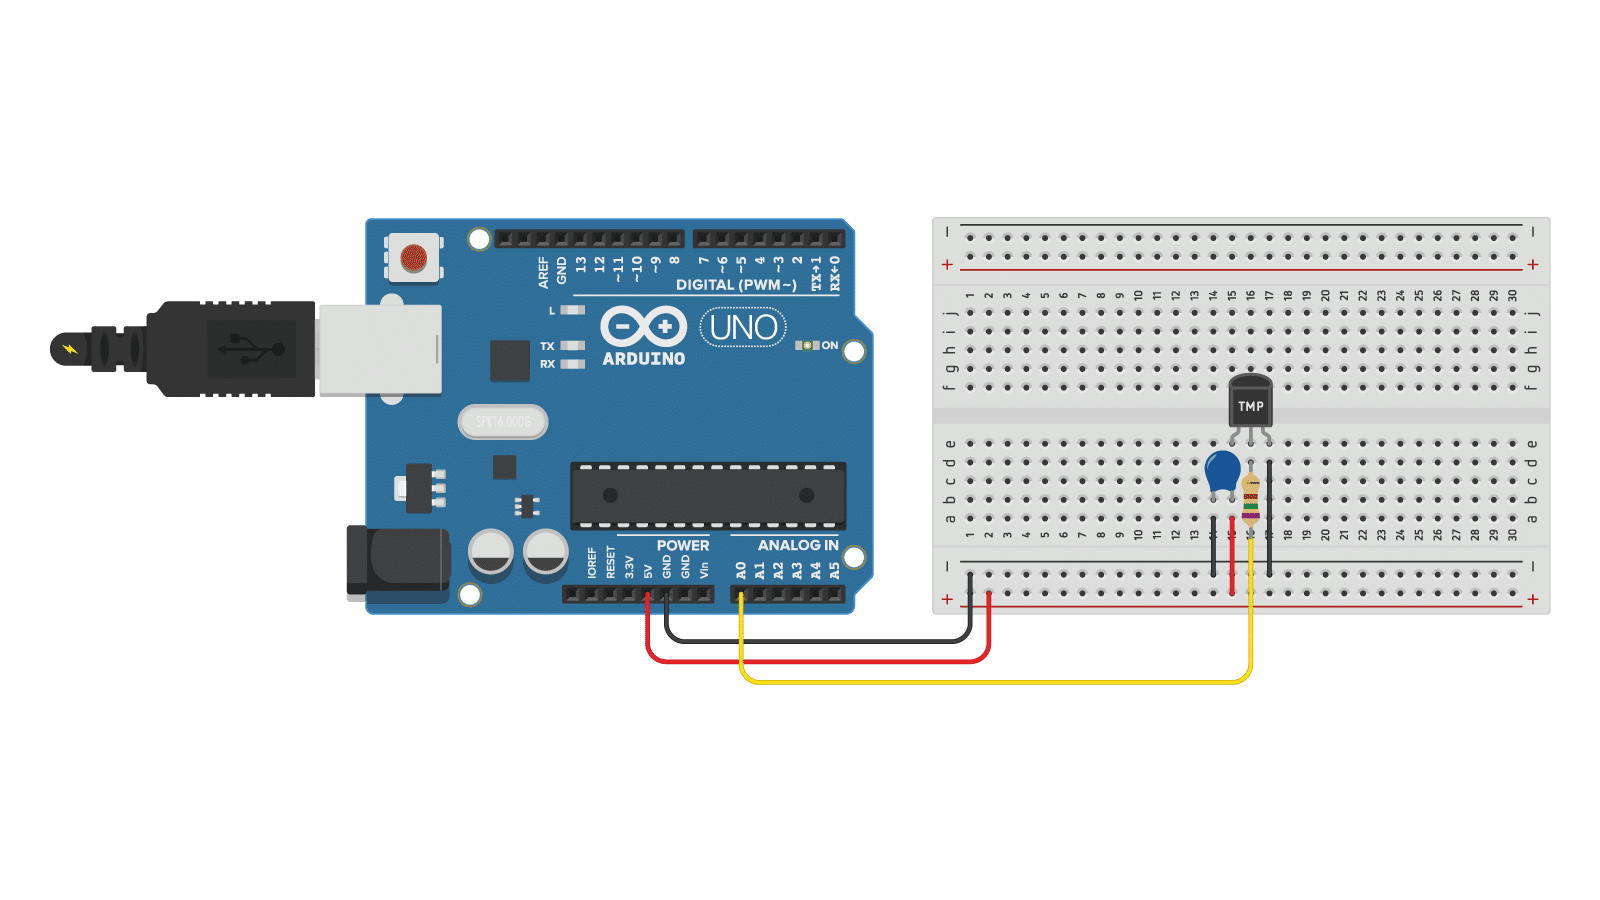
TMP36 with optional resistor and capacitor
When I tested the sensor with an Arduino Uno, I got stable readings without the capacitor and resistor, but your results may vary.
Converting the TMP36 output voltage into temperature
To convert the output voltage of the sensor into the temperature in degree Celsius, you can use the following formula:
Temperature (°C) = (VOUT – 500) / 10
with VOUT in millivolt (mV). So if the output of the sensor is 750 mV, then the temperature is:
(750 – 500) / 10 = 25°C
As you can see in the wiring diagram above, the output of the TMP36 is connected to one of the analog inputs of the Arduino. The value of this analog input can be read with the function analogRead() as you will see in the code examples below. However, the function analogRead(pin) will not actually return the output voltage of the sensor.
Arduino boards contain a multichannel, 10-bit analog to digital converter (ADC), which will map input voltages between 0 and the operating voltage (5 V or 3.3 V) into integer values between 0 and 1023. On an Arduino Uno, for example, this yields a resolution between readings of 5 volts / 1024 units or, 0.0049 volts (4.9 mV) per unit.
So if you use analogRead() to read the voltage at one of the analog inputs of the Arduino, you will get a value between 0 and 1023.
To convert this value back into the output voltage of the sensor, you can use:
VOUT = reading from ADC * (5000 / 1024)
And if you are using a 3.3 V Arduino:
VOUT = reading from ADC * (3300 / 1024)
We will use these formulas in the code examples below.
TMP36 analog temperature sensor with Arduino example code
With the following example code, you can read the temperature from a TMP36 sensor and display it in the Serial Monitor.
You can upload the example code to your Arduino using the Arduino IDE.
To copy the code, click on the button in the top right corner of the code field.
You should see the following output in the Serial Monitor (Ctrl + Shift + M).
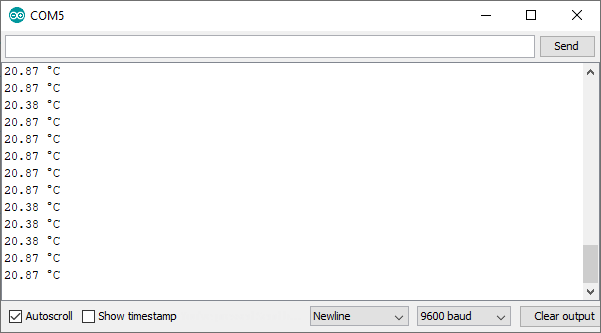 Serial Monitor output
Make sure that the baud rate of the Serial Monitor is also set to 9600.
How the code works
First, I defined to which pin of the Arduino the VOUT pin of the sensor is connected. In this case, we used the analog pin A0. The statement #define can be used to give a name to a constant value. The compiler will replace all references to this constant with the defined value when the program is compiled. So everywhere you mention sensorPin , the compiler will replace it with A0 when the program is compiled.
In the setup section of the code, we begin serial communication at a baud rate of 9600.
In the loop section of the code, we start by taking a reading from the sensor with the function analogRead(pin) .
Next, we use the formulas that I mentioned earlier in the article to convert the reading into voltage and then into temperature.
If you are using a 3.3 V Arduino, like the Arduino Due or Arduino Nano 33 BLE, you need to connect the +VS pin to 3.3 V and replace the highlighted line with:
Lastly, the results are printed in the Serial Monitor:
Display the TMP36 temperature readings on an I2C LCD
If you want to make a standalone thermometer that doesn’t need a computer, it can be nice to know how to display the temperature readings on an LCD display.
With the example code below, you can display the temperature readings on a 16×2 character I2C LCD.
Connecting the I2C LCD is fairly easy as you can see in the wiring diagram below. You can check out my detailed tutorial below for more information.
If you want to use a standard non-I2C LCD instead, take a look at this article:
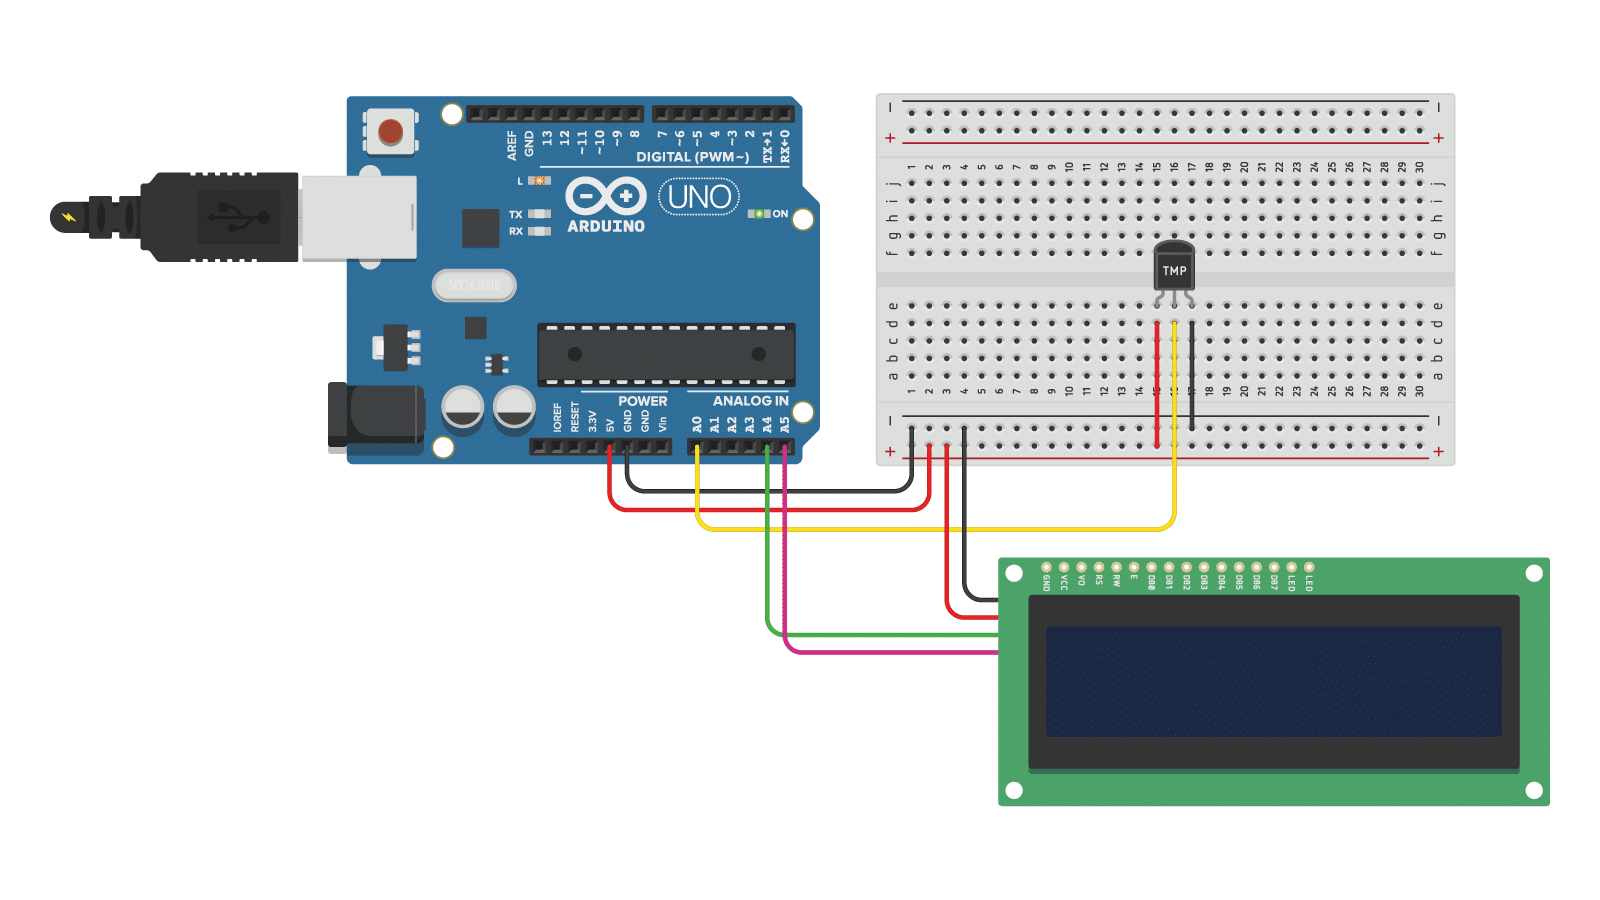
TMP36 analog temperature sensor with 16×2 character I2C LCD and Arduino wiring diagram.
The connections are also given in the table below:
I2C LCD Connections
| I2C Character LCD | Arduino |
|---|---|
| GND | GND |
| VCC | 5 V |
| SDA | A4 |
| SCL | A5 |
Note that the TMP36 temperature sensor is connected in the same way as before.
Installing the required Arduino libraries
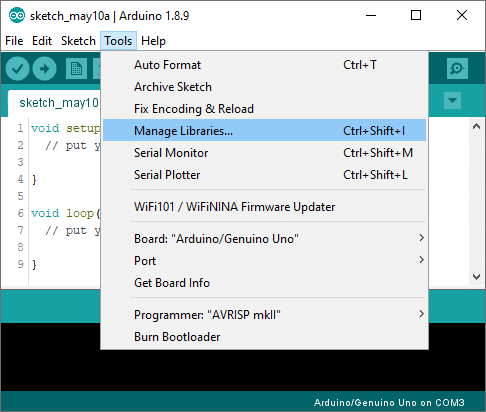
To use an I2C LCD, you need to install the LiquidCrystal_I2C Arduino library.
To install this library, go to Tools > Manage Libraries (Ctrl + Shift + I on Windows) in the Arduino IDE. The Library Manager will open and update the list of installed libraries.
Now search for ‘liquidcrystal_i2c’ and look for the library by Frank de Brabander. Select the latest version and then click Install.
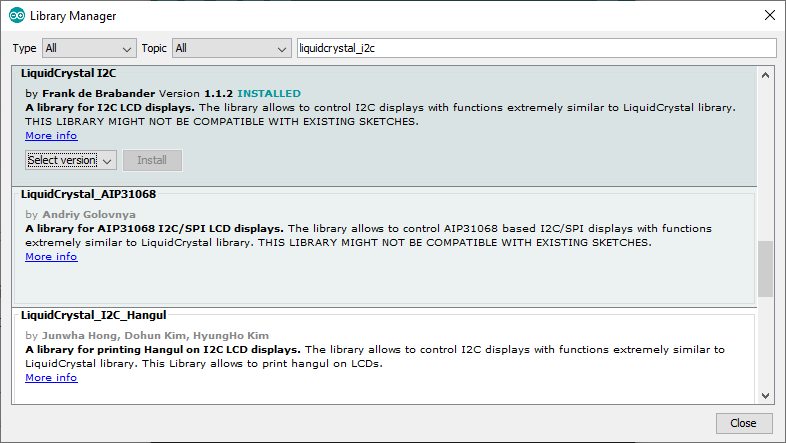 Installing the LiquidCrystal_I2C Arduino library
TMP36 with I2C LCD example code
You should see the following output on the LCD:
Conclusion
In this tutorial, I have shown you how to use a TMP36 analog temperature sensor with Arduino. I hope you found it useful and informative. If you did, please share this article with a friend who also likes electronics and making things.
I would love to know what projects you plan on building (or have already built) with this sensor. If you have any questions, suggestions, or if you think that things are missing in this tutorial, please leave a comment below.
Аналоговый датчик температуры TMP36, Подключение к Arduino

Датчик температуры на выходе которого формируется напряжение пропорционально температуре по шкале Цельсия. Датчик функционально схож с LM35 но не является его полным аналогом.
Характеристики датчика:
- Диапазон температур: −40°C — +125°C
- Точность температуры: типичная, в диапазоне -40°C … +125°C, ±2°C , при температуре 25°C: ±1°C.
- Линейность: ±0.5°C.
- Разрешение: 10.0 mV/°C
- Напряжение на выходе при 25°C: 750мВ.
- Напряжение питания: 2,7В — 5,5В.
Купить:
Особенности работы с датчиком:
Как и у похожего аналогового датчика LM35, на выходе формируется напряжение пропорционально температуре по шкале Цельсия, величина напряжения также 10.0 mV на 1°C, но в отличии от LM35, где отсчет начинается от 0°C и при 25°C датчик формирует напряжение 250mV, TMP36 ведет отсчет от -50°C, а при 25°C на выходе датчика будет 750mV.
TMP36 лишен основного недостатка LM35 при совместном использовании с Arduino, невозможность измерения отрицательных температур, но недостатки все таки пристукивают. При использовании встроенного в микроконтроллер источника опорного напряжения 1,1 вольт, максимальная температура датчика ограниченна 60°C но это всё еще пригодно для домашних или уличных термометров.
Крайне не рекомендуется использовать в качестве опорного напряжения для АЦП, напряжение питания или напряжение от встроенного стабилизатора на 3,3 вольта, подключенное на вход AREF, стабильность тех напряжений крайне низкая, что будет негативно сказываться на точности показаний датчика. Правильным решением будет использование встроенного источника опорного, а если верхняя граница в 60°C не достаточна, либо внешний источник опорного, например MAX6125, либо использовать другой, более подходящий, датчик температуры.
Схема подключения датчика:

Датчик не требует сторонних библиотек, код с использованием встроенного источника опорного ниже. Код актуален для плат на контроллере ATmega328.