String-строки
Мы с вами уже познакомились с символами в уроке про типы данных. Как в обычной жизни, одиночные символы соединяются в слова и строки – это текст, заключённый в двойные кавычки: «Hello, World!» . У нас есть два набора инструментов для работы с ними:
- Статические строки – они же массивы символов char , являются стандартными для языка C/C++ и работают одинаково на любой платформе. О них поговорим в следующем уроке.
- Динамические String -строки, в Arduino за них отвечает отдельная библиотека, которая входит в состав “ядра”. Эти строки просты и удобны в использовании, поэтому сначала разберём работу с ними.
Базовый синтаксис
Создание String
Строка создаётся как обычная переменная:
При создании также можно присвоить строке значение. String позволяет автоматически преобразовывать любой стандартный тип данных в строку:
Помимо такой инициализации, есть ещё вариант с конструктором, он более гибкий: в скобках можно указать значение, а для некоторых типов данных доступны дополнительные настройки:
Более того, данный способ работает быстрее присваивания, так как выделяет память под строку один раз. В варианте с присваиванием сначала выделяется пустая строка, а затем увеличивается под новые данные.
Сложение String
К строке можно прибавить любой тип данных, так же как при создании, по одному действию в строке кода:
Также String позволяет складывать строки между собой при помощи оператора + . В тексте ниже данные имеют любой тип, с которым String поддерживает сложение (см. выше):
- Одним из слагаемых должна быть строка, как выше: стринг + данные или данные + стринг
- Операция сложения возвращает строку обратно, что позволяет сделать “каскад” из таких сложений и собрать строку “одной строкой кода”, сборка происходит слева направо: стринг + данные1 + данные2 или данные1 + стринг + данные2 + данные3
- Результат всей суммы можно:
- Приравнять к String: стринг = стринг + данные1 + данные2
- Отправить в функцию, которая принимает String: f(стринг + данные1 + данные2)
- И так далее
Для сборки строки данный вариант менее предпочтительный, чем предыдущий с += . Ниже разберёмся, почему.
Доступ к символам
К строке можно обратиться как к массиву и прочитать или изменить символ по порядку:
Сравнение String
Стринги можно сравнивать между собой и с обычными строками ( const char* ):
Остальные методы
Рассмотрим все библиотечные методы для работы со строками, они применяются к строке через точку. В рассмотренных ниже примерах “тестовая” строка называется myString. Также оставлю некоторые комментарии по оптимизации.
myString.compareTo(myString2)
- Возвращает отрицательное число, если myString идёт до myString2
- Возвращает положительное число, если myString идёт после myString2
- Возвращает 0, если строки одинаковы
myString.replace(substring1, substring2) – в строке myString заменяет последовательность символов substring1 на substring2.
myString.substring(from) и myString.substring(from, to) – возвращает подстроку, содержащуюся в myString с позиции from и до конца, либо до позиции to
myString.toInt() – конвертирует и возвращает содержимое строки в тип данных int
Проблемы и оптимизация String
Преимущество стрингов заключается в том, что с ними очень легко и удобно работать: собирать из других строк и переменных любых типов, складывать между собой, делить на подстроки и так далее. За удобство приходится платить: String является динамическим объектом (читай урок про динамическую память), что влечёт за собой некоторые проблемы. Также на форумах часто критикуют String и предлагают использовать вместо них обычные си-строки, давайте рассмотрим всё вместе:
- String – тяжёлый. Несомненно – использование String-строк сразу добавляет пару килобайт Flash памяти к весу программы, так как для работы с ними используется менеджер памяти (встроенная библиотека). В то же время, если в программе уже используется динамическое выделение памяти – добавление String будет заметно не так сильно. На этом данная проблема заканчивается, потому что если открыть реализацию библиотеки String, то можно увидеть, что все действия со строками выполняются при помощи стандартных строковых функций языка Си (подробнее – в следующем уроке).
- String – медленный. Да, когда строка меняет свою длину – она начинает менять свой размер и даже место в оперативной памяти микроконтроллера. Переписывание и перераспределение памяти происходит отнюдь не мгновенно, поэтому операции со String выполняются относительно долго: сотни микросекунд. Если собирать строку посимвольно – каждая прибавка будет выполняться дольше, чем хотелось бы! Этого можно избежать, используя метод reserve() , который зарезервирует память, чтобы увеличение строки происходило без выделения памяти (подробнее об этом ниже). Если место под строку зарезервировано – операции со строкой будут выполняться с такой же скоростью, как и с обычными строками, потому что для них используются те же стандартные строковые функции.
- String – опасный. Всё верно, неаккуратная работа со String может привести к сильной фрагментации памяти, неправильной работе программы и даже полному её зависанию. В то же время, если понимать как работают стринги и использовать эффективные и безопасные конструкции в работе с ними – можно избежать абсолютно всех проблем!
Использование памяти
Несмотря на то, что строка – это динамический инструмент, в реализации Arduino она может только увеличиваться. Это означает, что если у нас была длинная строка, а затем мы её обнулили – места в памяти она не стала занимать меньше! То есть
Следующая созданная стринга будет размещена в памяти сразу за предыдущей. Возникает вопрос: а как тогда удалить строку и освободить память? Очень просто:
- Если строка создана глобально – никак, в библиотеке не предусмотрено публичного инструмента для очистки строки.
- Если строка создана локально – она автоматически выгрузится из памяти, когда код дойдёт до закрывающей фигурной скобки, за которой она уже не существует.
Сложение строк
Самый плохой вариант, который только можно себе представить, выглядит вот так:
Так делать нельзя, но тем не менее, на форумах очень часто можно встретить этот вариант. Здесь плохо всё: создаётся несколько “временных” экземпляров строки, под каждый выделяется память, тратится время, в результате каждый кусок начинает смещаться по памяти вперёд на новое место и изначальная строка прыгает в самый конец этого “паравозика”, образуя “дырку” в памяти (фрагментацию)!
Для сборки строки из нескольких частей рекомендуется использовать исключительно вариант с построчным прибавлением += . Пусть он не такой визуально компактный, как сложение “в одной строке кода”, но он позволяет избежать создания лишних экземпляров String, лишних перераспределений памяти и самое главное – не приводит к её фрагментации и выполняется гораздо быстрее:
Фрагментация памяти
Тут есть ещё один важный момент: если в процессе такой сборки строки создать ещё одну строку – это приведёт к сильной фрагментации памяти! Например:
В конце выполнения этого кода собранная строка состоит условно из 25 символов и должна занимать в памяти 25 байт. Но с начала выполнения этого кода свободная память уменьшилась на 50+5 байт! Как и почему это произошло:
- Перед созданием второй строки у нас уже есть строка, представим её как блок памяти [——str——]
- Мы создаём ещё одну строку, она располагается в памяти сразу за предыдущей строкой (так работает менеджер памяти) [——str——][—str2—]
- Теперь мы прибавляем к первой строке вторую: вторая строка остаётся в памяти, она никуда не пропадает, а первой нужно больше места. Поэтому менеджер памяти переносит первую строку на место сразу после второй и в памяти остаётся “дырка”! [ дырка ][—str2—][——str-str2——]
- В итоге “край” свободной памяти смещается на длину первой строки плюс длину второй строки. Беда!
С небольшими строками и кучей свободной памяти данная ситуация нам ничем не страшна, но если вы неправильно собираете например веб-страницу или другой ответ серверу – строка может начать занимать в несколько раз больше места, чем должна, и свободная оперативная память просто закончится!
Аналогичная ситуация произойдёт в том числе при вот такой записи, здесь тоже будет создана новая стринга в процессе сборки первой:
- Избегать создания новых строк в процессе работы с уже имеющимися
- Резервировать место под “прибавку”, прибавлять, а затем удалять вторую строку из памяти. Рассмотрим этот вариант
Сценарий первый, строка создаётся как переменная
Мы поместили создание второй строки в отдельный блок кода, чтобы она автоматически удалилась из памяти после выхода из этого блока.
Сценарий второй, преобразование
Как это работает:
- Была строка [——str——]
- Мы её расширили [——str—— ]
- Создали вторую строку [——str—— ][—str2—]
- Переписали [——str——str2—][—str2—]
- Удалили временную строку [——str——str2—]
- Осталась сумма и никаких препятствий в памяти
Резервирование памяти
Вернёмся к первому примеру: можно ещё сильнее оптимизировать сборку строки, если сразу зарезервировать место. Мы не знаем, какой длины она будет, но можем прикинуть. Можно даже зарезервировать чуть больше, это не так страшно:
Теперь каждое прибавление не будет приводить к перераспределению памяти и код выполнится быстрее. Также создание промежуточных строк не будет приводить к фрагментации памяти, потому что строке есть куда расти!
Оптимизация памяти
Забегая немного вперёд – текст в двойных кавычках хранится и в программной памяти программы (которой много), и в оперативной (которой мало). В уроке про PROGMEM мы рассмотрим несколько способов оптимизации памяти, но уже сейчас можно начать применять макрос F() – данный макрос позволяет хранить строку только в программной памяти и доставать её оттуда только для сложения со стрингой. Например после выполнения вот такого безобидного кода
Текст «Hello» окажется продублирован в памяти микроконтроллера целых 3 раза!
- Текст всегда хранится в памяти программы
- При запуске МК текст переписывается в оперативную память, чтобы можно было иметь к нему доступ. Находится там на всём протяжении работы программы
- Мы создали стринг-строку, в которую скопировали этот текст. Копия будет находиться в памяти, пока строка не будет удалена из памяти
Если обернуть текст в макрос F() – он будет загружаться из программной памяти напрямую в строку, и удалится из неё вместе со строкой:
Таким образом этот макрос крайне рекомендуется использовать для сборки строки с участием строковых констант. Вернёмся к нашему примеру:
Именно так и рекомендуется собирать строки.
Передача в функции
Функции очень многих библиотек для Arduino принимают String-строки. Это может быть вывод на дисплей, отправка в веб и многое другое. Если посмотреть реализацию этих функций – они принимают тип данных String& или const String& . Это – ссылка на строку, подробнее читайте в уроке про указатели и ссылки.
Как это работает и зачем: допустим вам нужна функция, которая принимает строку и что то с ней делает, например выводит в монитор порта. Это будет выглядеть примерно так:
Проблема в том, что когда мы передадим в эту функцию строку
она будет продублирована в памяти, то есть внутри нашей функции будет копия переданной строки. Если строка большая, а свободной памяти мало – быть беде. Если передать строку по ссылке – внутри функции окажется именно наша строка, лишней копии не будет.
Рекомендуется делать именно так.
Далее, если вы захотите помимо String-строк отправлять в свою функцию строковые константы (текст в кавычках) или текст внутри макроса F() для экономии памяти, то нужно будет добавить слово const :
Такая конструкция сможет эффективно принимать любые строковые данные для дальнейшей работы:
Сборка строки в отдельной функции
Довольно частый сценарий – сделать себе функцию, которая будет собирать строку из каких то данных, переданных в функцию или из глобальной области. Например, для дальнейшей отправки этой строки куда-нибудь. Это можно сделать двумя способами, первый очевидный: сделать функцию, которая возвращает тип String , внутри неё создать строку, заполнить чем нужно и вернуть обратно:
В этом случае не происходит фрагментации памяти, строка не дублируется в памяти, так как библиотека String предусматривает такой сценарий и буквально перемещает строку без создания копии. Но есть вариант лучше: создать строку там где она нужна, и передать её в функцию, которая изменит строку. Передавать будем по адресу, чтобы внутри новой функции это была та же самая строка. Возвращать из функции ничего не нужно:
Такой вариант работает чуточку быстрее (на пару десятков мкс на AVR) и использует чуть меньше оперативной памяти в рамках всей конструкции (около 10 байт на AVR по моим тестам).
Другие библиотеки
Ради интереса я написал свою версию String, но без использования динамической памяти: максимальный размер строки задаётся при её создании, это позволяет сэкономить в сумме около 2 кБ Flash на одних и тех же операциях со строкой. Библиотека имеет такой же набор методов и возможностей, как у String, что позволяет легко заменить стандартные стринги на мои, а также там есть несколько дополнительных фишек. Библиотека называется mString, документацию и примеры смотрите на GitHub.
Arduino int to string: How to convert an integer to a string. Find out the standard form and Learn how to code it yourself. Also find the one subtle error you missed.
If you want to know how it really does its magic, this page will also show you fundamental code for Arduino int to strings conversion .
Standard form of Arduino int to string
The function you need is itoa() which has the prototype:
char *itoa( int value, char *str, int base);
- value — is the integer you want to change to a string.
- str — is a string buffer that stores the string.
- base — is the conversion radix.
The function takes the above arguments and returns a string (it is basically the same string buffer that you gave it!).
You supply the integer value, a pointer to buffer that will store the string ‘str’ and then specify the base which can be any number, but common ones are:
- 10 for decimal,
- 16 for hexadecimal,
- 2 for binary
The base can be any integer — but you’ll get odd characters above 36 — and eventually run out of characters!
The name of the function is an acronym for int to ASCII — itoa.
Where ASCII is another acronym standing for American Standard Code for Information Interchange. It defines is a table of characters.
String Buffer length
The string buffer must allow room for the maximum characters that can be created when converting an integer.
If you don’t you could overwrite other variables causing random output!
For example a decimal string requires 5 characters, space for a minus sign, and a null termination ‘\0’. So a buffer of length 7.
Hexadecimal requires 4 characters and a null termination ‘\0’.
Binary requires 16 characters and a null termination ‘\0’.
Simple Arduino int to string example
static char buf[17];
char *convertBin( int v ) <
return itoa(v, buf, 2);
Fundamental Code: Arduino int to string conversion
Introduction
How to code itoa from first principles.
For the Arduino Uno, integers are defined as 16 bits long. The C standard does not specify the length of an integer so for a different chip e.g. a 32 bit processor such as the ESP32, an integer could have a different length (probably 32 bits!).
If you really want to tie down the compiler use the type below:
int16_t <variable name>;
which (for the Uno) is the same as:
int <variable name>;
Both of the above are signed integers that use the two’s complement representation of binary numbers.
It is important to know the length (in bits) of the integer since that determines the maximum possible string length. That means you can set the minimum required string buffer length in your code. So for an integer, the range is:
If this was an unsigned integer then the range would be:
So for a signed integer, the maximum string length buffer required is 6 characters (including minus sign). Unsigned requires 5 characters.
The maximum buffer length for both signed and unsigned integers is 7 characters (including the null string terminator).
Arduino int to string Algorithm
Now you have the fundamental information on the input and output variables you can start to write the algorithm.
uint16_t v
char buf[7];First of all determine the sign and store that information
Also normalize the number so you are working only with positive integers.
Since we use base 10 numbers the number we process will be divided by 10 each time around a loop — the remainder is the bit we store in the buffer.
So lets say we have a number 12345 to convert into a string.
As you can see, the buffer content is reversed, so to finalise the result you have to reverse the buffer content, remembering to add the sign character if needed.
Arduino int to string Code
//****************************************************
// Find more Arduino Projects and Tutorials at TronicsBench.com
//
// Written by John Main.
//
// MIT license, all text above must be included in any redistribution
// ****************************************************char *dectoa(int16_t v , char *str) <
char *p = str, *buf=str;
char ch;
byte sign = 0;// Special case if input is zero — display a zero!
if (v==0) <
str[0] = ‘0’;
str[1] = ‘\0’;
return str;
>// // This commented-out code has a subtle problem
// if (v < 0)
// sign = 1;
// v = -v;
// >if (v < 0)
sign = 1;// Add the sign character if needed.
if (sign)
*str++ = ‘-‘;// Now reverse the string
str—; // at last character.void showValBuf(int v,char *buf) <
Serial.print(«Input variable v is: «);
Serial.println(v);
Serial.print(«String buffer is «);
Serial.println(buf);
Serial.println(«void setup() <
static char buf[7];Serial.begin(115200);
Serial.println(«Dec to A»);int v = 12345;
dectoa(v,buf);
showValBuf(v,buf);v = 102;
dectoa(v,buf);
showValBuf(v,buf);v = 0;
dectoa(v,buf);
showValBuf(v,buf);v = -4783;
dectoa(v,buf);
showValBuf(v,buf);v = INT16_MAX;
dectoa(v,buf);
showValBuf(v,buf);v = INT16_MIN;
dectoa(v,buf);
showValBuf(v,buf);v = 40000;
dectoa(v,buf);
showValBuf(v,buf);void loop() <
// put your main code here, to run repeatedly:Ouptut from the code
A gotcha: Arduino int to string
I had a bit of trouble with this one and its useful for you to see how subtle problems can arise in any code.
I originally wrote that code as follows (commented out in above code):
Which has the intention of detecting a negative number and normalising it to a positive one, so that only positive values are used in the while loop. It means that the index into the ASCII array is positive and depends on the positive remainder value.
This all sounds very reasonable until you actually test it!
All reasonable numbers work fine. But testing an unreasonable number at the limits of the signed integer type shows a problem:
Normal numbers are fine:
Input variable v is: 12345
String buffer is 12345Input variable v is: -4783
String buffer is -4783dectoa(INT16_MAX,buf) & dectoa(INT16_MIN,buf) gives:
Input variable v is: 32767
String buffer is 32767Input variable v is: -32768
String buffer is —.)*(It outputs garbage even though the code is entirely reasonable!
This type of problem takes a while to sort out because the code is syntactically correct!
First you have to identify the problem which involves writing lots of Serial.print outputs and this lets you narrow down where the problem is located.
In this case the index value into the array was negative!
So looking at the specific case of INT16_MIN and printing the hex output helps.
Performing a two’s complement for negating the value gives:
complement: 0x7fff
add one :0x8000Input : 0x8000 (or -32768)
output : 0x8000 (or -32768)So in the C code when writing.
. has no effect and does not make the value positive!
This is due to the operation of the two’s complement addition.
Here v = -v results in the same negative number as -32768 can not be represented as a positive value! therefore the index into the ASCII table is negative which is why garbage is output.
How to solve it
Since the % operator can work with negative values the solution is to ‘not’ negate the variable v in the sign detection condition, and instead use the abs function on the smaller index values i.e.
*str++ = v % 10 + ‘0’; // zero = ascii ‘0’
*str++ =abs(v % 10) + ‘0’; // zero = ascii ‘0’
Full code with base control
The following code adds the ability to control the conversion radix (or base). It gives you the same operation as the commonly used itoa function.
It means you can output a number in any base e.g. hexadecimal is base 16, binary is base 2.
Note however that leading zeros are not output, and you must allow the string buffer more room i.e. for a binary output there are a possible 16 characters!
//****************************************************
// Find more Arduino Projects and Tutorials at TronicsBench.com
//
// Written by John Main.
//
// MIT license, all text above must be included in any redistribution
// ****************************************************char *_itoa(int16_t v , char *str, int base) <
char *p = str, *buf=str;
char ch;
byte sign = 0;// Special case if input is zero
if (v==0) <
str[0] = ‘0’;
str[1] = ‘\0’;
return str;
>int rem = abs(v % base);
// Set index into ASCII — numbers over 9 start from ‘A’
ch = ‘0’;
if (rem>9) <
rem -=10;
ch = ‘A’;
>*str++ = rem + ch; // zero = ascii ‘0’
// Add the sign character if needed.
if (sign)
*str++ = ‘-‘;// Now reverse the string
str—; // at last character.void showValBuf(int v,char *buf) <
Serial.print(«Input variable v is: «);
Serial.println(v);
Serial.print(«String buffer is «);
Serial.println(buf);
Serial.println(«void setup() <
int v;
char buf[27];Serial.begin(115200);
Serial.println(«Dec to A»);v = 12345;
_itoa(v,buf,10);
showValBuf(v,buf);v = INT16_MIN;
_itoa(v,buf,10);
showValBuf(v,buf);
_itoa(v,buf,16);
showValBuf(v,buf);v = INT16_MAX;
_itoa(v,buf,10);
showValBuf(v,buf);_itoa(v,buf,16);
showValBuf(v,buf);v = 0x7ffe;
_itoa(v,buf,16);
showValBuf(v,buf);v = 102;
_itoa(v,buf,10);
showValBuf(v,buf);v = 0;
_itoa(v,buf,10);
showValBuf(v,buf);v = -4783;
_itoa(v,buf,10);
showValBuf(v,buf);v = 40000;
_itoa(v,buf,10);
showValBuf(v,buf);v = 0xff;
_itoa(v,buf,2);
showValBuf(v,buf);v = 0x5a;
_itoa(v,buf,2);
showValBuf(v,buf);void loop() <
// put your main code here, to run repeatedly:Output from above code
Conclusions
The built in version works as expected; You can obtain a string version of an integer translated using any radix (number base).
Remember to allow enough characters in the buffer string to accept the maximum conversion length — which varies depending on the radix!
You have learned, from this page, how to code the Arduino int to string function — itoa — from first principles.
If you code it yourself there are unexpected subtle problems (explored above) that are not to easy to solve or debug. They are solved above and give you a good idea of what it takes to figure out code/hardware.
How to Convert Integer to String Arduino
Arduino is a microcontroller-based platform consisting of both software and hardware. Arduino programming is based upon the C/C++ language. Multiple functions used in Arduino are inherited from both these languages. This article will describe different ways of converting int into string using C functions in Arduino IDE.
Methods to Convert int to String in Arduino
Int to string conversion is the process of converting an integer data type to a string data type using the Arduino code. This is often necessary when working with programming languages, as different data types have different characteristics and methods of manipulation.
For example, an integer may be used to perform mathematical calculations, while a string may be used to hold text data. In order to use the data stored in an integer as a string, it must first be converted to the string data type.
Multiple C functions are available that can be used in Arduino programming for converting int to string. Following are the three ways that can convert any integer to a string:
1: Using String() Function
String function in Arduino programming is the simplest way of transforming int to string. String() function constructs an instance of string class. Using this function different data types can be converted to string including the int.
Syntax
String() function syntax:
Parameters:
This function takes one parameter:
val: A variable to format into a string.
Returns:
It returns a string.
Example Code
Following is the example code where we initialize a variable “a” with int data type. After that a new string is initialized with the name myStr. Next using the String() function variable a is returned as an instance of string.
Serial.begin ( 9600 ) ; /* Baud rate for serial communication */
int a = 1234 ; /* Initialize a string with value 1234 */
String myStr; /* New string is defined */
myStr = String ( a ) ; /* Convert Int to String */
Serial.print ( "Integer Converted to String: " ) ;
Serial.println ( myStr ) ; /* Print string value on serial monitor */
We can see the converter string in the IDE serial monitor.

2: Using sprintf() Function
The sprintf stands for String print. This function takes value from variables and stores it inside the buffer. To show the variable formatted as string inside that buffer we use the Serial.print() function.
Syntax
Parameters
This function takes two arguments.
- First argument buffer will store the characters inside the array.
- Second argument is the int variable or any other string which is to be stored.
- %d is the format specifier for signed decimal integers. It tells sprintf() that what datatype of variable is to be stored inside the buffer.
Returns
It returns a buffer which stores a string.
For more detailed information on Arduino sprintf() function read the article How to Print Multiple Variables Using sprintf() function in Arduino Serial Monitor.
Example Code
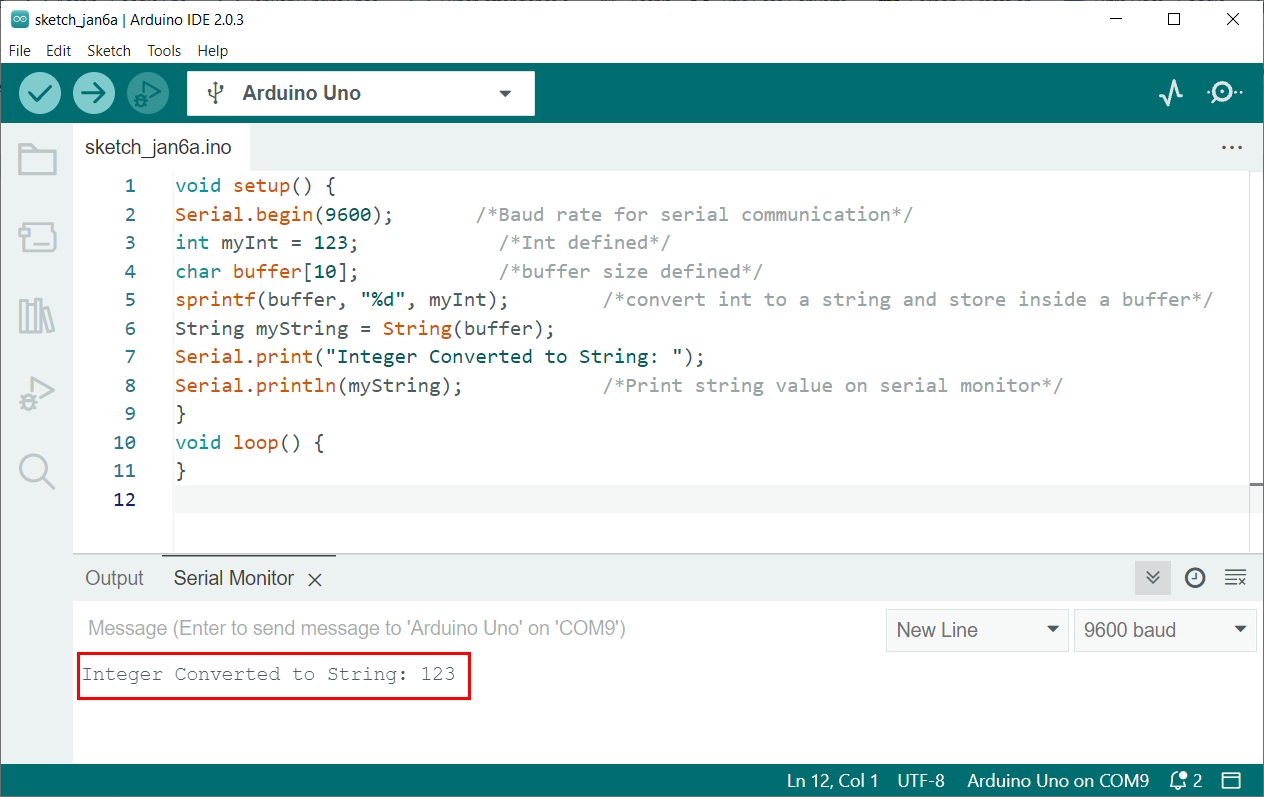
In given code an int variable is initialized. After that using the sprintf() function this integer value is converted to string and stored inside the buffer.
Serial.begin ( 9600 ) ; /* Baud rate for serial communication */
int myInt = 123 ; /* Int defined */
char buffer [ 10 ] ; /* buffer size defined */
sprintf ( buffer, "%d" , myInt ) ; /* convert int to a string and store inside a buffer */
String myString = String ( buffer ) ;
Serial.print ( "Integer Converted to String: " ) ;
Serial.println ( myString ) ; /* Print string value on serial monitor */
Output represents the integer converted to string.
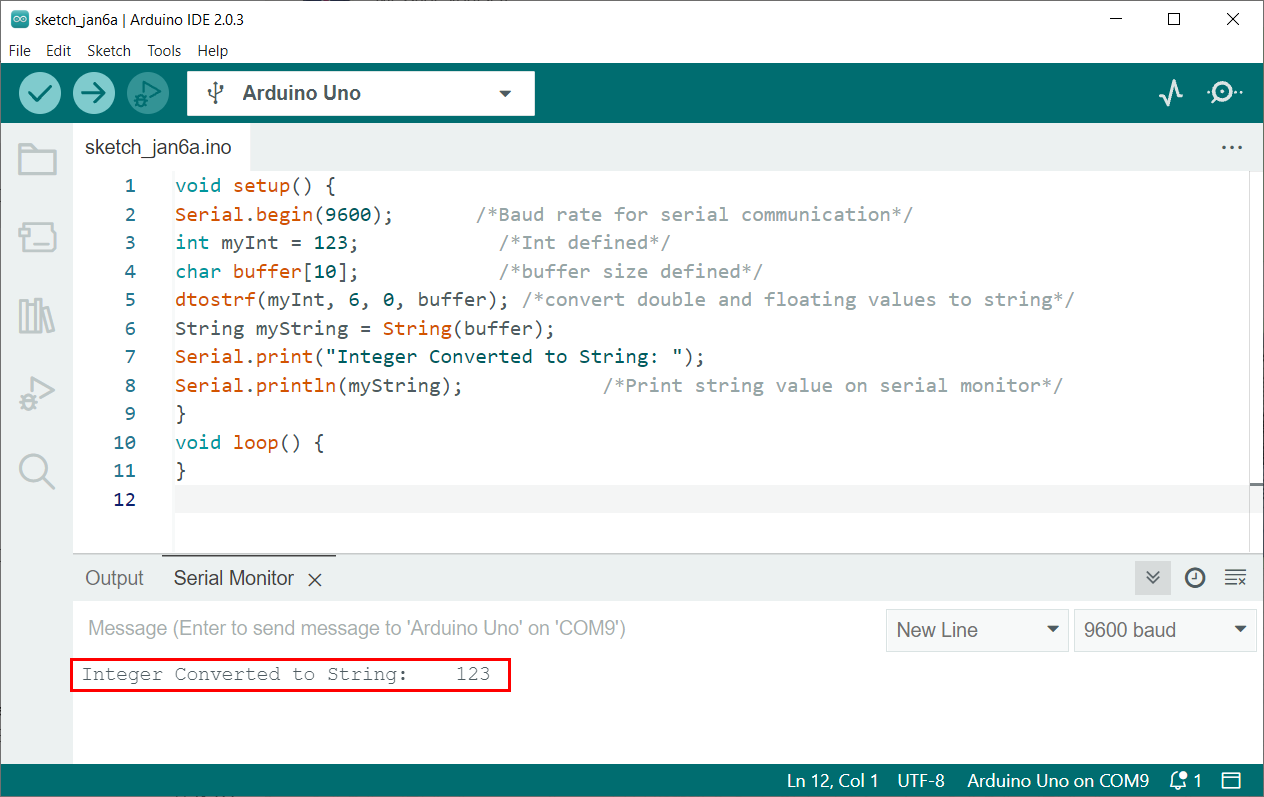
3: Using dtostrf() Function
Arduino dtostrf() function allows you to specify the minimum width and number of decimal places for the resulting string.
This function can pass a double value and convert it into a ASCII representation which is stored inside the string.
Syntax
Parameters
This function takes 4 arguments:
- Float value (Type double)
- Min string width (Type char)
- Number after decimal (Type char)
- Char buffer (Type char)
Return
This function returns a new pointer towards the string converted from int.
For a more detailed guide on the dtostrf() function read the tutorial Arduino dtostrf() Function -Turn Your Floats into Strings.
Example Code
This will create a string with a minimum width of 6 characters and no decimal places, so the resulting string will be ” 123“.
Serial.begin ( 9600 ) ; /* Baud rate for serial communication */
int myInt = 123 ; /* Int defined */
char buffer [ 10 ] ; /* buffer size defined */
dtostrf ( myInt, 6 , 0 , buffer ) ; /* convert double and floating values to string */
String myString = String ( buffer ) ;
Serial.print ( "Integer Converted to String: " ) ;
Serial.println ( myString ) ; /* Print string value on serial monitor */
Output represents the string “ 123”. Three left spaces are left as the width defined for the output string is 6.
Conclusion
Arduino programming takes most of its function from C/C++. To convert integer into string in Arduino programming three different functions are there that includes dtostrf(), sprintf(), and String(). Using these functions any of the integers can be converted into string and displayed on either serial monitor or some I2C LCD or OLED display.
About the author

Kashif
I am an Electrical Engineer. I love to write about electronics. I am passionate about writing and sharing new ideas related to emerging technologies in the field of electronics.
How to convert int to string on Arduino?
How do I convert an int, n , to a string so that when I send it over the serial, it is sent as a string?
This is what I have so far:
1000 bytes larger, so you may not want to use it if size is a problem." playground.arduino.cc/Main/Printf
10 Answers 10
You can find more examples here.

use the itoa() function included in stdlib.h
You can simply do:
which will convert n to an ASCII string automatically. See the documentation for Serial.println() .

You just need to wrap it around a String object like this:
You can also do:
This is speed-optimized solution for converting int (signed 16-bit integer) into string.
This implementation avoids using division since 8-bit AVR used for Arduino has no hardware DIV instruction, the compiler translate division into time-consuming repetitive subtractions. Thus the fastest solution is using conditional branches to build the string.
A fixed 7 bytes buffer prepared from beginning in RAM to avoid dynamic allocation. Since it’s only 7 bytes, the cost of fixed RAM usage is considered minimum. To assist compiler, we add register modifier into variable declaration to speed-up execution.
This sketch is compiled to 1,082 bytes of code using avr-gcc which bundled with Arduino v1.0.5 (size of int2str function itself is 594 bytes). Compared with solution using String object which compiled into 2,398 bytes, this implementation can reduce your code size by 1.2 Kb (assumed that you need no other String’s object method, and your number is strict to signed int type).
This function can be optimized further by writing it in proper assembler code.