How to Install Visual Studio Code on Raspberry Pi OS
This tutorial is an excellent guide to install Visual Studio Code on Raspberry Pi OS easily.
How to Install Visual Studio Code on Raspberry Pi OS
Since Visual Studio Code is a lightweight source editor, you can run it smoothly on your Raspberry Pi device. However, to begin the installation first, you must update current packages on your system using the following command:
After completing the package upgrade, you are good to install Visual Studio Code on Raspberry Pi and you can follow the below two methods to install it on your Raspberry Pi system:
- Install Visual Studio Code from Raspberry Pi Repository
- Install Visual Studio Code from Recommended Software Option
1: Install Visual Studio Code from Raspberry Pi Repository
You can directly install the latest version of Visual Studio Code from the official Raspberry Pi repository using the below-mentioned command:
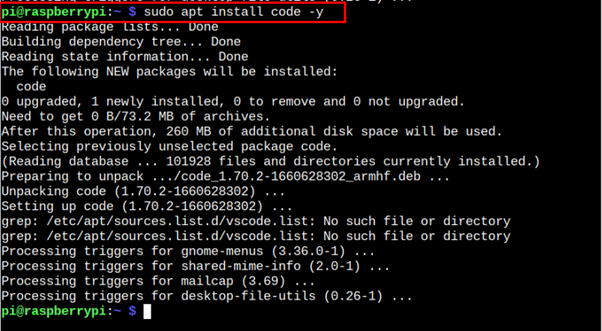
After the installation, ensures that you have install the latest version of Visual Studio Code on your system because the latest version comes up with enhanced features.

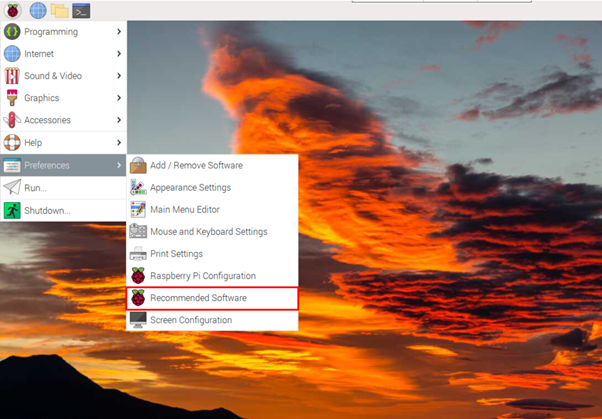
2: Install Visual Studio Code from Recommended Software Option
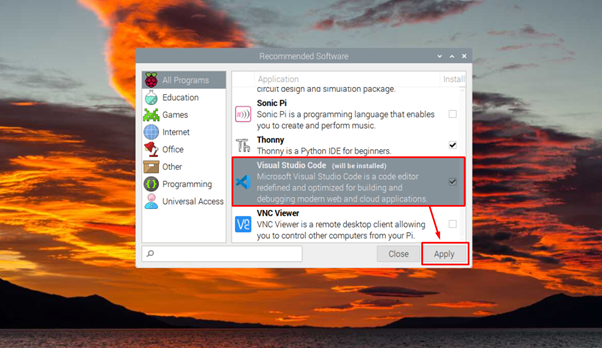
Since Visual Studio Code is an efficient programming tool, the Raspberry Pi developers include its installation in the Recommended Software Option of the Raspberry Pi. To open this option, go to your Raspberry Pi main menu and you will find this option in the “Preferences” section.
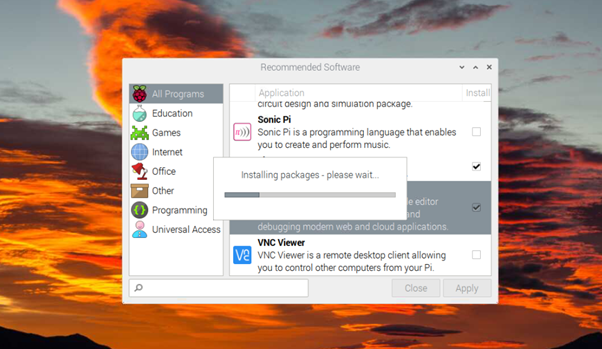
You will find “Visual Studio Code” in the “All Programs” section. Follow the onscreen instruction for installing the IDE on your Raspberry Pi system.
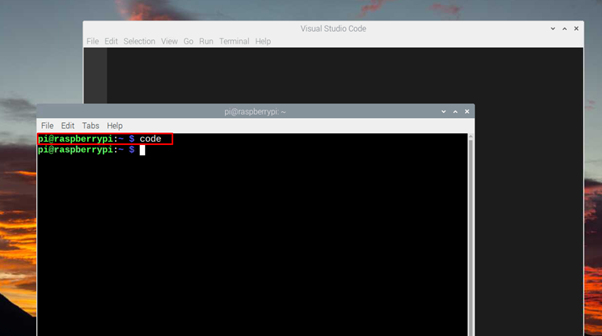
Run Visual Studio Code on Raspberry Pi
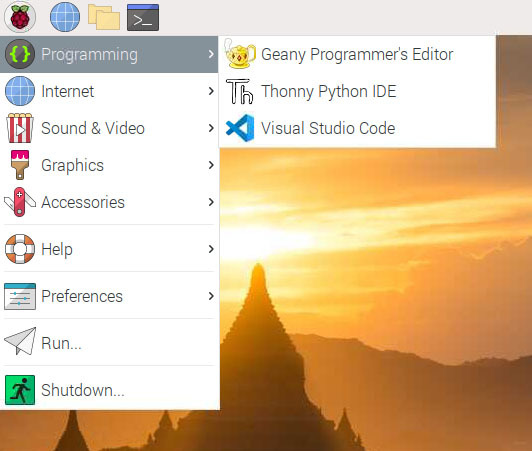
There are two ways to run Visual Studio Code on Raspberry Pi, either you can run it from the “Programming” section of the main menu, or you can run it directly from the Raspberry Pi terminal using the “code” command.

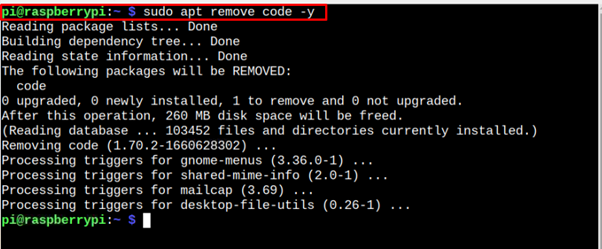
Remove Visual Studio Code from Raspberry Pi
To remove Visual Studio Code from the Raspberry Pi repository, you should apply the following command:
Conclusion
Visual Studio Code is an efficient source code editor that allows you to write code in multiple programming languages, such as Python, Java, JavaScript and more. You can install this editor either from the official Raspberry Pi repository or through Recommended Software Option available in the Raspberry Pi main menu. Once you are done with Visual Code installation, you can run the editor either from the terminal or desktop using the Programming section from the main menu.
About the author

Awais Khan
I’m an Engineer and an academic researcher by profession. My interest for Raspberry Pi, embedded systems and blogging has brought me here to share my knowledge with others.
Setup Visual Studio Code and Jupyter on Raspberry Pi
 VSCode on Raspberry Pi
Introduction
Microsoft has released a version of Visual Studio Code (VSCode) for ARM-based computers like the Raspberry Pi. VSCode is one of the most popular and powerful code editors. There are many useful extensions for VSCode that make programming a lot easier.
For example, we can start a Jupyter notebook inside VSCode. Jupyter is an interactive Python environment that we can use to experiment with machine learning libraries. In this tutorial, we will:
- install and use VSCode on Raspberry Pi,
- install and use Jupyter on Raspberry Pi,
- do a simple machine learning lab inside Jupyter.
Install Visual Studio Code
First, visit the website of Visual Studio Code. On this page, click the link for the ARM version of the deb file.
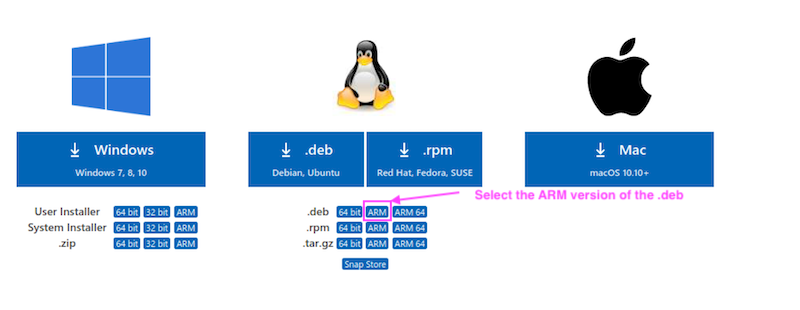 Download the ARM 32 bit version of the DEB file
When the download is completed, open the terminal and navigate to the Downloads folder.
Check the name of the installation file.
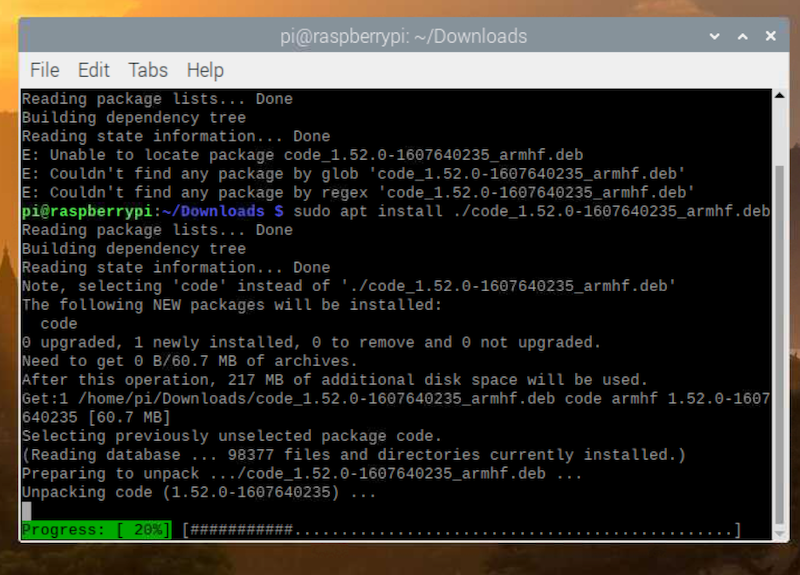
Suppose the name of the file is code_1.52.0-1607640235_armhf.deb , type the following command to install Visual Studio Code.
Replace code_1.52.0-1607640235_armhf.deb by the name of the file that you have downloaded. Do not miss the ./ before the filename. The installation should be completed in a few minutes.
 Installing VSCode
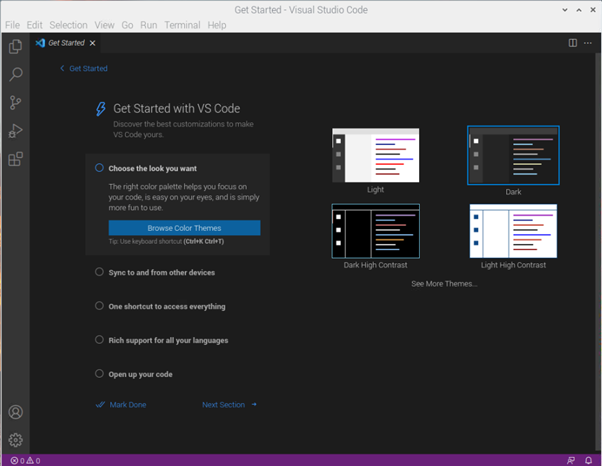
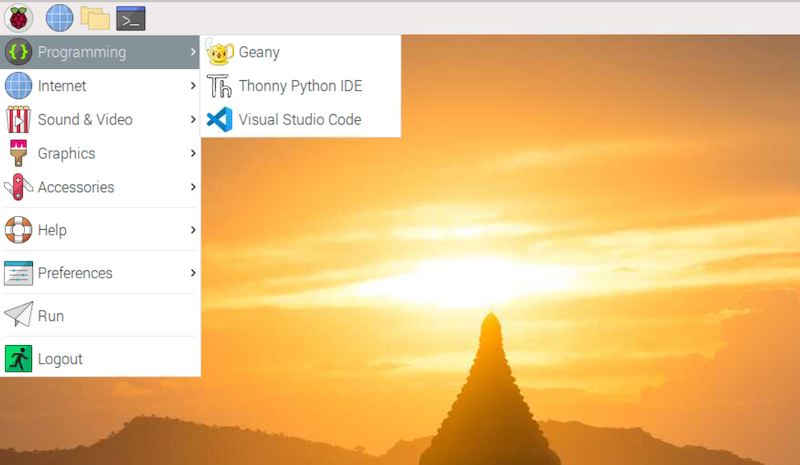
After the installation is completed, we can launch VSCode from the ‘Programming’ menu.
 Launching VSCode from the menu
We can also launch VSCode from the terminal.
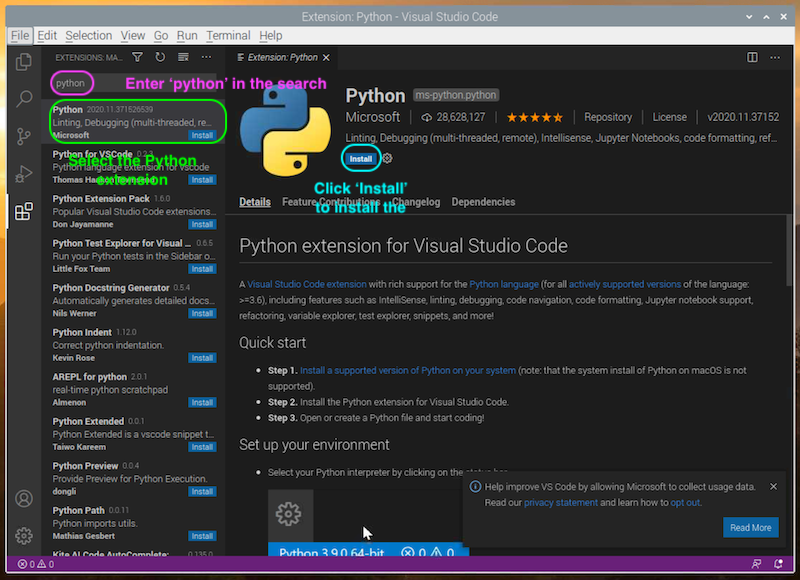
Install the Python extension
To install an extension, we can click the extension icon on the left.
Click the extension icon
In the search field, enter ‘python’, then select the Python extension made by Microsoft. Click the ‘Install’ button to install this extension.
 Locate the Python extension made by Microsoft
Install Jupyter
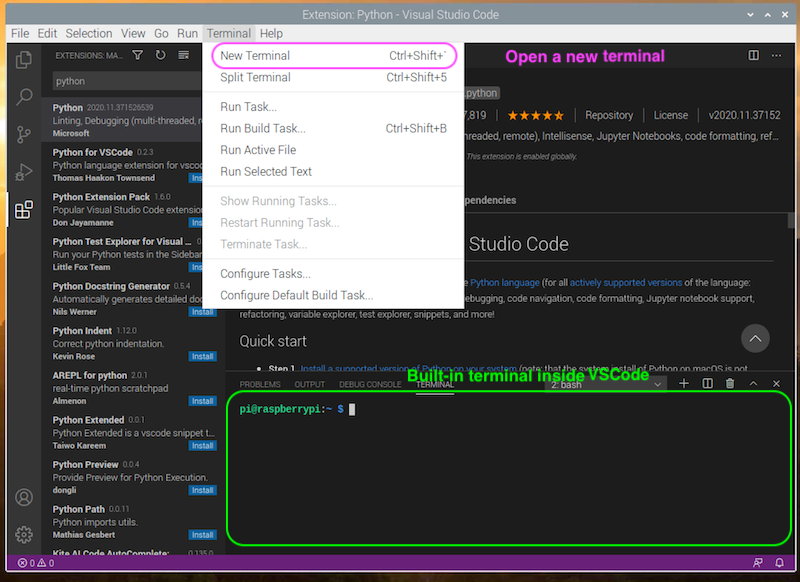
Next, we will install Jypyter on Raspberry Pi. We can use the terminal as before, but we can also use the built-in terminal inside VSCode. To open the terminal, click Terminal → New Terminal in the menu or press ‘Ctrl + Shift + `’.
 Terminal inside VSCode
In the terminal, use the following command to install Jupyter:
When the installation is completed, we can create a new Jupyter notebook directly inside VSCode. To do that, click View → Command Palette… or press ‘Ctrl + Shift + P’. Type ‘Jupyter’ in the search field of the command palette and select ‘Create New Blank Jupyter Notebook’.
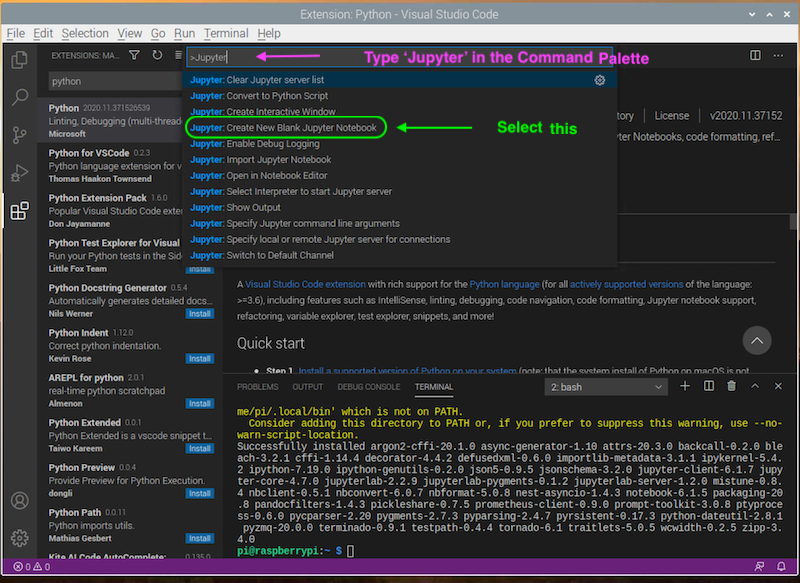 Create New Blank Jupyter Notebook
Note: Many functionalities provided by VSCode extensions can be used through the Command Palette.
In the Jupyter notebook, we can write Python code inside a cell, and the code will be executed if we press ‘Shift + Enter’. The result of the code will then be shown in the cell.
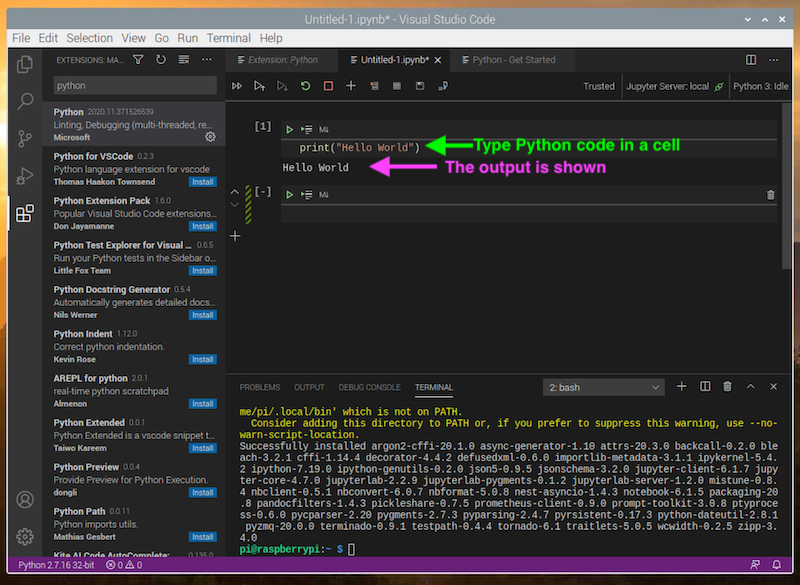 Run Python codes inside Jupyter
Since we can run the cell one by one at any order we want, Jupyter is an excellenet tool for us to experiment with different things in Python. After writing codes to the notebook, don’t forget to save it (as a ‘.ipynb’ file) and share it with others!
Do a Machine Learning Experiment
Download this notebook from the repository and open it in VSCode. In this notebook, we perform a simple linear regression with scikit-learn, a popular Python package for machine learning. Linear regression can be thought as drawing the best-fit line that matches the given data as closely as possible. If you want to know more about the mathematics behind linear regression and other methods of statistical learning, you may read An Introduction to Statistical Learning with Applications in R.
We go through the steps here and you can try it on your own.
Note: If you receive a warning when opening the notebook, simply click ‘Trust’ to dismiss the warning.
First, we install or update the libraries that we are going to use.
Note: apt-get and pip3 are Linux commands, and Linux commands can be executed inside the notebook. To execute a Linux command, add an exclamation mark before the command.
Then, we import the necessary libraries.
After that, we setup matplotlib for plotting graphs.
Notice that %matplotlib inline is a Jupyter command. It allows us to plot graphs with matplotlib right inside the Jupyter notebook.
Next, we generate some data.
X is an array containing some random numbers from 0 to 1. Each number in y is created by multiplying the corresponding number in X by 3, and then adding 4 and a random number to the product. Therefore, the best-fit line should look like ‘y = 3x + 4’. Let’s plot the data and see if this is the case.
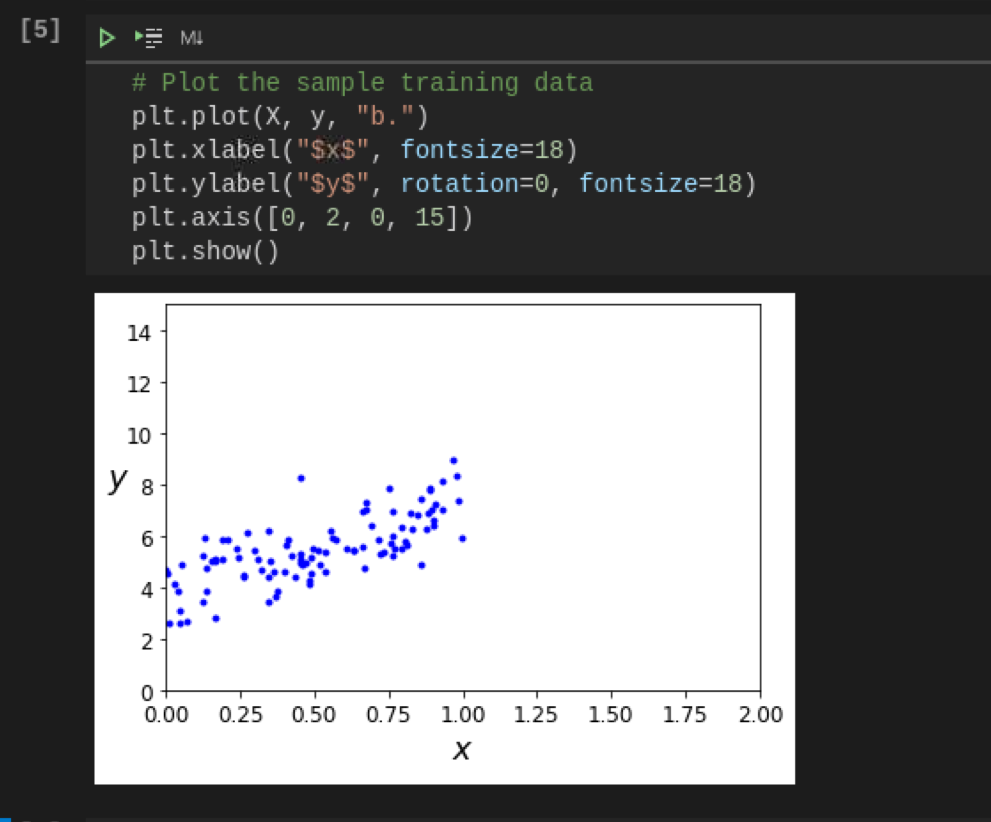 Plot a graph inside Jupyter
Let’s do the linear regression now. Scikit-learn makes this task extremely simple. We only need to create a LinearRegression model object, and fit the model with the training data. We can look at the intercept and the slope of the straight line after the fitting.
We can use the model to make predictions on new data.
Finally, we can plot the results and compare the models and the training data.
 The best-fit line
Conclusion
Although the Raspberry Pi is not a powerful computer that can train giant machine learning models, it is definitely enough for exploring many machine learning methods that are not computationally intensive. Using VSCode with the Python extension and the Jupyter notebook makes the Raspberry Pi an excellent platform for studying these machine learning strategies. We will explore machine learning further with these tools in future tutorials.
Visual Studio Code on Raspberry Pi
You can run Visual Studio Code on Raspberry Pi devices.
By downloading and using Visual Studio Code, you agree to the license terms and privacy statement.
Installation
Visual Studio Code is officially distributed via the Raspberry Pi OS (previously called Raspbian) APT repository, in both 32-bit and 64-bit variants.
You can install it by running:
Running VS Code
After installing the VS Code package, you can run VS Code by typing code in a terminal or launching it via the Programming menu.
Updates
Your Raspberry Pi should handle updating VS Code in the same way as other packages on the system:
You can always check when a new release is available in our Updates page.
System requirements
VS Code is supported on these Raspberry Pi models running a 32-bit or 64-bit version of Raspberry Pi OS:
- Raspberry Pi 3 Model B/B+
- Raspberry Pi 4 Model B
- Raspberry Pi 400
While 1 GB of memory (RAM) meets the minimum system requirements, users will benefit from installing VS Code on a Raspberry Pi 4 with more memory.
First-generation Raspberry Pi modules and Raspberry Pi Zero are not supported as they only include an ARMv6 CPU.
Workaround for poor performance
VS Code on Raspberry Pi 4 may be slow with the default setup. A workaround is to disable hardware (GPU) acceleration in VS Code:
- Open the VS Code argv.json file using the Preferences: Configure Runtime Arguments command.
- Set "disable-hardware-acceleration": true .
- Restart VS Code.
The "disable-hardware-acceleration": true runtime argument switch has the effect of passing the —disable-gpu command-line argument on VS Code startup.
Next steps
Once you have installed VS Code, these topics will help you learn more about it:
Install Visual Studio Code on Raspbian
![]()
While i am working with Raspberry PI 3 for developing Machine Learning apps on the edge. One of the primary requirements is to install an IDE that works with various development platforms such as: Python and .NET.
In this post, i will share easy steps to install Visual Studio Code on Raspberry PI from the terimal window.
- Package Cloud provides builds for VS Code, below command shows how to add their repository to Raspbian OS:
2. The above command will add package cloud repository so it is ready to install VS code package in the next step. Below screen shot shows the output of step 1.
3. Installing VS Code package with one command:
Below screen show shows a successful installation of VS Code!
Now you can access VS Code from the menu or from the terminal on Raspberry PI.