
Тема: Теоретический вопрос о чейнлайне, колёсах и кассетах.
Теоретический вопрос о чейнлайне, колёсах и кассетах.
Есть теоретический вопрос (возник в результате размышлений о покупке нового вилсета).
Чейнлайн есть некая цифра в мм, которая представляет из себя расстояние от представляемой продольной оси велосипеда до середины кассеты (между 4 и 5 звездой в случае 8-звёздной, 5-я звезда в случае 9-ти звёздной и т.д.) или до второй звезды системы.
При этом, если взять и поменять кассету, скажем с 8 на 9-ти скоростную, чейнлайн будет прежним.
Так как вне зависимости от количества звёзд, толщина кассеты (т.е. сумма толщин всех звёзд и спейсеров между ними) есть величина постоянная, расстояние между задними перьями есть величина постоянная, длина втулки тоже величина постоянная, то каким образом может варьироваться чейнлайн на разных рамах?
Ибо рассуждая исходя из имеющихся постоянных размеров, чейнлайн всё равно будет находиться на том же месте, иначе разные колёса и разные кассеты меняли бы чейнлайн каждый по-своему, что не соотвтетствует реальности и является абсурдом.
Если написано не совсем понятно или сумбурно могу уточнить свой вопрос.
ChainLine — линия цепи
Обычно при замене каретки не возникает никаких трудностей, если у новой каретки такие же параметры, как и у старой: длина вала каретки, ширина кареточного узла, шаг резьбы. Но, при замене звёзд системы и шатунов очень часто возникают проблемы – звезды после установки цепляются за раму или не переключаются передачи на передних звездах. Из-за чего это происходит?
У рамы велосипеда есть очень важный параметр — линия цепи (Chainline). Определяется он шириной кареточного узла, а также угловыми и линейными размерами заднего треугольника. Линия цепи определяет, какое расстояние должно быть от центра рамы до звёзд системы, чтобы передний переключатель работал правильно и передачи включались чётко.
Когда длина вала каретки и система звёзд не обеспечивают необходимую величину линии цепи (Chainline), то передний переключатель работает неправильно. Числовое значение ChainLine измеряется в mm.
Линия цепи ChainLine
В технических данных систем и шатунов как правило указывают рекомендуемый ChainLine. Перед тем, как снимать отработавшие срок старые компоненты, необходимо измерить Chainline и новые компоненты подбирать зная этот размер.
Измерение ChainLine
Чтобы высчитать ChainLine надо сделать два измерения (всё измеряется в миллиметрах).
А — расстояние между внешней плоскостью большой звезды и левой кромкой подседельной трубы рамы.
В — расстояние между внешней плоскостью маленькой звезды и правой кромкой подседельной трубы рамы.
Величину Chainline высчитываем по формуле:

К примеру, после измерений получилось: А = 74 мм, В = 27 мм. Подставляем в формулу значения А и В, и получаем:

Chainline велосипеда равняется 49,5 мм. Соответственно шатуны и звёзды необходимо подбирать, ориентируясь на эту величину. Разница между величиной Chainline рамы и той, что указана для шатунов должна быть не более 0.5 мм. Поэтому, в нашем случае можно использовать шатуны с Chainline, которая находится в диапазоне 49 – 50 мм. Приобретать шатуны в магазине надо с таким же значением ChainLine.
В случае с тремя передними звёздами значение ChainLine равняется расстоянию между центром трубы и плоскостью средней звезды.
Также читать на эту тему:
Ещё о линии цепи Chainline. На разных типах велосипедов и разных стилях езды по разному используются передачи. От этого зависит как наиболее рационально располагать линию цепи. На шоссейном велосипеде с трёхскоростной передней системой обычно больше всего используются две больших звезды…
Стандарты осей втулок велосипеда. Длина оси втулки определяется параметром Over – Locknut – Dimension (OLD). Этот параметр определяет расстояние между внешними гайками на оси. Оно равно расстоянию между дропаутами вилки или нижними перьями заднего треугольника рамы…
Q – фактор. Так сложилось, что коленные суставы человека не предназначены природой нести длительные нагрузки, если ноги хотя бы немного разведены в сторону. На велосипеде, где при длительном педалировании, особенно с большой каденцией положение суставов имеет важное значение для здоровья велосипедиста приходиться учитывать Q –фактор…
Каденция при езде на велосипеде. Спринтеры могут показать результат до 170 об/мин, но в течении недолгого периода. А у гонщиков, которые участвуют в соревнованиях на горных велосипедах каденция может изменяться в широком диапазоне. При очень крутом подъёме она резко возрастает из за использования…
Двухсторонняя втулка. Двухсторонняя втулка (Flip-Flop) – втулка, которая предназначена для быстрой смены типа привода и соотношения передачи перестановкой колеса велосипеда на 180° по его оси. Она имеет резьбу с обеих сторон и позволяет установить…
Bicycle chainline
This post explains what bicycle chainline is. Why is it important? How is it measured? How to set a “correct” chainline?
Table Of Contents (T.O.C.):
1. What is a bicycle chainline?
Definition is: distance between the middle of chainring(s set/s) and the longitudal axis of the bicycle. It is explained in plain English in this post. ��
Middle of the front chainring and middle of the rear sprocket should be at the same distance from the axis that goes along the middle of the bicycle frame from the front to the back. That means the chain will run completely straight from the front to the rear. For bicycles with more speeds, definition is the same, only measurement is taken as middle of the sets of chainrings and sprockets. Picture explains it better:
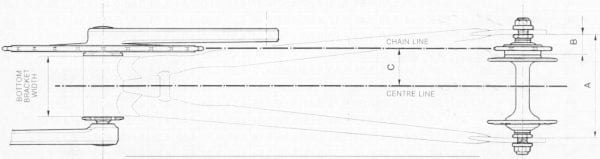 Single speed bicycle chainline.
Front and rear sprocket are at the same distance from the longitudinal axis of the bicycle. The chain runs perfectly straight, parallel to the longitudinal axis of the bicycle.
Picture 1 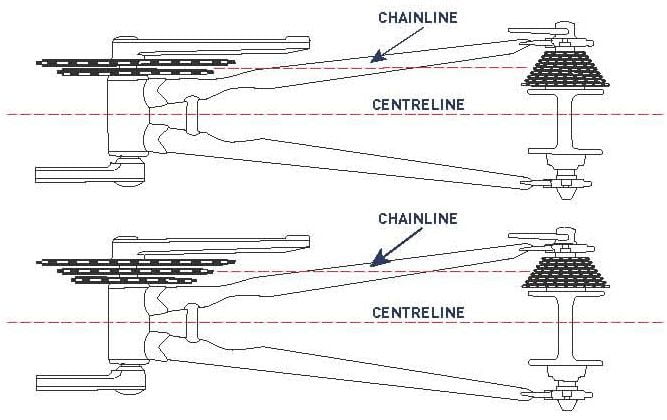 Double (up) and triple (down) chainring multi speed bicycle chainline.
When measuring, the middle of the rear sprocket set is taken as a reference, aligned with the middle of the front chainring set.
Picture 2
2. Why is bicycle chainline important?
For single speed bicycles (one chainring at the front and at the back) the answer is more obvious: the straighter the chain, the longer it will take for it to wear out, the less mechanical losses it creates when pedaling and the harder it will drop off the chainrings.
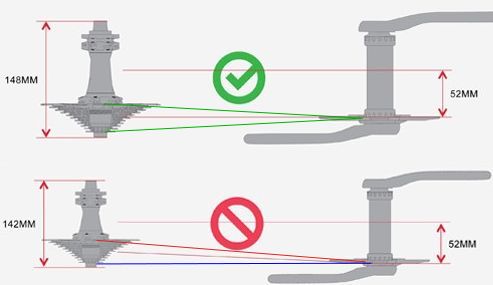
For multi speed bicycles (more sprockets), the answer is a bit more complicated. If the middle of front chainrings is not aligned with the middle of the rear sprocket set, then in some gear combinations, the chain will be too crossed. Picture below explains it better:
Good (up) and bad (down) bicycle chainline
Picture 3
Upper half of the picture number 3: middle of the sprocket set is aligned with the middle of the front chainring. That way, in either gear combination, the chain is not at a great angle (green lines).
Lower half: front chainring is too far out compared to the middle of the sprocket set. That means that in top gear (blue line), the chain is almost straight. However, in lowest gear (red line), the chain runs at a sharp angle – bringing more wear and tear to both the chain and the sprockets, more noise and less mechanical efficiency of the whole system.
For double chainring set – the middle between the two front chainrings should be aligned with the middle of the sprocket set. For triples – middle chainring is aligned with the middle of the sprocket set. This is shown in the picture 2.
3. How to measure bicycle chainline
3.1. Measuring front chainline
It can be measured simply with a ruler:

Measuring front chainline with a ruler
Picture 4
Technically more precise measurement is taken this way:
- measure the diameter of the seat post and the width of the front chainring (set) with vernier calipers. “Set” means the total width of the two, or three chainrings if the crankset is a double, or a triple one.
- measuring distance from the seatpost to the end of the largest chainring.
- add half of the seatpost width to the measured distance, and then deduct half of the chainring (set) width. That’s the front chainline.
For the example in picture 5, the chainline would be:
44 / 2 + 29 – (9.8 /2) =
= 22 + 29 – 4.9 = 46.1 mm
3.2. Measuring rear chainline
Measure the width of the rear hub. OLD (over locknut distance).
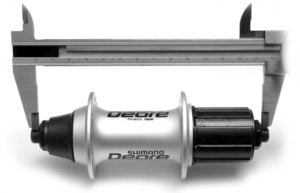
Measuring rear hub width from one locknut to the other
Picture 6
The whole axle is not measured, just the inner locknuts that hold the hub bearings in place. For solid axles – outer nuts that hold the wheel in place are disregarded. Only the part of the hub that sits against the inner part of the rear dropouts is measured.
Most modern rear MTB hubs are 135 mm wide (OLD), most road ones 130 mm, while older road hubs are 126 mm. Ancient road and newer single speed hubs are usually 110 to 120 mm wide.
With help of a picture, the procedure is more easily explained:
- First measure a), like explained in the text above
- Then measure b) – from the hub locknut, to the begining of the smallest sprocket. Measure to the face of the sprocket itself, not to the locknut holding the sprockets in place.
- Finally measure c) – from the beginning of the smallest, to the end of the largest sprocket
Rear chainline = (a / 2 ) – ( (c / 2) + b)
For example: if a = 135 mm. b=4 mm. c = 35.4
Chainline = (135 / 2) – ( (35.4 / 2) + 4)
= 67.5 – ( 17.7 + 4)
= 67.5 – 21.7
= 45.8 mm
4. How to set a correct chainline?
By setting a correct chainline it is meant to set front and rear sprockets so that their middles are in line, like shown in pictures 1 and 2. Literally: front chainline (measurement explained in paragraph 3.1.) and rear chainline (3.2.) should be the same.
When doing that, rear sprockets are usually taken as a fixed position, with front chainring position set to match them. That case is first explained under 4.1.
4.1. Front chainline adjustment
- For single chainring crankset, where chainring is bolted to the spider holding it, the chainring can be moved outwards with adding spacers between the chainring and the spider, then bolting it. To move the chainring inwards, it can be mounted on the inner side of the spider, with fine adjustment made using spacers, as shown in picture 8:
- With triple cranksets, smallest, or largest chainring can be removed, or front derailleur set so it never moves onto one of them, effectively altering the chainline according to needs.
- A spacer can be added between the right bottom bracket cup and the frame, in order to move chainrings outward.
- Longer, or shorter axle (spindle) can be used with square taper and Octalink bottom brackets to move the chainrings outward, or inward. When using shorter axle, make sure that crank arms aren’t too close to the frame so they don’t hit the rear chainstay when turning.
- Replacing crankset for one with more outward, or inward placed chainrings.
It is important to bear in mind the type of chainrings (crankset) used. This goes especially for square taper cranks. On an axle of the same width, some will stick further outwards, while others may be positioned more inwards, towards the frame. This plays an important role when choosing a correct BB axle length. Some crankset manufacturers publish required axle lengths for desired chainlines, while with others it’s more trial and error.
4.2. Rear chainline adjustment
Adjusting the rear chainline is done by rearranging the rear axle spacers.
- Spacers from the left side are placed on the right, to make the sprockets move inward.
- Spacers from the right are moved to the left side to make the sprockets move outward.
It is important to note that this affects:
- Room left for rear sprockets – they might start rubbing the frame if too many spacers are removed from the right side.
- Disc brake alignment – make sure disc brake calipers can be moved laterally enough to match the sprocket rearrangement. If a spacer is added to the left side, disc brake calipers must be moved inwards. If a spacer is removed from the left side, calipers must be moved outwards.
- Rim alignment – rim will no longer sit in the middle of the frame, and must be re-dished. If a spacer is added to the left side, left hand side spokes must be tensioned to move the rim back into the middle. If a spacer is added to the right side, right hand side spokes must be tensioned to center the rim.
It can be also combined by discarding a wide spacer and replacing it with a narrower one from some old axle, then placing a third, narrower spacer on the opposite side to keep the total used spacer width the same.
Setting correct chainline using the rear hub is a complicated task that is not recommended, unless it’s not possible to get a satisfactory chainline by adjusting the front chainrings. It’s often better to leave a less than perfect chainline, than to mess with the rear hub spacers.
5. Deliberate imperfections
I do most of my riding from the largest front chainring. That’s why I like to have my chainrings more to the inward, than it is perfect. That way, the chain is a bit more crossed when using smallest chainring, but where I do most of my riding, on the big chainring, the chain is straighter than it would be if I had set the correct chainline.
The rule of thumb and a safe bet is to set the chainline correct, but if one is certain what they are doing, they can play with imperfect chainlines. Of course, diverting from perfect chainline has its drawbacks and consequences, like shown in picture 10:
If the front chainline is smaller than the rear chainline, when the chain is on the smaller chainring, it might rub the big chainring, even when not crossed too much.
Picture 10
Important note: when experimenting with imperfect front chainlines, for bicycles with front derailleurs (FDs), it is important to make sure the FD can reach all the chainrings. If they are moved too much outwards, FD might not reach far out enough to shift to the largest chainring, and vice-versa – if moving chainrings too much inward, FD might not be able to move in enough to shift to the smallest chainring.
Also, make sure that right and left-hand side crank distance from the frame is not greatly different, since that could affect ride comfort (having one foot moved substantially more towards the outside, compared to the other foot).
6. Apendix – axle lengths for BBs with axles
Axle measurements for BBs with axle (square taper and Octalink are the most widely used ones) are noted in picture 11:
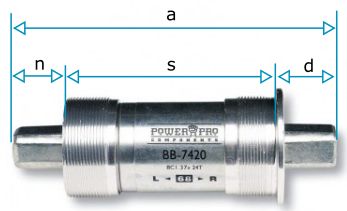
a) Axle length
d) Drive side (chainrings side) length
s) Width inside the frame’s BB shell
n) Non-drive (left) side length
Picture 11
Measurement d) is always taken from the inside of the flange that aligns with the outer side of the frame’s BB shell. The drive side is always screwed all the way in, until the flange stops at the BB shell wall.
Table 1 shows measurements of some existing cartridge BB models:
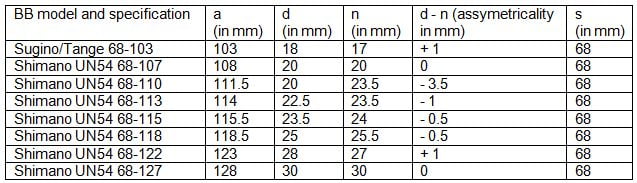
Some typical measurements.
As a guide to what to measure and look for.
a) Axle length
d) Drive side (chainrings side) length
s) Width inside the frame’s BB shell
n) Non-drive (left) side length
Table 1
For Shimano square taper cartridge bottom brackets combined with Shimano cranks, optimal axle lengths are usually (not always, it’s best to mount and measure):
- 110 mm for single chainring cranks (single-speed and 1x).
For example, a 110 axle will result in a 46 mm front chainline; 113 will give you 48 mm; and 117 will give a 50 mm front chainline. - 110 to 113 mm for double chainring cranks.
- 122.5 (122
Shimano often notes on a paper inside the package of their (square taper and Octalink) cranks which BB model (and axle length) gives which chainline with that particular crank. Without this, it’s often a trial and error, with various axle lengths.
Как измерить чейнлайн
Ремонт
У начинающих велосипедистов, которые хотят поменять каретку на новую, не случается никаких проблем. Достаточно купить вместо старой каретки новую, но с теми же параметрами. Но при смене звезд системы и шатунов постоянно возникают трудности – звезды зацепляются за раму или передачи не могут переключаться на передних звездочках. Что нужно сделать, чтобы больше не возникало таких проблем? Конечно же измерить чейнлайн!
Чейнлайн – что это?
У велосипедных рам есть один из главных и важных параметров – линия цепи (Chainline). Чейнлайн велосипеда находится линейными и угловыми параметрами последнего треугольника, а также шириной узла каретки. Этот параметр необходим для определения протяженности от центральной части рамы до звездочки системы. Чтобы соблюсти линию цепи, нужно выбирать к системе каретку с необходимой и подходящей длиной вала. Определение расстояния дает понять, работают ли переключатели исправно. Если длина вала, каретки или системы не предоставляют необходимый размер Chainline, то работа переключателя может быть неправильной или с перебоями. Величина чейнлайна велосипеда определяется только в миллиметрах.
От изменений чейнлайна, влияют такие значения, как стандартный размер втулки заднего колеса, количество звезд на последнем колесе, геометрия рамы, форма шатунов.
Во многих технических инструкциях систем и шатунов дают рекомендации по Chainline. Таким образом, перед сменой старых запчастей цепи, нужно в первую очередь найти размер Chainline рам велосипеда и подобрать современные, уже зная размер.
Как измерить чейнлайн?

Чтобы найти величину длины линии цепи необходимо использовать штангенциркуль. Каждое значение принято измерять или переводить только в миллиметры. Величина Chainline находится по следующей формуле:
где А – это длина протяженности между внешней части плоскости звезды большого размера и левой кромкой подседельного штыря велосипеда;
В – это длина протяженности между внешней плоскостью звезды меньшего размера и правой плоскостью подседельного штыря велосипеда
Например, после всех измерений получились такие замеры: А = 65 мм, В = 30 мм. Подставим значения А и В в формулу и найдем величину Chainline:
Таким образом, Chainline велосипеда получился 51,5 мм. И шатуны со звездами необходимо выбирать, исходя из величины линии цепи. Разницу между длиной Chainline и шатунов рекомендовано выбирать не больше 0,5 мм.
Поэтому в примере можно применять шатуны, которые находятся в интервале 46-47 миллиметра.
Если же в велосипеде три передние звездочки, то в величину Chainline берется расстояние между центральной частью трубы и плоскостью звездочки среднего размера.
Прошел путь от мастера до управляющего мастерской по ремонту велосипедов и самокатов. В данный момент работаю на себя