Как сбросить service на бмв k1600gt
Чтобы сбросить индикатор Service на мотоцикле BMW K1600, необходимо подключить диагностический инструмент к порту OBD транспортного средства. Этот порт находится в нижней части седла мотоцикла, поэтому необходимо полностью снять седло, чтобы подключить сканер. Порт находится на задней стороне корпуса. После подключения инструмента нужно выбрать модель мотоцикла и соответствующую версию. Затем, следуя всем инструкциям, можно полностью сбросить индикатор, отключив сканер и выключив приборную панель.
Как сбросить сервисное уведомление на KTM 1290 Super Duke R?
В этом уроке мы узнаем, как сбросить сервис в KTM 1290 Super Duke R, что является очень простой и быстрой операцией, которую следует выполнить только после завершения запланированных технических работ. Для начала включаем приборную панель, затем нажимаем кнопку «SET» и прокручиваем различные экраны до настройки. После этого удерживаем нажатыми кнопки стрелок вверх и вниз, чтобы получить доступ к меню обслуживания, настраиваем различные интервалы в соответствии с потребностями и сохраняем настройки, вернувшись на главный экран.
Горит надпись сервис.
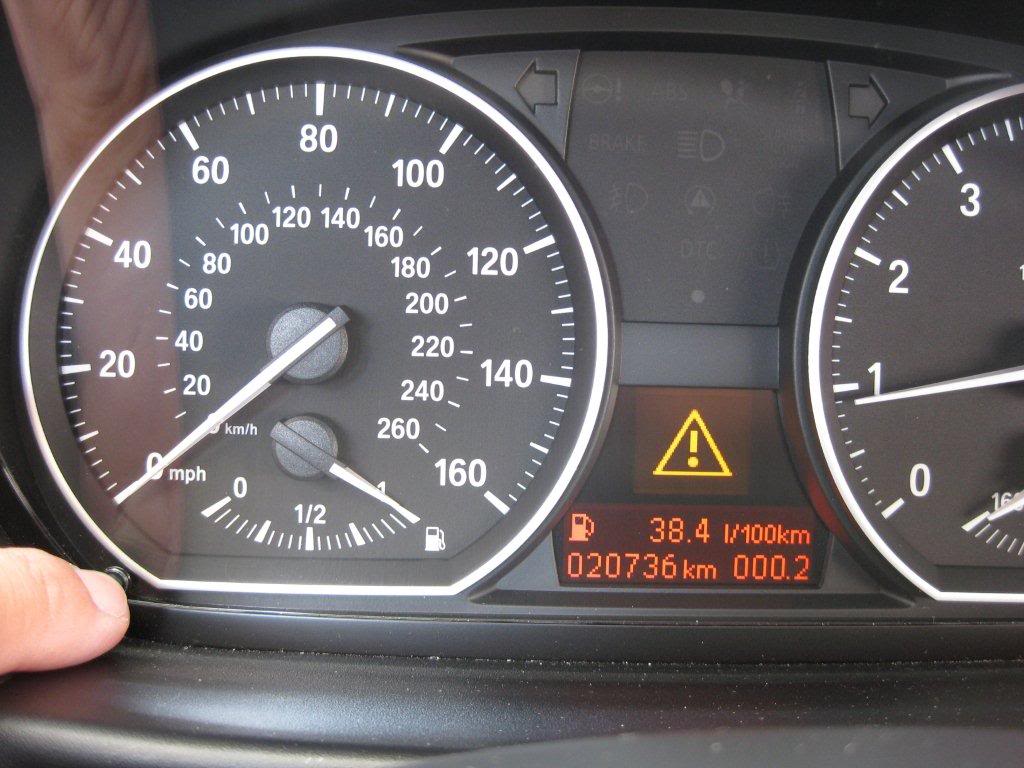
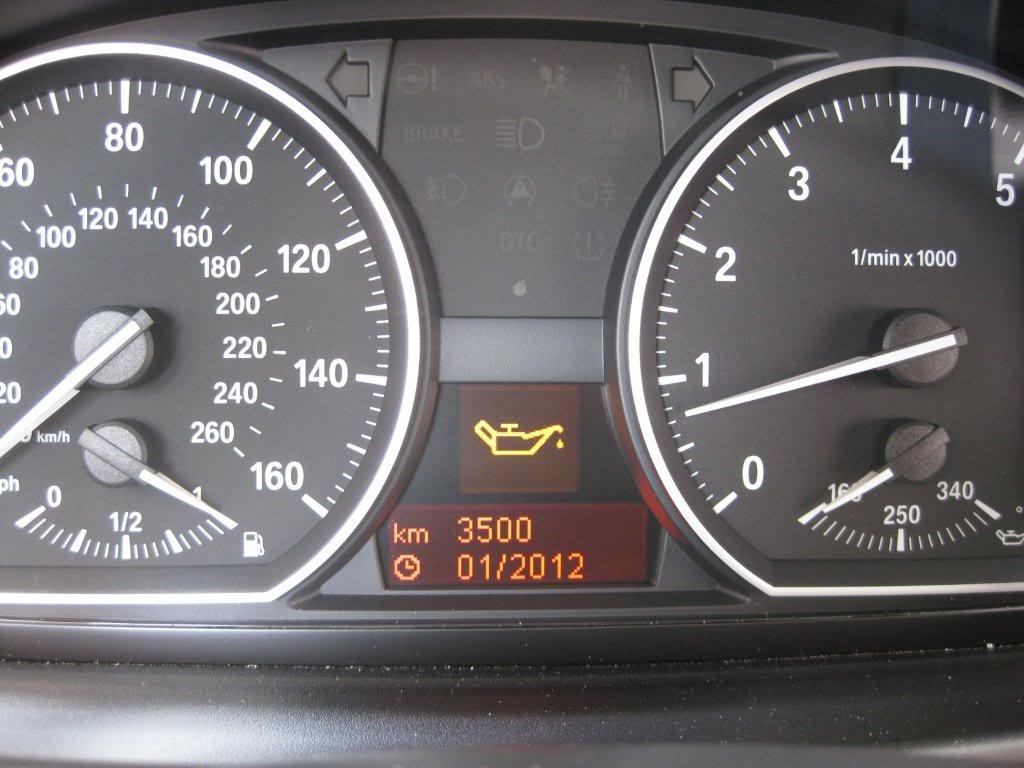
Добрый день БМВводы. Подскажите плиз .хочу купить к 1300жт в Италии ,выслали фото .На фото приборки горит надпись сервис .Ответили что мотоцикл не был заведен. Вопрос ,эта надпись исчезает после заводки или ему нужен сервис?
———- Сообщение добавлено в 19:31 ———- Предыдущее сообщение размещено в 19:18 ———-

Завсегдатай
- BMW R 1200 GS Adv
- BMW R 1200 GS LC
- BMW R 1250 GS Adv
- 16 Сен 2013
- #2
Florist
Заблокирован
- BMW K 1300 GT
- YAMAHA
- 16 Сен 2013
- #3
Добрый день БМВводы. Подскажите плиз .хочу купить к 1300жт в Италии ,выслали фото .На фото приборки горит надпись сервис .Ответили что мотоцикл не был заведен. Вопрос ,эта надпись исчезает после заводки или ему нужен сервис?
Попробую вставить фото
Вложения
Завсегдатай
- Vespa
- 16 Сен 2013
- #4
Vifer
Модератор
- BMW R 1200 GS Adv
- 16 Сен 2013
- #5
stray bullet
Завсегдатай
- 16 Сен 2013
- #6
Florist
Заблокирован
- BMW K 1300 GT
- YAMAHA
- 17 Сен 2013
- #7
MOSMOTOTECH
MOTTORRAD Ильменский
- BMW R 1200 GS Adv
- 17 Сен 2013
- #8
Grigor
Заблокирован
- HARLEY-DAVIDSON
- 17 Сен 2013
- #9
Эдисон
Участник
- BMW K 1200 GT
- 10 Ноя 2013
- #10
CLIFF
Активный участник
- BMW K 1600 GT
- HONDA
- 10 Ноя 2013
- #11
Эдисон
Участник
- BMW K 1200 GT
- 10 Ноя 2013
- #12
Florist
Заблокирован
- BMW K 1300 GT
- YAMAHA
- 15 Ноя 2013
- #13
Принимайте BMW K1300GT 2009г.
Всем привет. Вот и я пополняю ваши ряды BMWводов,принимайте. Вчера наконецто растаможили а сегодня поставил на учет. Прокатился 20 км(на улице +4) ,да по сравнению с фазером лимузин и ветрозащита класс. Мот 2009г. пробег 22тыс, резина новая METZELER. Видать надо менять аккум. заводиться тяжеловато, а после того как включил подогревы вообще перестал крутить, пришлось прикуривать от авто. Я даже не вловил момент как он завелся. Загорелся восклицательный зак в аренжевом треугольнике и высветились показание давления в шинах ,перед 2,0- зад 2,4. Инструкция на итальянском ,но какбы надо перед 2,5 а зад 2,9 или я нетуда посмотрел, подскажите плиз.:yahoo:
Как сбросить service на бмв k1600gt
Сбрасываем сервисный интервал на различных моделях BMW

О том, что такое Oil Service и Inspection мы уже писали и подробно рассказывали как интерпретировать эти данные, так что самое время разобраться в том, как же сбросить сервисный интервал не обращаясь в сервис.
Если вы проходите техническое обслуживание в сервисе, то там обязательно сбросят сервисный интервал при помощи специального ключа. Но что делать если вы меняете масло самостоятельно?
Сложность работы:
Примерное время: 15 минут
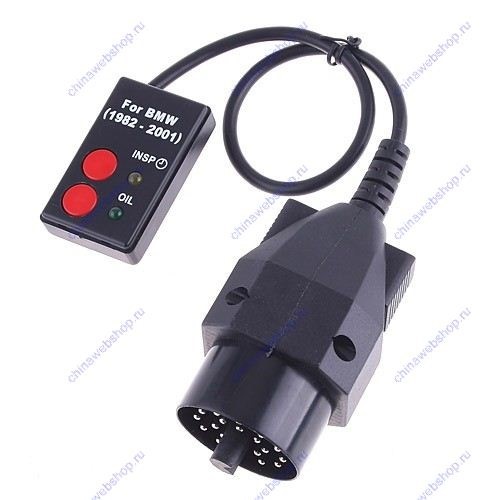
Вариант первый – затратный. Приобрести устройство для сброса сервисного интервала. Когда я писал этот материал то заглянул на E-bay – первое попавшееся мне устройство стоило 12 долларов, плюс доставка, плюс надо ждать пока почта России доставит его.
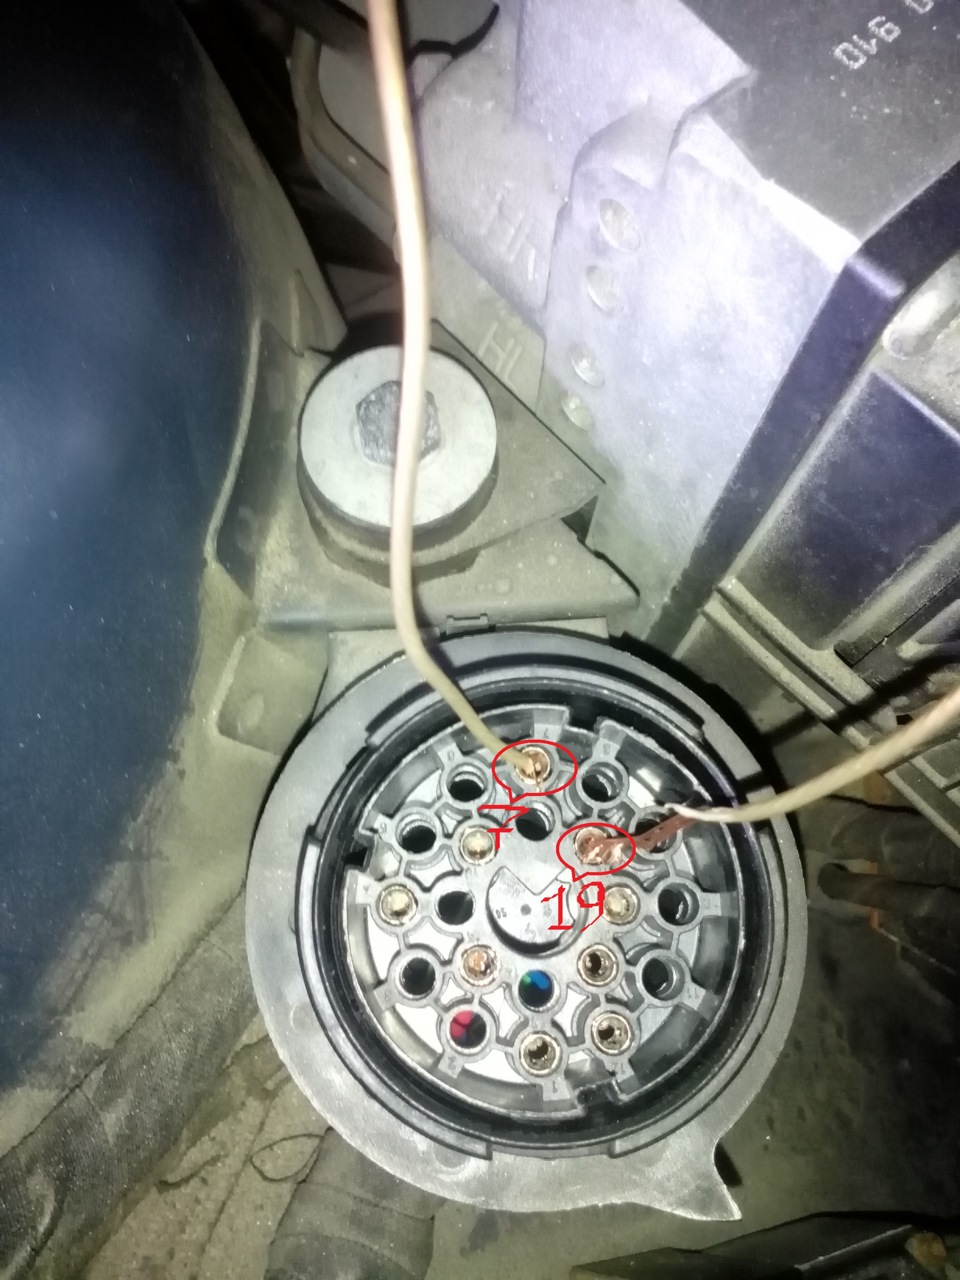
Поэтому нам нужен второй вариант. В моторном отсеке расположен многоконтактный электрический разъем. К нему подключается диагностическое оборудование, через него мы и будем сбрасывать сервисный интервал. Обнаружить его легко – он круглый, прикрыт пластиковой крышкой. На обратной стороне крышки разъема размещены номера контактов.
Автомобили до 1987 года
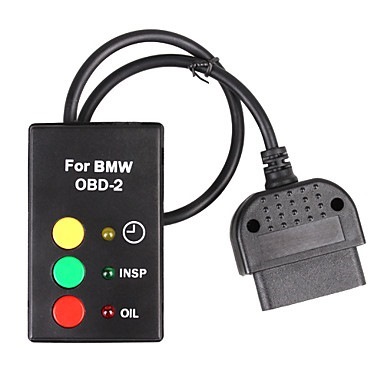
Автомобили после 1987 года
На таких авто разъем имеет уже 20 контактов. Соответственно для того, чтобы сбросить интервал придется замкнуть 7 и 19 контакты.

Процедура сброса
1. Выключаем зажигание
2. Замыкаем контакты. Если контактов 15 – то 7 и 1, если 20 – то 7 и 19. Для этого используем обычную перемычку.
3. Поворачиваем ключ в положение 2 (когда зажигание выключено – то ключ в положении 0)
4. Ждем до тех пор, пока не загорятся все индикаторы зеленого цвета (приблизительно 15 секунд)
5. Выключаем зажигание, вытаскиваем перемычку.
Вариант 2 – если по первому ничего не получилось.
1. Выключаем зажигание
2. Замыкаем контакты. Если контактов 15 – то 7 и 1, если 20 – то 7 и 19. Для этого используем обычную перемычку.
3. Поворачиваем ключ в положение 2
4. Ждем 15 секунд.
5. Вытаскиваем перемычку.
6. Выключаем зажигание.
Если после сброса индикаторов через некоторое время они опять загорятся, то придется заменить аккумуляторы, которые находятся в приборной панели (аккумуляторы типоразмера АА, годятся, например, «Varta») и повторить процедуру сброса.
Автомобили после 1999 года
2. Нажимаем и удерживаем кнопку сброса суточного пробега (кнопка слева).
3. Поворачиваем ключ в положение 1 (удерживая кнопку нажатой).
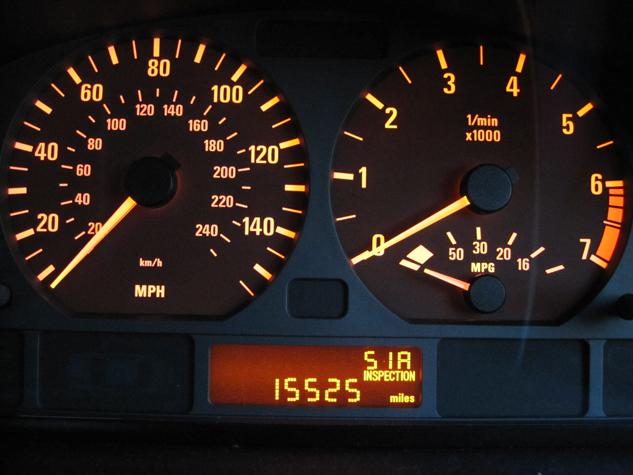
4. Ждем 5 секунд, пока не увидим на приборной панели одно из следующих слов «Oil Service» или «Inspection» в сочетании с «Reset» или «Re»), после чего отпускаем кнопку сброса;
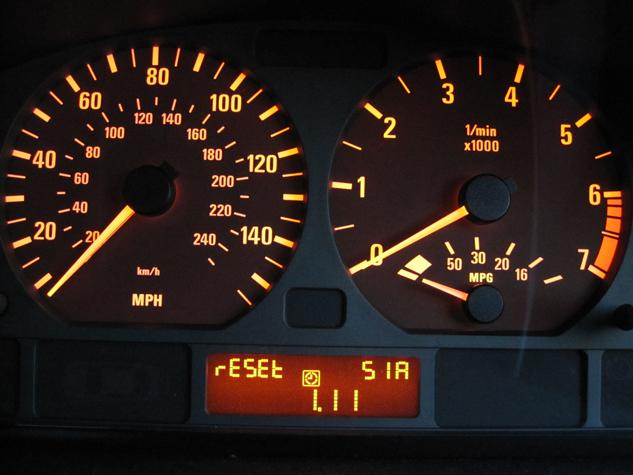
6. Пока индикатор продолжает мигать, еще одно короткое нажатие на кнопку сбросит сервисный интервал. Если все прошло корректно – на экране на несколько секунд появится надпись «RESET / END SIA».
Повторно сбросить сервисный интервал сразу невозможно, необходимо сначала истратить 10 литров бензина.
Модели E82, E90, E92 и E93
Для начала необходимо попасть в сервисное меню
1. Вставить ключ в зажигание.
2. Никуда не нажимая (не выжимая сцепление и не нажимая на тормоз) нажать кнопку start/stop.
3. Дождаться пока на дисплее не исчезнет напоминание о сервисном обслуживании.
Теперь сбрасываем индикатор Oil Service
5. Используйте переключатель вверх/вниз на рычаге переключателя поворотов, чтобы осуществлять навигацию по сервисному меню.
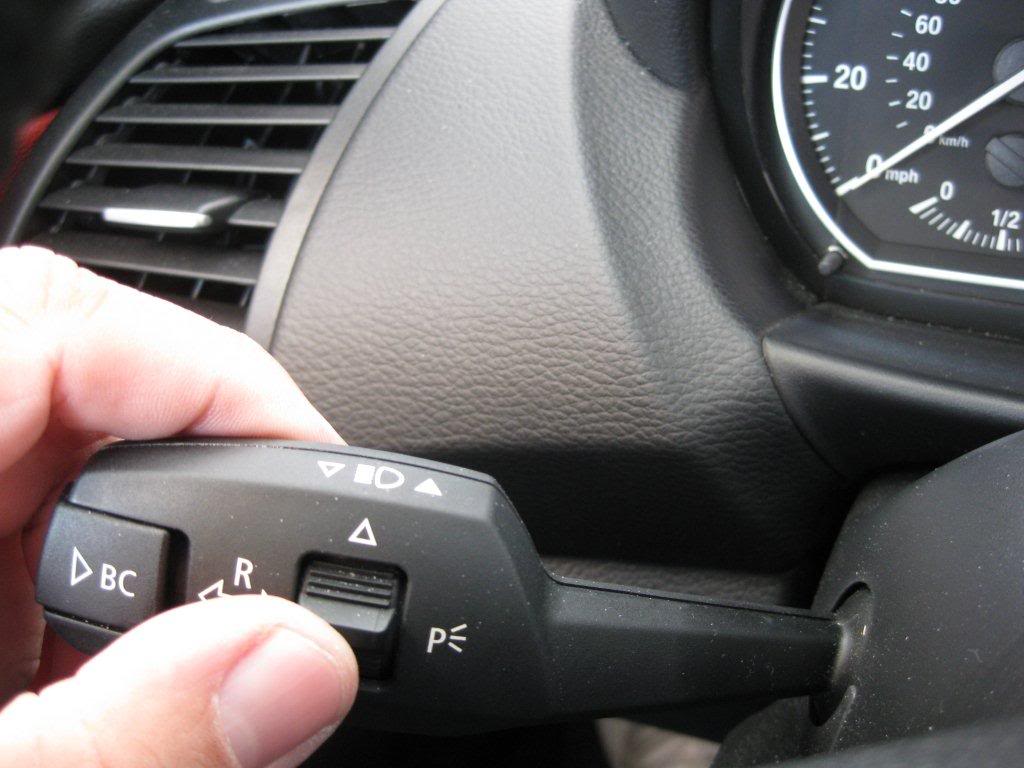
6. Листайте, пока на центральном дисплее не появится символ масленки.
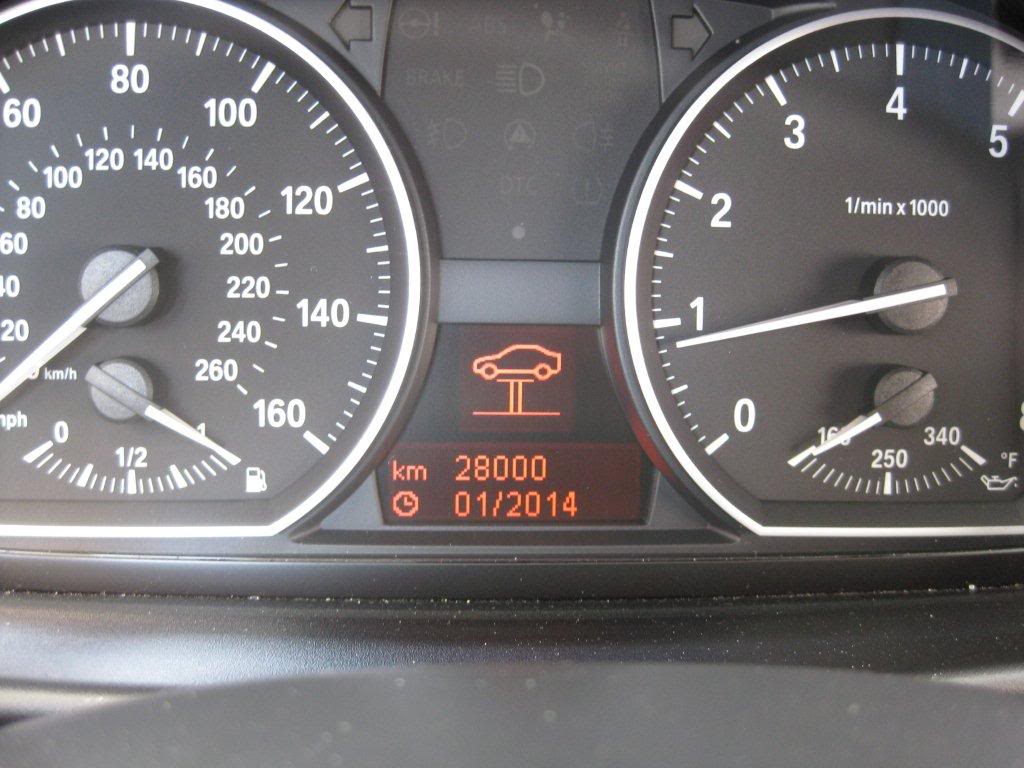
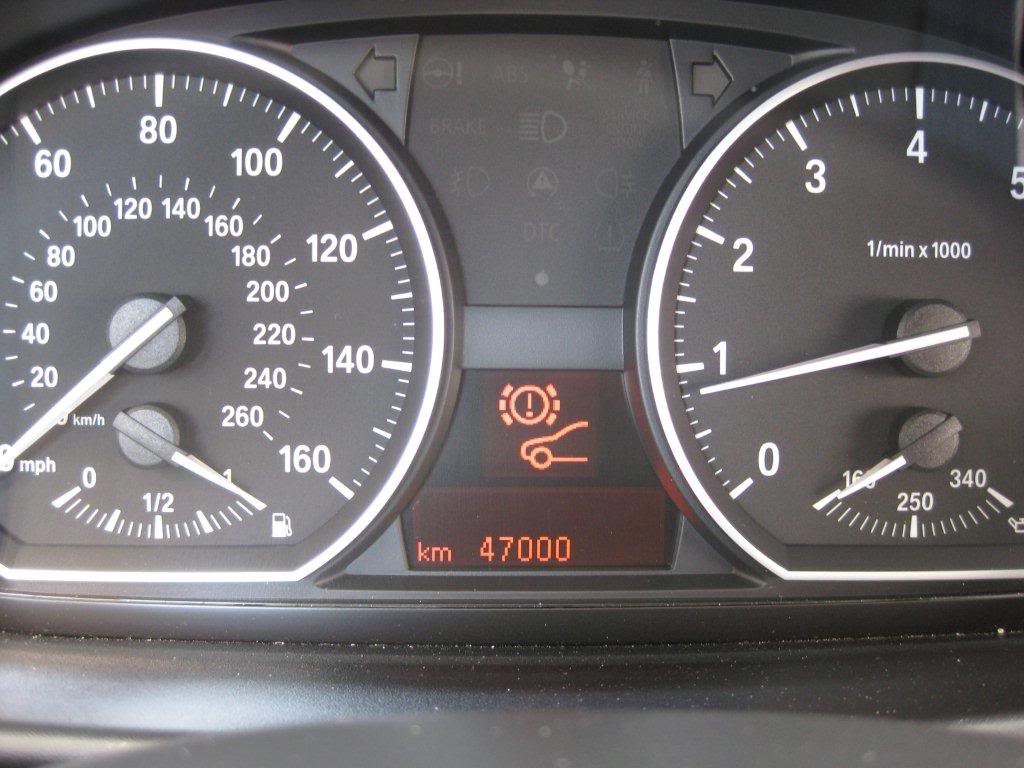
Обслуживание передних тормозов на 47 000 км.

Обслуживание задних тормозов на 60 000 км.

Замена тормозной жидкости в 2012 году.
А вот и долгожданная масленка


Если вы знаете процедуры сброса сервисного интервала на других моделях – описывайте в комментариях, или пишите нам и мы дополним руководство.
Как сбросить в BMW сервис ТО: E30, E34, E36, E39, Z3, X5, M5
Oil Servise BMW: Сбрасываем индикацию сервиса после замены масла.

Те, кто владеет старыми автомобилями, как правило, забывают дорогу к дилеру для технического обслуживания авто. Естественно, это связано с дорогой стоимостью ТО у официалов. Для большинства автовладельцев старых авто обслуживание в официальном техническом центре – непозволительная роскошь. Тем более что для замены масла ехать на старой машине к дилеру просто не имеет смысла. Как же быть?
Ведь, например, после плановой замены моторного масла во многих автомобилях на приборке горит индикация ТО (Oil Servise BMW), которую дилер после смены масла сбрасывает через свой компьютер. Но не беда, в Сети полно инструкций, как обойти электронику автомобиля и сбросить межсервисный интервал ТО. Сегодня предлагаем вам лайфхак по сбросу индикатора сервисного обслуживания в автомобилях БМВ. Этот способ реально работает на следующих автомобилях:
Сброс индикации «Сервис ТО»: BMW 3-серии (кузов E30), BMW 5-серии (кузов E34), BMW 3-серии (кузов E36), BMW 5-серии (кузов E39), BMW Z3, BMW X5 (E53), BMW M5.

Вот несколько роликов, в которых его авторы рассказывают нам, как можно самостоятельно, без посещения технического центра обойти электронику BMW, сбросив межсервисную индикацию на приборной панели. Один ролик русскоязычный и один, не менее полезный, англоязычный, в котором его автор и указывает на работоспособность лайфхака для вышеуказанных моделей BMW.
Итак, после того, как вы заменили масло в двигателе, слив предварительно старое, все что вам нужно для сброса сервиса ТО, это обычный провод.
В последнем, англоязычном видео его автор демонстрирует нам сброс межсервисной индикации на примере BMW Z3.
Причем заметьте, все шаги очень просты и их может сделать самостоятельно любой автолюбитель.
Правда, мы сразу предупреждаем всех тех, кто решит воспользоваться этим способом по сбросу сервиса ТО: вы будете пробовать все на свой страх и риск, и мы не несем ответственность за риски и последствия подобного автолайфхака. Сами понимаете, что ролики взяты из открытых источников в Сети и нет гарантий, что этот способ не приведет к ошибкам электроники автомобиля или другим проблемам.
Обратите внимание: автор видео показал, что после замены масла в двигателе индикация на приборке Z3 по-прежнему указывает на необходимость скорого технического обслуживания автомобиля (один зеленый бар).

Если ничего в этом случае не предпринимать, то затем индикатор сначала окрасится в оранжевый цвет, а далее на приборке начнет появляться предупреждение о необходимости срочно обратиться в сервисный центр для ТО.
Итак, вот что вы должны сделать, чтобы сбросить индикацию ТО в БМВ:
- 1. Вставьте ключ в замок зажигания
- 2. Далее сначала поверните ключ против часовой стрелки (влево), а затем вправо – на второе положение (т. е. повернуть ключ вправо два раза)
- 3. Затем оставьте ключ в этом положении (на приборке будут светиться некоторые индикаторы / значки /)
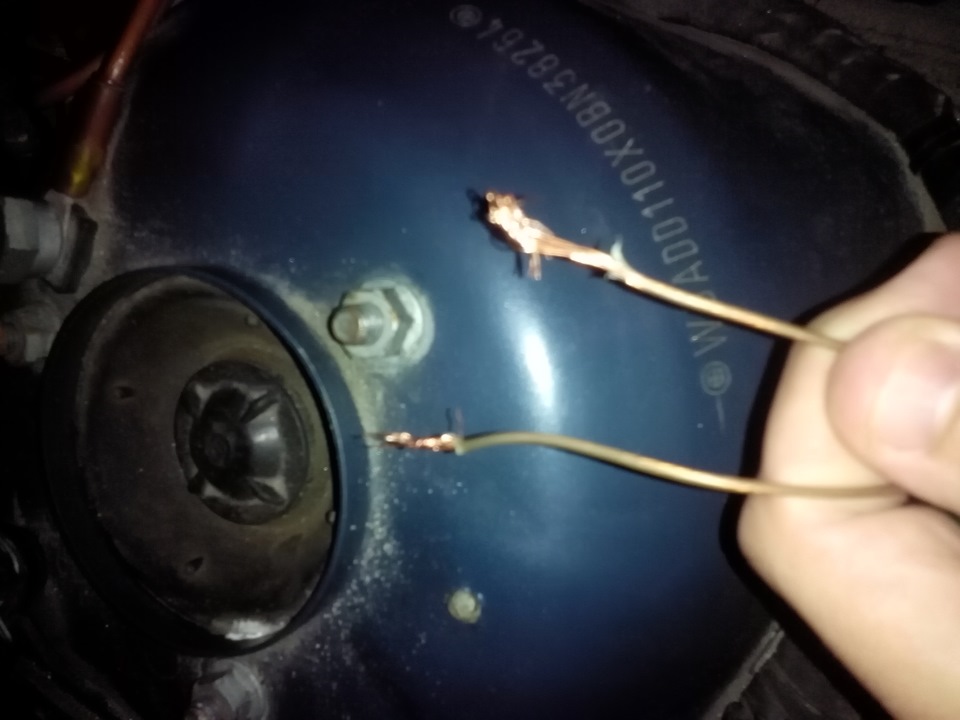
- 4. Теперь возьмите медный провод (обычный электропровод с оплеткой) и откройте капот
- 5. Под капотом откройте крышку, которая скрывает разъем OBD (диагностический разъем автомобиля)

- 6. Далее вам нужно вставить провод в контакты номер 7 и 19 (способ, продемонстрированный автором видео из России, канал на YouTube Владимир Кокорин)

- 7. Способ с канала DutchRingRacing немного иной: провод одним концом нужно вставить в нижний от вас разъем, а второй конец провода прислонить к «земле» (к корпусу автомобиля).
- 8. В обоих случаях после установки провода в правильное положение необходимо подождать 10 секунд. Обратите внимание, что в способе, предложенном Владимиром Кокориным, порядок действий несколько иной. Так, сначала необходимо установить провод в два разъёма и только затем повернуть ключ зажигания в замке и подождать 10 секунд.
Но в обоих случаях этот способ, судя по роликам, приводит к сбросу сервисной индикации, предупреждающей о техническом плановом обслуживании автомобилей BMW.
- 9. Не забудьте поставить на место крышку диагностического разъема OBD.
Как утверждает один из авторов лайфхака, этот способ по сбросу индикации ТО в BMW дешев и сердит, а также очень полезен. Особенно для тех, кто не хочет платить лишние деньги за обычный сброс межсервисной индикации.
Сброс сервисного интервала ТО BMW e39

Доброго времени суток всем!
Готовлюсь к плановому ТО, замену масла, фильтров и тд и тп. А значит в скором понадобится сбросить сервисный интервал ТО BMW на приборной панели, а так как у меня дорестайлинговая модель, то сброс интервала производится несколько по-другому, как у меня было на е46, поэтому решил рассказать как я буду производить этот самый сброс, привести еще некоторые варианты, в надежде, что кому-нибудь может пригодится в будущем.)
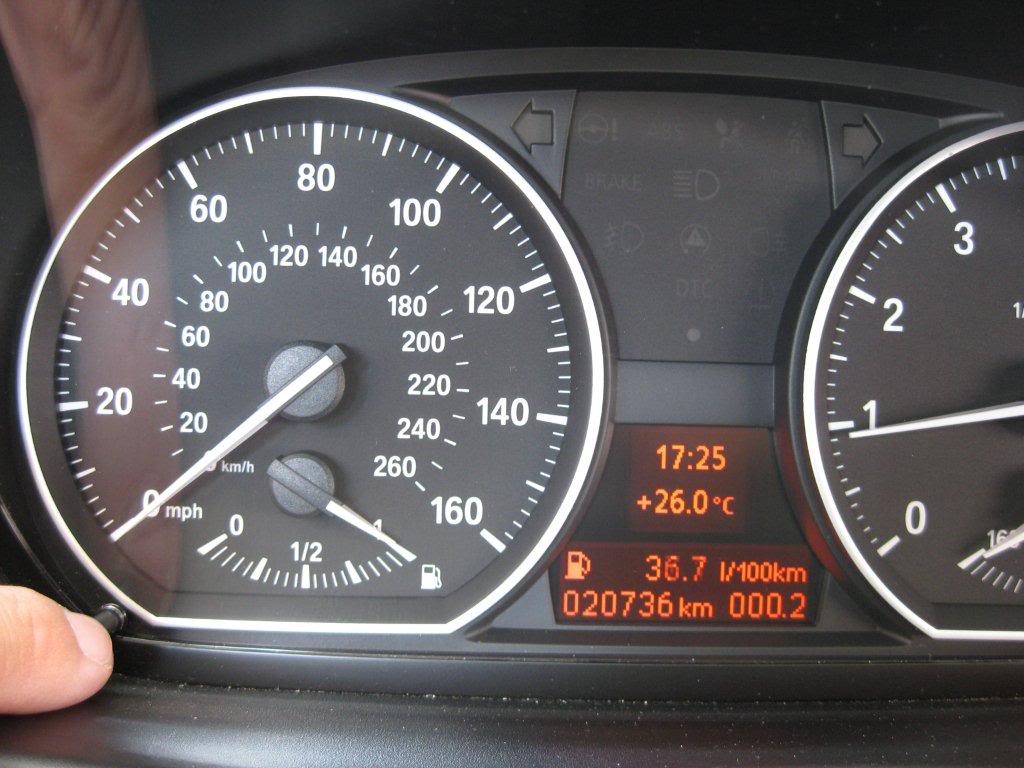
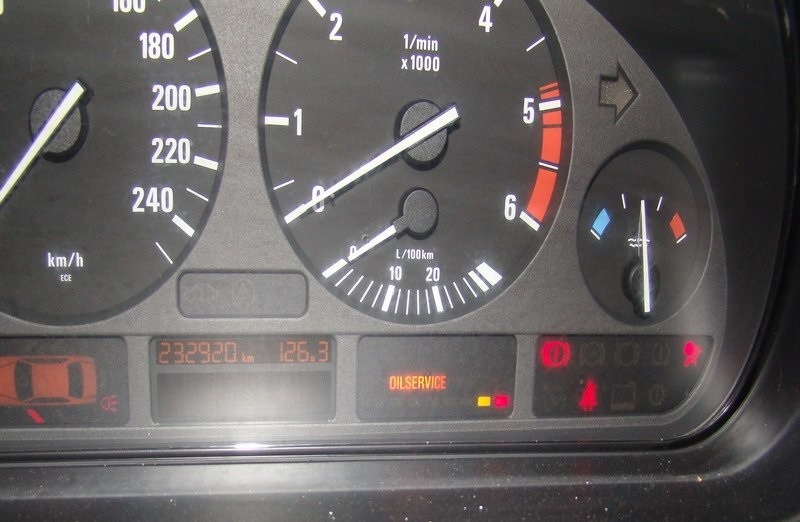
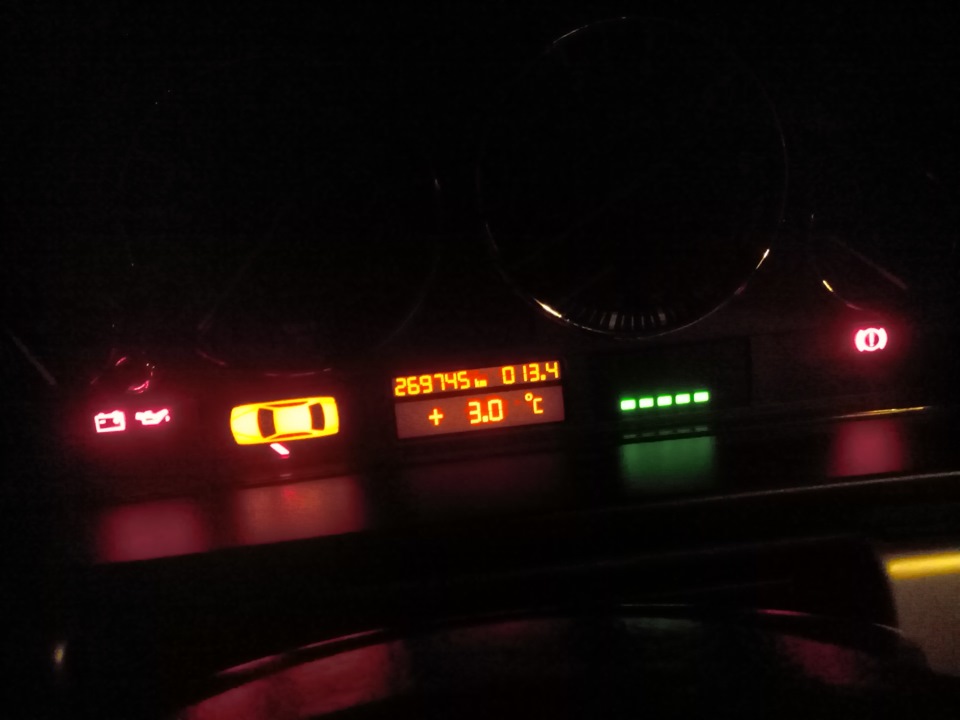
Сам лично не люблю когда на приборной панели горят какие либо лишние значки, напоминалки, это напрягает и отвлекает, поэтому рекомендую, и сам настоятельно своевременно устраняю поломки или напоминания, чтобы приборка была чистой, как и совесть перед своим родным авто. Вот пример, как будет выглядеть приборка, с предупреждением о необходимом ТО:
Но это все лирика, приступим. Начну с того варианта, которым воспользовался сам.
Повторюсь, имею дорестайлинговую модель, и сбросить интервал на приборке использовав кнопку суточного пробега не выйдет. Для сброса сервисного интервала, воспользуемся 20-пиновым диагностическим разъемом, который находится в подкапотном пространстве, собственно вот он:
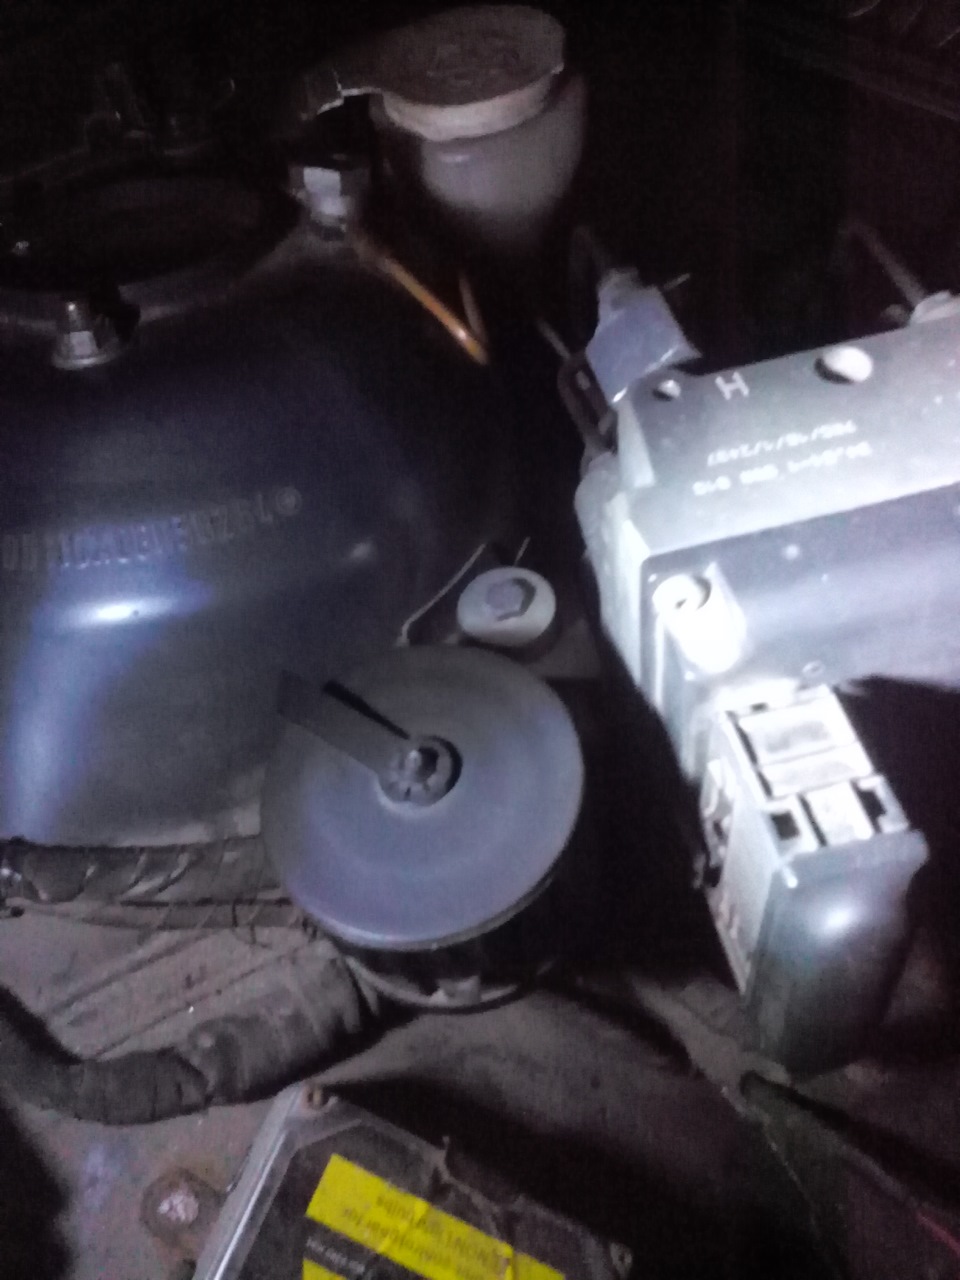
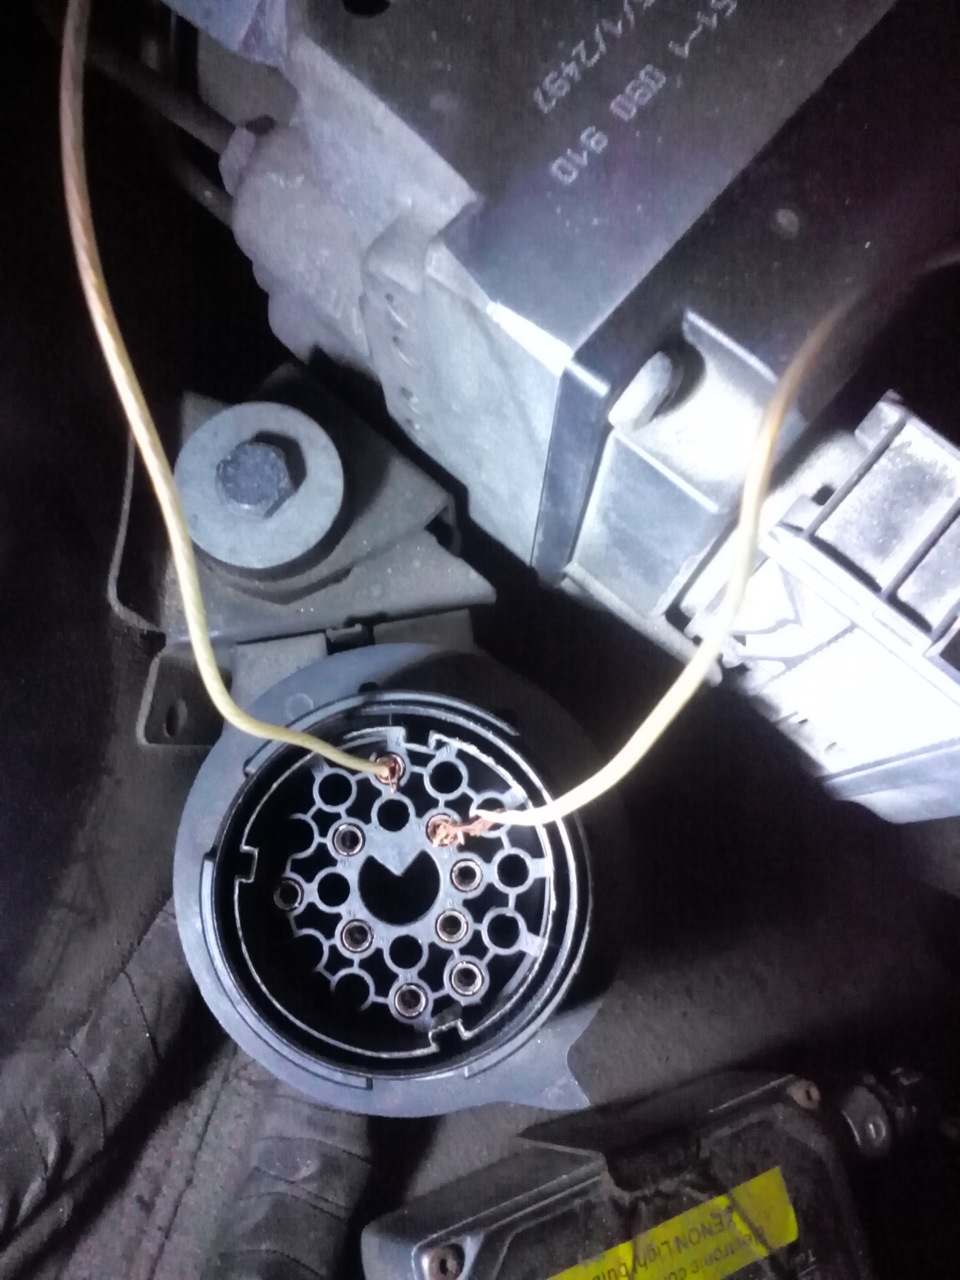
Выключаем зажигание, снимаем с разъема защитную крышку, берем в руки пинцет, скрепку или кусок провода в общем что то типо этого, это не столь важно. Я воспользовался проводом:
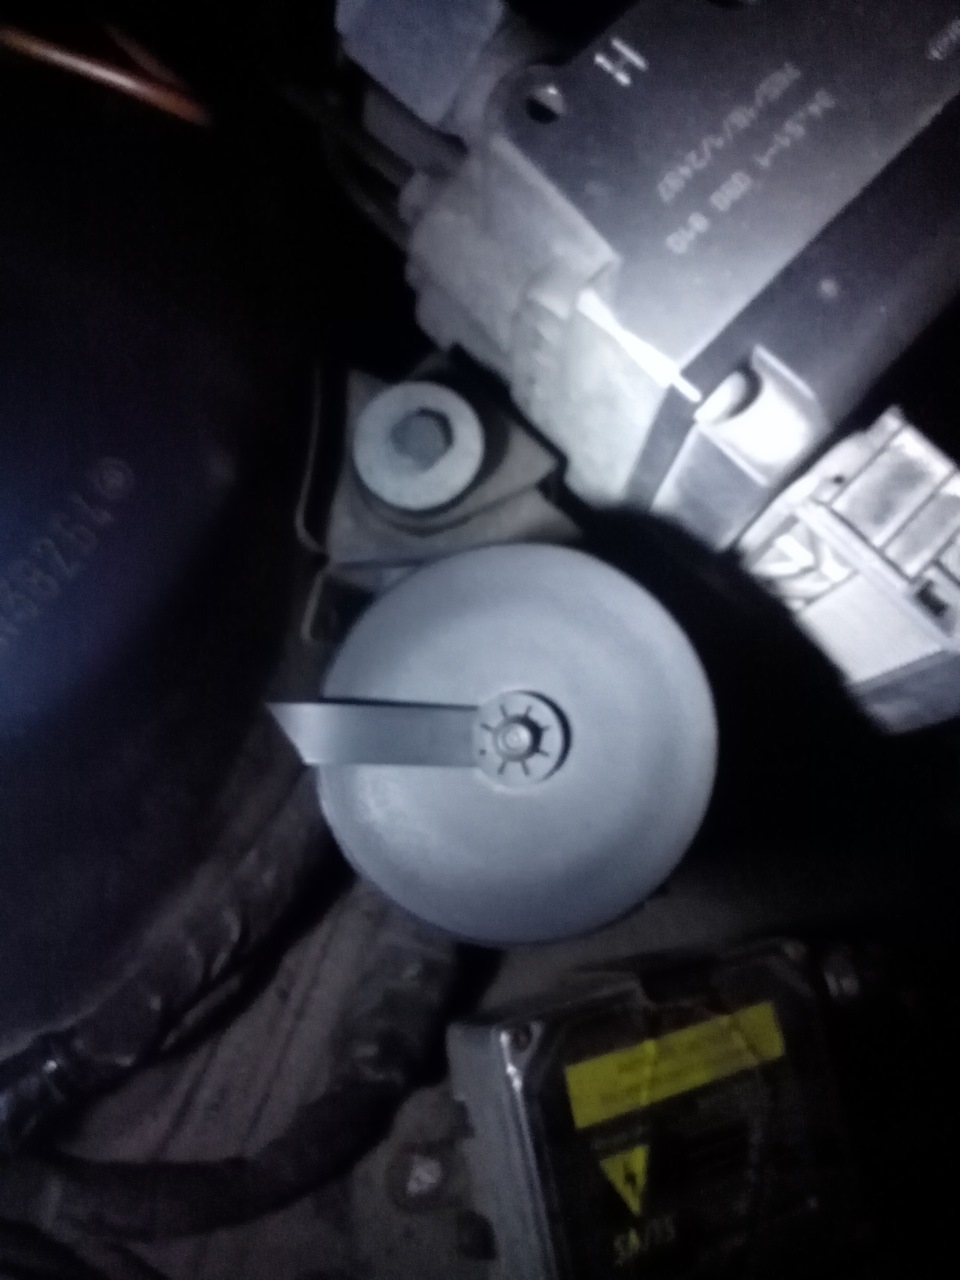
Замыкаем контакты 7 и 19 в диагностическом разъеме, в принципе контакты подписаны цифрами, ошибиться сложно, но на всякий случай подпишу на фото:
Еще как пример, только с использованием пинцета:

После того, как замкнули контакты, поворачиваем ключ зажигания в положение 2, ждем приблизительно 5-15 секунд, обнулится OIL Servise, потом INSPECTION. После этого на табло загорится пять зеленых лампочек вместо желто-красных, все, зажигание можно выключать, сброс произведен.
Если при данном способе не происходит обнуление/сброс сервисного интервала ТО, то можно воспользоваться несколько иным способом. Проворачиваем ключ зажигания в положение 2, вставляем один конец провода в 7 контакт разъема, а вторым концом провода просто "чиркаем" по массе авто (например по болтам на стойке), приблизительно 10-15 секунд, пока не произойдет сброс интервала и не загорятся желаемые лампочки) Как итог:
Так же, для сброса сервисного интервала используют диагностическое оборудование:
Но, не вижу в них смысла, так как кроме сброса, никакого функционала в них нет. Тем более что на авто с 2000 года, интервал можно сбрасывать используя кнопку суточного пробега.
Ну и раз добрались до рестайлинговых моделей е39 начиная с 2000 года, то сбросить интервал ТО на них проще простого:
— Вставляем ключ зажигания но, не поворачиваем:
— Нажимаем клавишу сброса суточного пробега и удерживаем:
— Поворачиваем ключ зажигания в положение 1, продолжая удерживать клавишу сброса суточного пробега.
На дисплее появиться индикация «Oilservice» или «Inspektion». Клавишу сброса пробега можно отпустить.
— Что бы сбросить «Oilservice» нажимаем и удерживаем клавишу сброса суточного пробега, пока «Reset» не замигает.
— Еще раз коротко нажимаем клавишу сброса суточного пробега для сброса интервала.
Собственно все, счетчик сервисного интервала ТО сброшен. Данный способ работает так же и на рестайлинговых моделях е46 и е38.
Ну и еще один вариант сброса интервала ТО, для тех у кого имеется диагностический кабель BMW, например K+D-Can, как в моем случае, можно использовать естественно и другие. Сброс интервала можно произвести используя программы для диагностики BMW, например INPA, делается это достаточно просто, подсоединяем диагностический кабель, включаем зажигание, запускаем программу, например INPA, выбираем модель своего авто, заходим в приборку (instrument cluster), далее в активацию (F6), и сбрасываем интервалы ТО.
Так же можно воспользоваться сканером BMW Scanner 1.4 (бобром), зайти в блок приборки, выбрать кнопку сервисных интервалов, произвести сброс.
Всем спасибо за внимание, потраченное на прочтение время, надеюсь кому-нибудь пригодится в будущем. Всем всех благ и здоровья!
BMW K 1600 GT Service Manual
Browse online or download Service Manual for Motorcycles BMW K 1600 GT. BMW K 1600 GT Technical data User Manual
- Page / 181
- Table of contents
- BOOKMARKS

- Rider's Manual 1
- K 1600 GT 1
- Motorcycle data 2
- Dealership details 2
- Welcome to BMW 3
- Table of Contents 4
- Overview 8
- Abbreviations and 8
- Equipment 9
- Currency 9
- General instructions 10
- General views 11
- General view, left side 13
- General view, right side 15
- Handlebar fitting, left 16
- Handlebar fitting, right 18
- Underneath the seat 19
- Instrument panel 20
- Status indicators 23
- Multifunction display 24
- Meaning of symbols 25
- Warning and telltale 29
- Warnings 30
- Operation 45
- Ignition switch/steering 46
- Electronic immobiliser 47
- EWS warning appears in the 47
- Info menu. Each time 48
- MENU button 2 to 51
- Settings menu 51
- Selecting readings 52
- Resetting average values 52
- Operating stopwatch 53
- Measuring travel times 53
- Selecting odometer 53
- Operating ground lighting 56
- Operating flashing turn 56
- Operating hazard warning 57
- Grip heating 58
- Handle heat 58
- Seat heating 58
- Switching DTC off and on 60
- Ride mode 61
- Front seat 62
- Cruise-control system 65
- Stowage compartments 67
- Spring preload 68
- Adjustment ESA 70
- Adjusting suspension 71
- Anti-theft alarm (DWA) 75
- Activation with remote 76
- Settings 78
- Vehicle 78
- Alarm syst 78
- Checking tyre pressure 79
- Safety instructions 82
- Risk of poisoning 83
- Risk of burn injury 83
- Catalytic converter 83
- Risk of overheating 83
- Manipulation 83
- Checklist 84
- Starting 84
- CHECK! appears on the dis 85
- Running in 86
- Brake pads 87
- How can stopping 87
- Parking your 88
- Refuelling 89
- Securing motorcycle 90
- Brake system with 95
- BMW Motorrad Integral 95
- Electronic engine 98
- Motorrad DTC 98
- Tyre pressure 100
- —" for each tyre 100
- Engineering details 100
- Electronic Suspension 101
- Adjustment ESA II 101
- Accessories 103
- Power sockets 104
- Navigation device 105
- Navigation 106
- Special functions 107
- Maintenance 115
- Engine oil 116
- Brake system 118
- Rims and tyres 123
- Front-wheel stand 130
- Jump starting 132
- Replacing fuses 139
- Fuse assignment 139
- Plastics 142
- Paint care 143
- Technical data 145
- Threaded fasteners 147
- Transmission 150
- Rear-wheel drive 151
- Running gear 151
- Wheels and tyres 153
- Electrics 154
- Anti-theft alarm 156
- Dimensions 157
- Riding specifications 158
- BMW Motorrad service 161
- Maintenance work 161
- BMW Pre-delivery 162
- BMW Running-in 162
- BMW Service 163
- Confirmation of service 167
- Item Odometer 168
- Windscreen 174
- Adjusting, 61 174
- Control, 14 174
- Certifications 175
- Remote Control for 175
- Declaration Of Conformity 178
- Tire Pressure Control TPC 179
- *01418526791* 181
Summary of Contents
BMW MotorradRider's ManualK 1600 GTThe UltimateRiding Machine
Tyre pressuremonitoring RDCwith tyre pressure monitoring(RDC)OEFunctionA sensor integrated into eachtyre measures the air temperat-ure and the air pre
ference between the value in thetable and the RDC reading; whenthe air-line gauge shows 2.7 bar,the tyre is inflated to the correctpressure.Electronic
AccessoriesAccessoriesGeneral instructions . . . . . . . . . . . . . . . . 102Power sockets . . . . . . . . . . . . . . . . . . . . . 102Navigation de
General instructionsBMW Motorrad recommendsthe use of parts and accessoriesfor your motorcycle that are ap-proved by BMW for this purpose.Genuine BMW
sequently switch off the ignitionthe sockets are also switched offif the power drain caused by theirelectrical consumers is high. Ifthe power drain is
Check that the navigationdevice is secure in the cradle.Press cover 7 to push cradlewith navigation device into theslot until it snaps into position.R
The options for using the naviga-tion device appear on the display.Page: You can page fromview to view; the choices aremain menu, map and on-boardcomp
Time and dateThe Navigator sends time anddate to the motorcycle. Accept-ance of these data for the read-ings on the instrument panel hasto be activate
Pull the release lever all theway up and open the lid of thecase.Closing casesPull release lever 2 all the wayup.Close the lid of the case andpress it
General viewsGeneral viewsGeneral view, left side . . . . . . . . . . . . . . . 11General view, right side . . . . . . . . . . . . . 13Handlebar fitti
Push handle 3 down until itengages.Turn the key in the case lockto the LOCK position and re-move the key from the lock.Topcasewith topcaseOAOpening to
Removing topcaseSwitch off the ignition.Remove the front seat. ( 60).Remove screws 1.Pull the rear seat slightly for-ward and lift the seat slightly.D
Lift the topcase at the rear andremove it from the luggagecarrier.Installing topcaseIf applicable, empty the top-case and lift out the bottommat.Set t
Work the cable into position atpositions 6.Connect plug 1.Connect plug 2 of the seatheating.Slip the rear seat undermounts 3 and lower it intoposition
MaintenanceMaintenanceGeneral instructions . . . . . . . . . . . . . . . . 114Toolkit . . . . . . . . . . . . . . . . . . . . . . . . . . . . . 114Eng
General instructionsThe Maintenance chapter de-scribes straightforward proced-ures for checking and replacingcertain wear parts.Special tightening tor
and place the motorcycle on itscentre stand.Allow the engine to idle untilthe fan starts up, then allow itto idle one minute longer.Switch off the eng
also applies if the oil level is toohigh.Always make sure that the oillevel is correct.Top up the engine oil to thespecified level.Check the engine oi
Brake pads worn past theminimum permissible thick-ness can cause a reduction inbraking efficiency and undercertain circumstances they cancause damage
certain circumstances they cancause damage to the brake sys-tem.In order to ensure the dependab-ility of the brake system, do notpermit the brake pads
an authorised BMW Motorraddealer.If the bottom edge of the blackdiaphragm in the brake-fluidreservoir is below the MAX mark:Check the front brake padt
authorised BMW Motorraddealer.CoolantChecking coolant levelMake sure the ground is leveland firm and place the motor-cycle on its stand.Allow the engi
Check the clutch fluid level inreservoir 1.Wear of the clutch causesthe fluid level in the clutchfluid reservoir to rise.Clutch-fluid level (visualins
WheelsTyre recommendationFor each size of tyre BMWMotorrad tests and classifiesas roadworthy certain makes.BMW Motorrad cannot assessthe suitability o
care not to damage the RDCsensor. Be sure to draw theattention of the authorised BMWMotorrad dealer or specialistworkshop to the fact that thewheel is
Force the brake pads 4 slightlyapart by rocking brake caliper 5back and forth against brakedisc 6.Carefully pull the brake calipersback and out until
Remove right-hand axle clamp-ing screw 2.Remove quick-release axle 3,while supporting the wheel.Roll the front wheel forward toremove.Installing front
Insert the ABS sensor into itsbore and install screw 1.Ease the brake calipers on tothe brake discs.Install securing screws 3 onleft and right and tig
Hold the front-wheel cover inposition and install bolts 1 onleft and right.Remove the rear wheelMake sure the ground is leveland firm and place the mo
General view, left side1 Clutch-fluid reservoir( 120)2 Fuel filler neck ( 87)3 Seat lock ( 60)4 Rear seat heating control(on rear seat) ( 57)5 Payload
Installing rear wheelPossible malfunctions whenABS and DTC systems in-tervene if non-standard wheelsare installed.See the information on the effectof
Place the motorcycle on itscentre stand or another auxiliarystand before lifting the frontwheel with the BMW Motorradfront-wheel stand.Use basic stand
Apply uniform pressure to pushthe front-wheel stand downand raise the motorcycle.Jump startingThe wires leading to thepower socket do not havea load-c
BulbsGeneral instructionsA warning appears in the multi-function display if a bulb is de-fective.A defective bulb placesyour safety at risk becauseit
with audio system with prepar-ation for navigation deviceOERemove screws 1.Work speaker unit 2 to the rearto remove.Disconnect plug 3.Turn covers 1 co
Install bulb 4, making sure thattab 5 is correctly positioned.Engage spring clip 3.Connect plug 2.Turn covers 1 clockwise to in-stall.with audio syste
Hold hand protector 3 in posi-tion and install screw 2.Switch off the ignition andwait until the windscreen hasmoved to its lowest position.Install sc
torcycle. Using this charger, youcan keep the battery chargedduring long periods of disuse,without having to disconnect thebattery from the motorcycle
Comply with the operating in-structions of the charger.Once the battery is fullycharged, disconnect thecharger's terminal clips fromthe battery t
Then connect battery negativelead 1.Install the front seat ( 60).Switch on the ignition.Set the time in Settings- Time and set the date inSettings — D
-7 4 AMain relay, instrument pan-el, ignition switch-8 Not usedwith anti-theft alarm(DWA)OEorwith central lockingOE7.5 AAnti-theft alarmCentral lockin
CareCareCare products . . . . . . . . . . . . . . . . . . . . . 140Washing motorcycle . . . . . . . . . . . . . . . 140Cleaning easily damaged compon-
Care productsBMW Motorrad recommendsthat you use the cleaning andcare products you can obtainfrom your authorised BMWMotorrad dealer. The substancesin
Body panelsClean the trim panels with waterand BMW plastic care emulsion.Windscreens and headlightlenses made of plasticClean off dirt and insects wit
Protective wax coatingBMW Motorrad recommendsapplying only BMW car wax orproducts containing carnaubawax or synthetic wax.It is time to rewax the pain
Technical dataTechnical datatroubleshooting chart . . . . . . . . . . . . . . 144Threaded fasteners . . . . . . . . . . . . . . . . 145Engine . . . .
troubleshooting chartEngine does not start at all or is difficult to start.Possible cause RectificationSide stand Retract the side stand ( 82).Gear en
Threaded fastenersFront wheel Value ValidFront brake caliper to wheel car-rierM8 x 30 — 10.9 30 NmClamping screw for quick-re-lease axle to wheel carr
EngineEngine design transverse straight-six four-stroke engine with fourvalves per cylinder and two overhead camshafts;liquid cooling, electronic fuel
FuelRecommended fuel grade Super unleaded95 ROZ/RON89 AKIUsable fuel capacity approx. 24 lReserve fuel approx. 4 lEngine oilEngine oil, capacity 4.5 l
General view, right side1 Vehicle Identification Num-ber (above engine oil fillerneck)2 Power socket ( 102)3 Brake-fluid reservoir, front( 118)4 Coola
Clutchclutch type Multiplate clutch running in oil bathTransmissiongearbox type Claw-shift 6-speed gearbox, integrated into en-gine blockGearbox trans
Rear-wheel driveType of final drive Shaft drive with bevel gearsType of rear suspension Cast-aluminium single swinging arm with BMWMotorrad ParaleverN
Rear wheelType of rear suspension Cast-aluminium single swinging arm with BMWMotorrad ParaleverType of rear suspension central suspension strut pivote
Wheels and tyresRecommended tyre sets You can obtain an up-to-date list of approvedtyres from your authorised BMW Motorrad dealeror on the Internet at
ElectricsElectrical rating of on-board socket max 10 A, All socketsBatterybattery type Gel batterybattery rated voltage 12 Vbattery rated capacity 19
FusesFuse carrier 1 30 A, Engine electronicsFuse carrier 2 40 A, Slot left: Vehicle electronics40 A, Slot right: Vehicle electronics, ESAFuse box Not
Anti-theft alarmwith anti-theft alarm (DWA)OEAnti-theft alarmTime to active after activation 30 sAlarm duration 26 sActivation time between two alarms
FrameFrame type Cast light alloy weldment with bolt-on light-alloyrear frametype plate location Wheel carrier, front rightVIN location Frame side sect
WeightsUnladen weight 319 kg, DIN unladen weight, without cases, readyfor road, 90 % load of fuel, without optional extrasPermissible gross weight 540
ServiceServiceBMW Motorrad service . . . . . . . . . . . . 158BMW Motorrad service quality . . . . . 158BMW Motorrad mobility services -roadside assis
Handlebar fitting, left1 High-beam headlight andheadlight flasher ( 52)2 with auxiliary headlightOAOperation of the auxiliaryheadlights ( 53)3 Cruise
BMW Motorrad serviceAdvanced technology requiresspecially adapted methods ofmaintenance and repair.If maintenance and re-pair work is performed in-exp
contact the Mobile Service or-ganisation of BMW Motorrad.The specialists will provide thenecessary advice and assistance.You will find important count
Confirmation of maintenance workBMW Pre-deliveryCheckCompletedonStamp, signatureBMW Running-inCheckCompletedonOdometer readingNext serviceat the lates
BMW ServiceCompletedonOdometer readingNext serviceat the latestonor, if logged beforehand,Odometer readingStamp, signatureBMW ServiceCompletedonOdomet
BMW ServiceCompletedonOdometer readingNext serviceat the latestonor, if logged beforehand,Odometer readingStamp, signatureBMW ServiceCompletedonOdomet
BMW ServiceCompletedonOdometer readingNext serviceat the latestonor, if logged beforehand,Odometer readingStamp, signatureBMW ServiceCompletedonOdomet
BMW ServiceCompletedonOdometer readingNext serviceat the latestonor, if logged beforehand,Odometer readingStamp, signatureBMW ServiceCompletedonOdomet
Confirmation of serviceThe table is intended as a record of maintenance and repair work, the installation of optional accessoriesand, if appropriate,
AAbbreviations and symbols, 6ABSEngineering details, 93Self-diagnosis, 83Warnings, 36Ambient temperatureBlack ice warning, 36Anti-theft alarmOperation
8 Multi-controller and MENUbuttonOperation of the multifunc-tion display ( 46)with Dynamic TractionControl (DTC)OEControl for DTC ( 58)with Electronic
DDampingAdjuster, rear, 11Adjusting, 67DimensionsTechnical data, 155DTCControl, 14Engineering details, 96Self-diagnosis, 84switching on/off, 58Warning
HHandlebar fittingsGeneral view, left side, 14General view, right side, 16Hazard warning flashersControl, 14Operation, 55HeadlightAdjusting for traffi
OOdometer and tripmeters, 22Control, 14Operation, 51Resetting, 52Select the readings, 51On-board computerAmbient temperature, 24Control, 14Oil level,
TTechnical dataBattery, 152Brakes, 150Bulbs, 152Clutch, 148Dimensions, 155Electrics, 152Engine, 146Engine oil, 147Frame, 155Fuel, 147Rear-wheel drive,
WindscreenAdjusting, 61Control, 1412172zIndex
Certifications Remote Control for central locking system Česky Meta System S.p.A. tímto prohlašuje, že tento PF240009 je ve shodě se základními p
Certifications Ελληνική ΜΕ ΣΗΝ ΠΑΡΟΤΑ Meta System S.p.A. ΔΗΛΩΝΕΙ ΟΣΙ PF240009 ΤΜΜΟΡΥΩΝΕΣΑΙ ΠΡΟ ΣΙ ΟΤΙΩΔΕΙ ΑΠΑΙΣΗΕΙ ΚΑΙ ΣΙ ΛΟΙΠΕ ΦΕΣΙΚΕ Δ
Certifications Slovensko Meta System S.p.A. izjavlja, da je ta PF240009 v skladu z bistvenimi zahtevami in ostalimi relevantnimi določili direktive
Declaration Of Conformity R&TTE Declaration Of Conformity (DoC) 0470 We: Meta System S.p.A. with the address: Via Majakovskij 10 b/c/d/e
Certifications Tire Pressure Control TPC FCC ID: MRXBC54MA4 IC: 2546A-BC54MA4 This device complies with Part 15 of the FCC Rules and with RSS-210
Handlebar fitting, right1 with central lockingOEOperation of the centrallocking system ( 69)2 Selection of the ride mode( 59)3 Emergency off switch (k
Details described or illustratedin this booklet may differ fromthe motorcycle's actual specifica-tion as purchased, the accessor-ies fitted or th
The most important data for a filling-station stop can be found in the following chart:FuelRecommended fuel grade Super unleaded95 ROZ/RON89 AKIUsable
Underneath the seat1 Rider's Manual2 Fuses ( 137)3 Battery ( 134)4 Toolkit ( 114)5 Seat-height adjustment( 61)217zGeneral views
Motorcycle data/dealership detailsMotorcycle dataModelVehicle identification numberColour codeDate of first registrationRegistration numberDealership
Instrument panel1 Speedometer2 Trimmerwith preparation for nav-igation deviceOERelease for navigation slot3 Warning and telltale lights( 27)4 with pre
apted automatically to suit ambi-ent brightness.219zGeneral views
Status indicatorsStatus indicatorsMultifunction display . . . . . . . . . . . . . . . . 22Meaning of symbols . . . . . . . . . . . . . . . . 23Range .
Multifunction display1 Ride mode ( 59)2 Coolant temperature3 Area for warnings ( 28)4 Menu area ( 46)with audio system withpreparation for navigationd
8 Total distance covered9 Clock ( 49)10 Fuel level11 Gear indicator; "N" indic-ates neutralMeaning of symbolsMeanings of the symbols at posi
with Electronic Suspension Ad-justment (ESA)OE5 Damping6 Vehicle loadRangeThe range readout indic-ates how far you can ridewith the fuel remaining in
The tyre-pressure readings arebased on a reference tyre tem-perature of 20 °C. The fronttyre pressure is on the left 1;the reading on the right 2 is t
If the countdown to the nextservice is less than one month,service-due date 1 appears onthe display.If the motorcycle covers long dis-tances in the co
Warning and telltalelights1 ABS warning light ( 36)2 with Dynamic TractionControl (DTC)OEDTC warning light ( 37)3 Telltale light of the left turnindic
Welcome to BMWWe congratulate you on yourchoice of a motorcycle fromBMW and welcome you to thecommunity of BMW riders.Familiarise yourself with your n
11 Telltale light of cruise con-trol ( 63)12 General warning light, incombination with warningsin the display ( 28)WarningsMode of presentationWarning
Warnings, overviewWarning light Status indicators MeaningLights up yellow Appears on the dis-playElectronic immobiliser active ( 33)Lights up Fuel-lev
Warning light Status indicators MeaningLights up yellow Appears on the dis-playOn-board system voltage critical ( 35)Lights up yellow Appears on the d
Warning light Status indicators MeaningLights upDTC switched off ( 37)Lights upDTC fault ( 37)Flashes red + tyre pressure inredTyre pressure outside p
Warning light Status indicators MeaningAppears on the dis-playHeadlight aiming changed ( 40)Appears on the dis-playAnti-theft alarm battery weak ( 41)
Electronic immobiliseractiveGeneral warning light showsyellow.Key appears on the display.Possible cause:The key being used is not au-thorised for star
Possible cause:The engine control unit has dia-gnosed a fault.The engine is running inemergency operating mode.Unusual engine response is apossibility
Battery is not being charged. Ifyou continue to ride the motor-cycle the on-board electronicswill drain the battery.Possible cause:Alternator or alter
workshop, preferably an author-ised BMW Motorrad dealer.Front light failureGeneral warning light showsyellow.Bulb symbol with arrowpointing to the fro
Possible cause:The ABS control unit has detec-ted a fault. The ABS function isnot available.You can continue to ride themotorcycle, but make due pro-v
Table of ContentsYou can also consult the index atthe end of this Rider's Manual ifyou want to find a particular topicor item of information.1 Ge
on situations that can lead to aDTC fault ( 97).Have the fault rectified asquickly as possible by aspecialist workshop, preferablyan authorised BMW Mo
the symptoms. Under thesecircumstances:Have the fault rectified by aspecialist workshop, preferablyan authorised BMW Motorraddealer.Possible cause:Wir
Possible cause:The integral battery in the tyre-pressure sensor has lost a sig-nificant proportion of its originalcapacity. There is no assuranceof ho
Anti-theft alarm batteryweakwith anti-theft alarm (DWA)OEThe anti-theft alarm bat-tery symbol appears on thedisplay.This error message appearsonly bri
OperationOperationIgnition switch/steering lock . . . . . . . . . 44Electronic immobiliser EWS. . . . . . . . . 45Multifunction display . . . . . . .
Ignition switch/steeringlockKeysYou receive two master keys andone spare key. Please consultthe information on the electronicimmobiliser (EWS) if a ke
a level surface with the handle-bars turned to the left than withthe handlebars turned to theright.On level ground, always turn thehandlebars to the l
Multifunction displaySelecting menuPress button 2 to step throughthe sequence of menus, startingwith the Info menu. Each timeyou press button 2 you ca
An arrow 1 at the top or bottomof the display indicates that thereare other items in this menuthat you can view by turningthe multi-controller in the
Securing motorcycle fortransportation . . . . . . . . . . . . . . . 886 Engineering details. . . . . 91Ride mode . . . . . . . . . . . . . . . . . . 9
Selecting from a list:A circle 2 beside each selectableitem means that the items arepart of a selection list. A circlewith a dot indicates the item th
Exiting menuArrow 3 appears when you are ina submenu.Press multi-controller 1 to theleft to return to the next highestmenu; press MENU button 2 toretu
Language: Display lan-guage (German, English, Span-ish, Italian, French, Dutch, Por-tuguese)Time format -Time format: Clock in 12-hour format (12 h) o
Operating stopwatchCall up the Info menu andselect Stopwatch.With the stopwatch stopped,push multi-controller 1 to theright to start the stopwatch.The
Automatic trip meter (Trip A,resets automatically eight hoursafter ignition OFF)Resetting tripmeterSwitch on the ignition.Select the desired tripmeter
Immediately after switching offthe ignition, push button 1 tothe left and hold it in this po-sition until the parking lightscome on.Switch the ignitio
Press button 1 to switch onthe auxiliary headlights.The telltale light shows.If this warning symbol ap-pears it tells you that theon-board system volt
Push button 1 to the left toswitch on the left flashing turnindicators.Push button 1 to the right toswitch on the right flashing turnindicators.Centre
a Engine switched offb Normal operating position(run)Grip heatingOperating grip heatingStart the engine.Grip heating can be activ-ated only when the e
Seat heating can be activ-ated only when the engineis running.Call up the Seat heatingmenu.The front seat has five-stageheating. Stage five is for hea
switch back to stage one as soonas the seat is warm.2 Switch centred: Heating off.3 One-dot section of switchpressed: 50 % heating power.4 Two-dot sec
Ride modeSetting riding modeSwitch on the ignition.Press button 1.See the section entitled"Engineering details"for more information on theva
Front seatRemoving front seatUse the ignition key to unlockseat lock 1 and lift the rear ofthe front seat.Disconnect plug 2 of the seatheating and rem
Lower the rear of the front seatand engage the seat in thelatching mechanism.Adjusting front-seatheightRemove the front seat. ( 60).Pull latch 1 to th
Press top section of button 1to raise the windscreen.Press bottom section of but-ton 1 to lower the windscreen.Switch off the ignition.The windscreen
Cruise-control systemSwitching on cruisecontrolSlide switch 1 to the right.Button 2 is operational.Saving road speedBriefly push button 2 forward.Crui
DeceleratingBriefly push button 2 back.Speed is reduced by approx.1 km/h each time you push thebutton.Push button 2 back and hold itin this position.T
Stowage compartmentsOperating the stowagecompartmentUse the ignition key to openor close lock 1 of the stowagecompartment.To open the lid, push the un
The adjusting screw is easi-er to turn if you push theclutch lever forward.The anti-hopping functionof the clutch can cause theclutch lever to pulsate
accordingly when the motorcycleis lightly loaded.Adjusting spring preloadfor rear wheelMake sure the ground is leveland firm and place the motor-cycle
General instructionsGeneral instructionsOverview . . . . . . . . . . . . . . . . . . . . . . . . . . . . 6Abbreviations and symbols . . . . . . . . .
If you want a harder dampingcharacteristic, use the tool fromthe on-board toolkit to turn ad-justing screw 1 in the directionindicated by the H arrow.
Adjusting suspensionStart the engine.You can adjust the damp-ing characteristic while themotorcycle is on the move.Call up the ESA menu.The possible s
Alternatively: Press button 1on the remote control.The stowage compartmentin the left side panel and thecases are locked.with preparation for audio sy
First turn the key in the top-case lock 45° past the LOCKposition, then turn it to the dotposition and press in the lockbarrel.The release lever pops
Step through the following pro-cedure with each remote con-trol in turn:Press and hold down buttons 1and 2 until LED 3 stops flash-ing.LED 3 flashes f
Replacing battery ofremote controlIf you press a button on the re-mote control and the LED doesnot show or lights up only briefly:Replace the battery
Switch off the ignition.Activation takes approximately30 seconds to complete.Turn indicators flash twice.Confirmation tone soundstwice (if programmed)
Confirmation tone soundstwice (if programmed).Anti-theft alarm is active.To deactivate the motionsensor (for example if youare about to transport them
when the ignition is switched on.The anti-theft alarm telltale lightthen signals the reason for thealarm for one minute.The meanings of the flash code
Automatic — On: Anti-theft alarm is activated auto-matically when the ignition isswitched off.Automatic — Off: Anti-theft alarm has to be activatedwit
OverviewChapter 2 of this Rider's Manu-al will provide you with an initialoverview of your motorcycle. Allmaintenance and repair work onthe motor
RidingRidingSafety instructions . . . . . . . . . . . . . . . . . . 80Checklist . . . . . . . . . . . . . . . . . . . . . . . . . . . . 82Starting . .
Safety instructionsRider's equipmentDo not ride without the correctclothing. Always wear:HelmetMotorcycling jacket andtrousersGlovesBootsThis app
Risk of poisoningExhaust fumes contain carbonmonoxide, which is colourlessand odourless but highly toxic.Inhaling the exhaust fumestherefore represent
ChecklistUse the following checklist tocheck important functions, set-tings and wear limits before youride off.BrakesBrake-fluid levels, front and rea
Pre-ride checkThe instrument panel runs a testof the 'General' warning lightwhen the ignition is switched on:this is the "Pre-Ride-Chec
You can continue to ride. Bearin mind that neither the ABSfunction nor the integral brak-ing function is available.Have the fault rectified asquickly
Running-in speed<5000 min-1(Odometerreading 0. 300 km)<6000 min-1(Odometerreading 300. 1000 km)no full throttle (Odometerreading 0. 1000 km)D
Descending mountainpassesThere is a danger of thebrakes fading if you useonly the rear brakes when des-cending mountain passes. Underextreme condition
On a gradient, the motorcycleshould always face uphill; se-lect 1st gear.Centre standSwitch off the engine.If the ground is soft or un-even, there is
ESA Electronic SuspensionAdjustmentElectronic SuspensionAdjustment.RDCTyre pressure monitoring(ReifenDruck-Control)EquipmentWhen you ordered your BMWm
onto the road surface. This couldcause a fall.Do not overfill the fuel tank.Leaded fuel will destroy thecatalytic converter.Use only unleaded fuel.Ref
The ball joint and the brakelines can suffer damage.Take care not to damagecomponents.Pass the straps on left andright through the suspensionand strap
Engineering detailsEngineering detailsRide mode . . . . . . . . . . . . . . . . . . . . . . . . . . 92Brake system with BMW MotorradIntegral ABS . . .
Ride modeSelectionThis section has yet to befinalised!Three riding modes enable themotorcycle's characteristics toadapt to the prevailing weather
DYNAMICSPORT is the standard mode.Power increase and engine re-sponse are the same as in ROADmode. Response to rider input,however, is considerably mo
of friction, the longer the brakingdistance.If the rider increases brakingpressure to the extent that brak-ing force exceeds the maxim-um transferrabl
Rear wheel liftEven under severe braking, ahigh level of tyre grip can meanthat the front wheel does notlock up until very late, if at all.Consequentl
What significancedevolves on regularmaintenance?Invariably, a technical sys-tem cannot perform beyondthe abilities dictated by its levelof maintenance